The Association of Model Submariners.

Would you like to react to this message? Create an account in a few clicks or log in to continue.

* THE FORUM FOR ALL THOSE INTERESTED IN BUILDING AND OPERATING MODEL SUBMARINES *


Join the AMS - Registered Forum users can become members of the AMS and it's free ...... To join send an email with your name , address and phone number to amstreasure@googlemail.com


For a guide to past events see the "Shows and Events" section.

Papplewick Pumping Station SUBMARINE Day. 31st March - 1st April 2024.

$$$

&&&

::::

Who is online?

In total there are 10 users online :: 0 Registered, 0 Hidden and 10 Guests

None


Most users ever online was 180 on Tue Nov 05, 2019 6:03 am

Latest topics

» No reverse on Brushless ESC
today's work EmptyTue May 07, 2024 3:26 pm by geofrancis

» Peral Submarine of 1888
today's work EmptyMon May 06, 2024 11:16 am by david f

» Newbie needs advice!
today's work EmptyFri Apr 26, 2024 1:58 pm by david f

» Modulated electric fields for submarine communication in a "heads up" from Harry!
today's work EmptySun Apr 21, 2024 6:09 am by geofrancis

» 868/915 Mhz as a viable frequency for submarines.
today's work EmptyWed Apr 10, 2024 5:48 am by tsenecal

» Laser cut Robbe U47 conversion
today's work EmptyTue Apr 09, 2024 3:40 pm by david f

» ExpressLRS - 868/915 Mhz equipment
today's work EmptyTue Apr 02, 2024 3:27 pm by tsenecal

» Information on camouflage patterns for German seahund
today's work EmptyFri Mar 15, 2024 4:36 pm by david f

» WW2 mini sub build
today's work EmptyTue Mar 12, 2024 1:56 pm by geofrancis

Statistics

Our users have posted a total of 12452 messages in 1983 subjects

We have 1010 registered users

The newest registered user is Chris Shelley

4 posters

    today's work

    merriman
    merriman
    Guest


    Posts : 347
    Join date : 2011-10-16
    Age : 75
    Location : Virginia Beach, Virginia

    today's work Empty today's work

    Post  merriman Sat Dec 07, 2019 2:22 am

    today's work LZa3w7

    today's work BfzVce

    today's work MomLVK

    today's work F1UDBr

    today's work WzylxU

    today's work 7b9KYM

    today's work Xs4woQ

    today's work WJCSPF

    today's work WbzFCO

    today's work EFmVuj

    today's work JbDfdL

    David
    merriman
    merriman
    Guest


    Posts : 347
    Join date : 2011-10-16
    Age : 75
    Location : Virginia Beach, Virginia

    today's work Empty Re: today's work

    Post  merriman Sun Dec 08, 2019 4:32 am

    today's work QAosPW

    today's work J6Wohv

    today's work Zzw5bH

    today's work E17j2h

    today's work Cc8w8s

    today's work Fm0V9m

    today's work 1Ip0lq

    today's work WSR08V

    today's work QCcd8x

    today's work JaWsHa

    today's work 79tPJG

    today's work QFzocs

    today's work TTurKL

    today's work JvSJWZ

    today's work ZivQZI

    today's work Hze5ok

    today's work UTHlQO

    today's work AXcBii
    merriman
    merriman
    Guest


    Posts : 347
    Join date : 2011-10-16
    Age : 75
    Location : Virginia Beach, Virginia

    today's work Empty Re: today's work

    Post  merriman Mon Dec 09, 2019 3:33 am

    today's work Plv2ha

    today's work AxSXSf

    today's work MXux8S

    today's work GzCQ1H

    today's work 6nWEml

    today's work JguHzO

    today's work IDQFOa

    today's work UHb5va

    today's work GhISxL

    today's work BKInbw

    today's work LuSIBj

    today's work W45Vv7

    today's work GtcKaK

    today's work CXqC0P

    today's work HoBDGu
    merriman
    merriman
    Guest


    Posts : 347
    Join date : 2011-10-16
    Age : 75
    Location : Virginia Beach, Virginia

    today's work Empty Re: today's work

    Post  merriman Tue Dec 10, 2019 3:53 am

    today's work ThvVib

    today's work Xkn0Fk

    today's work DJynF9

    today's work AGssuk

    today's work PXHD9k

    today's work Ei8NYf

    today's work Z1o3Pf

    today's work OESaBe

    today's work PgaNr8

    today's work IbeBEI
    merriman
    merriman
    Guest


    Posts : 347
    Join date : 2011-10-16
    Age : 75
    Location : Virginia Beach, Virginia

    today's work Empty Re: today's work

    Post  merriman Wed Dec 11, 2019 3:48 am

    today's work FfBcDK

    today's work RvAb4q

    today's work 0DGIGb

    today's work OJ5bFg

    today's work ExIsjE

    today's work Ev9e5W

    today's work I6ohIt

    today's work IZZzol

    today's work L5RMUs

    today's work WkC4y5

    today's work ZJncrR

    today's work XgR6RY

    today's work KZdZxd

    today's work Yqemaw

    today's work EkHqH5
    merriman
    merriman
    Guest


    Posts : 347
    Join date : 2011-10-16
    Age : 75
    Location : Virginia Beach, Virginia

    today's work Empty Re: today's work

    Post  merriman Thu Dec 12, 2019 5:11 am

    today's work MWeF6Z

    today's work CwizZE

    today's work SwtD0h

    today's work ZNIdYl

    today's work FzFfF3

    today's work DifMlu

    today's work UHqO97

    today's work 0AhlJF

    today's work T9tghU

    today's work CcpAnP


    today's work Usf0Yu

    today's work 0KnvVe

    today's work LDaqJr

    today's work EeUPf8

    today's work IQ8n3Q
    merriman
    merriman
    Guest


    Posts : 347
    Join date : 2011-10-16
    Age : 75
    Location : Virginia Beach, Virginia

    today's work Empty Re: today's work

    Post  merriman Sat Dec 14, 2019 3:39 am

    today's work AbpXuo

    today's work V12l8B

    today's work IIOUt1

    today's work Twz2JX

    today's work 0gjRJ1

    today's work FNPOKr

    today's work RaOuFN
    merriman
    merriman
    Guest


    Posts : 347
    Join date : 2011-10-16
    Age : 75
    Location : Virginia Beach, Virginia

    today's work Empty Re: today's work

    Post  merriman Sun Dec 15, 2019 4:10 am

    today's work FqSuyi

    today's work IB7Jrx

    today's work CZYuyt

    today's work WGLnut

    today's work EU0Whm

    today's work Df9rUc

    today's work 50vM0p
    salmon
    salmon
    AMS Forum Owner


    Posts : 312
    Join date : 2011-09-02
    Age : 64
    Location : Las Vegas, Nevada - USA

    today's work Empty Re: today's work

    Post  salmon Mon Dec 16, 2019 7:31 pm

    Amazing information in your photos.....
    What is the black oil paint used for?

    Peace,
    Tom


    _________________
    If you can cut, drill, saw, hit things and swear a lot, you're well on the way to building a working model sub.
    merriman
    merriman
    Guest


    Posts : 347
    Join date : 2011-10-16
    Age : 75
    Location : Virginia Beach, Virginia

    today's work Empty Re: today's work

    Post  merriman Mon Dec 16, 2019 9:01 pm

    salmon wrote:Amazing information in your photos.....
    What is the black oil paint used for?

    Peace,
    Tom

    To insure symmetry of channel form to each flange face of a rubber tool.

    The sprue, riser, and vent channeling -- required to provide a path for both resin and displaced air -- is cut into one half of the RTV rubber tool. Then, to insure I get an impression of that channel geometry to the other half of the tool, I coat the edges of the channels with artist oil paint (very slow drying). I then temporarily press the two tool halves together and that imprints the other tool half. I pull the tool halves apart, and follow the paint outlines to cut the channeling into the second tool half.

    Maybe this picture will better illustrate for you, Tom:

    today's work CaVtfc

    David

    salmon
    salmon
    AMS Forum Owner


    Posts : 312
    Join date : 2011-09-02
    Age : 64
    Location : Las Vegas, Nevada - USA

    today's work Empty Re: today's work

    Post  salmon Tue Dec 17, 2019 2:23 am

    I learned something new.....thank you David!


    _________________
    If you can cut, drill, saw, hit things and swear a lot, you're well on the way to building a working model sub.
    merriman
    merriman
    Guest


    Posts : 347
    Join date : 2011-10-16
    Age : 75
    Location : Virginia Beach, Virginia

    today's work Empty Re: today's work

    Post  merriman Tue Dec 17, 2019 10:50 pm

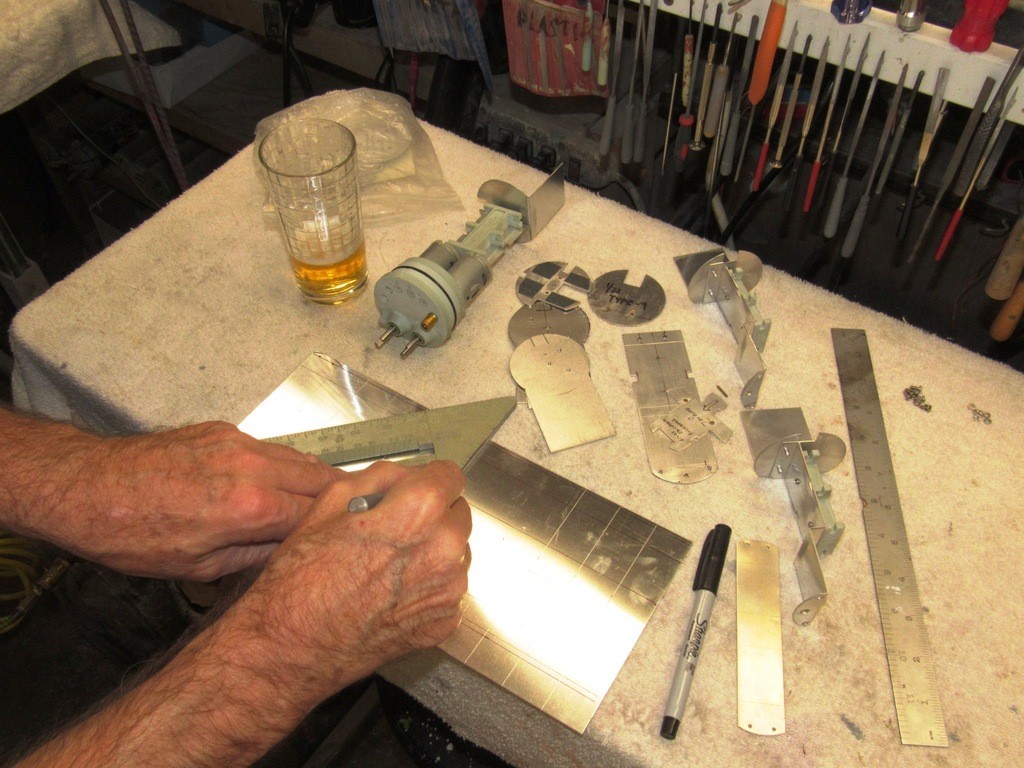
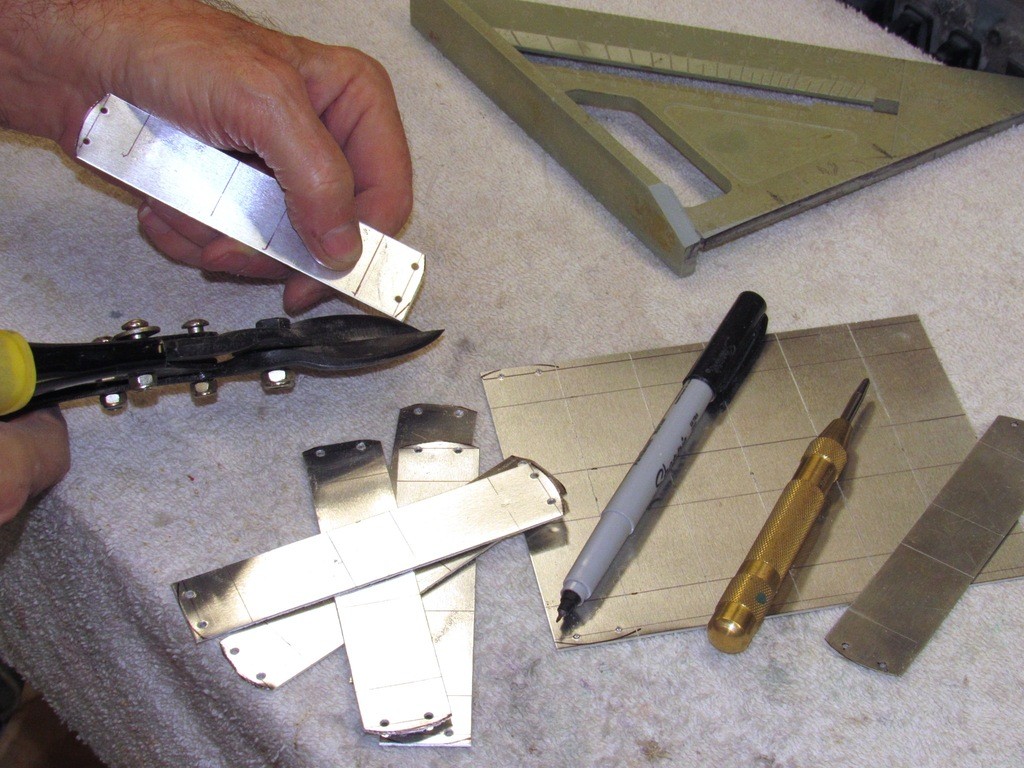
    SCRIBING   This is the process of scraping (abrading) engraved, often narrow, depressions into the work. Most suited to representing seams between plates in close proximity to each other, such as access panels, hatch or door outlines, safety-track, missile hatches, even cheat-lines (waterlines, centerlines, datum lines, etc.), and breaks between fixed structure and control surfaces. In sheet-metal work scribing lines onto the sheet (blued to highlight the shiny engraved line) is a part of the layout process.

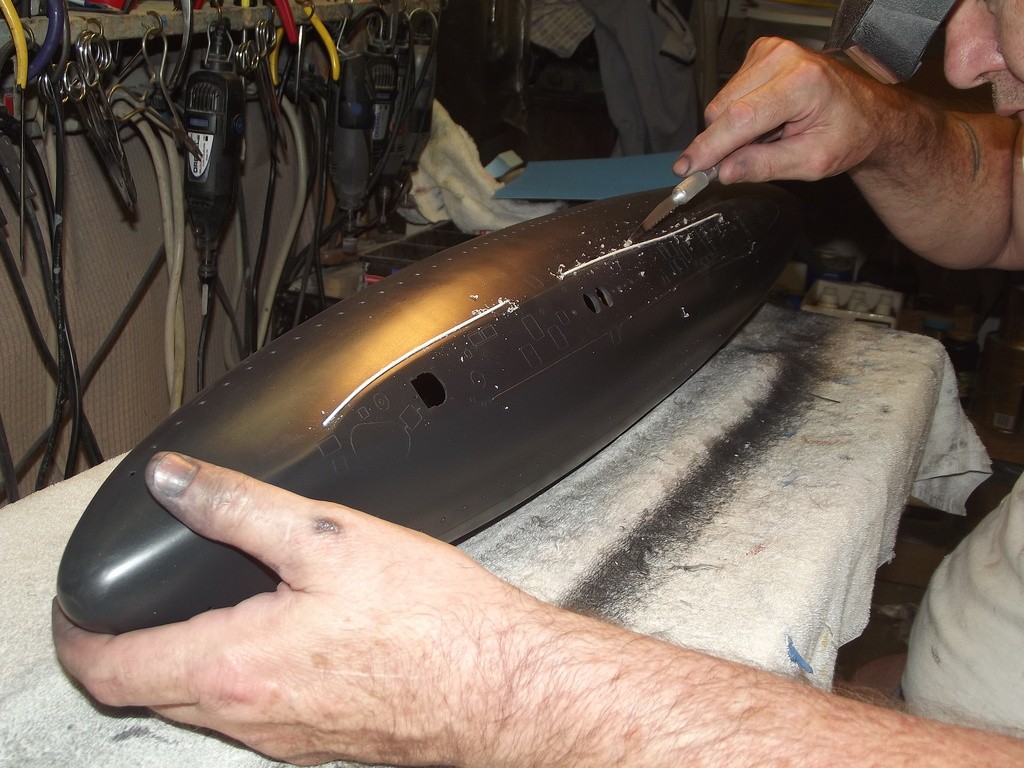
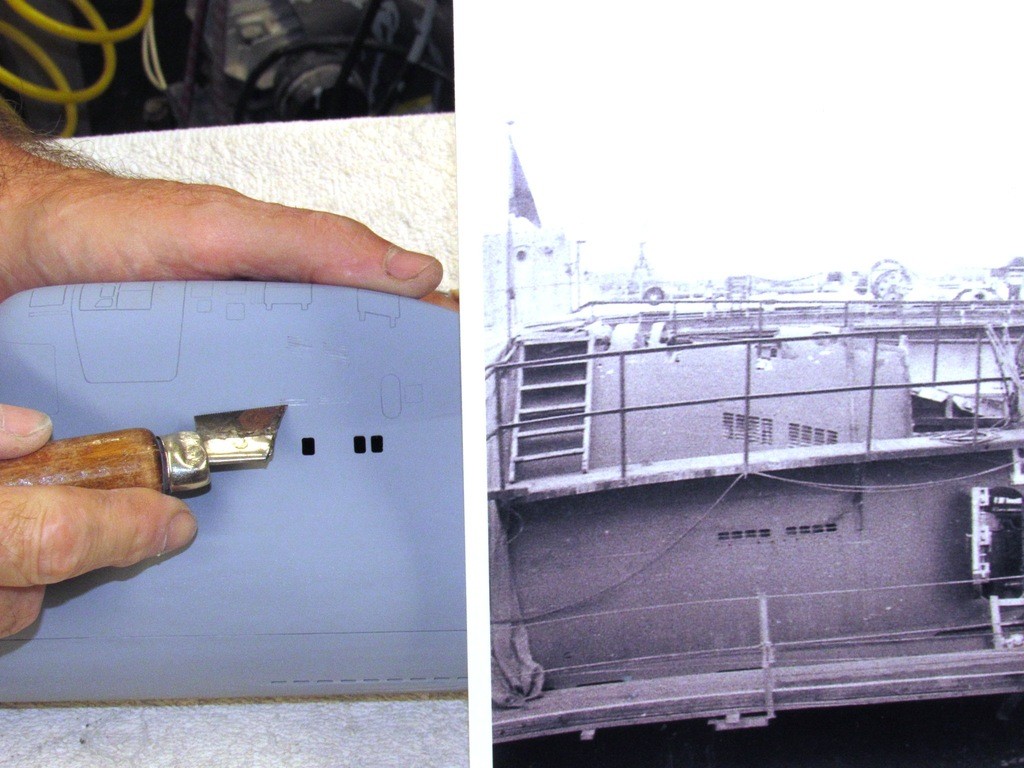
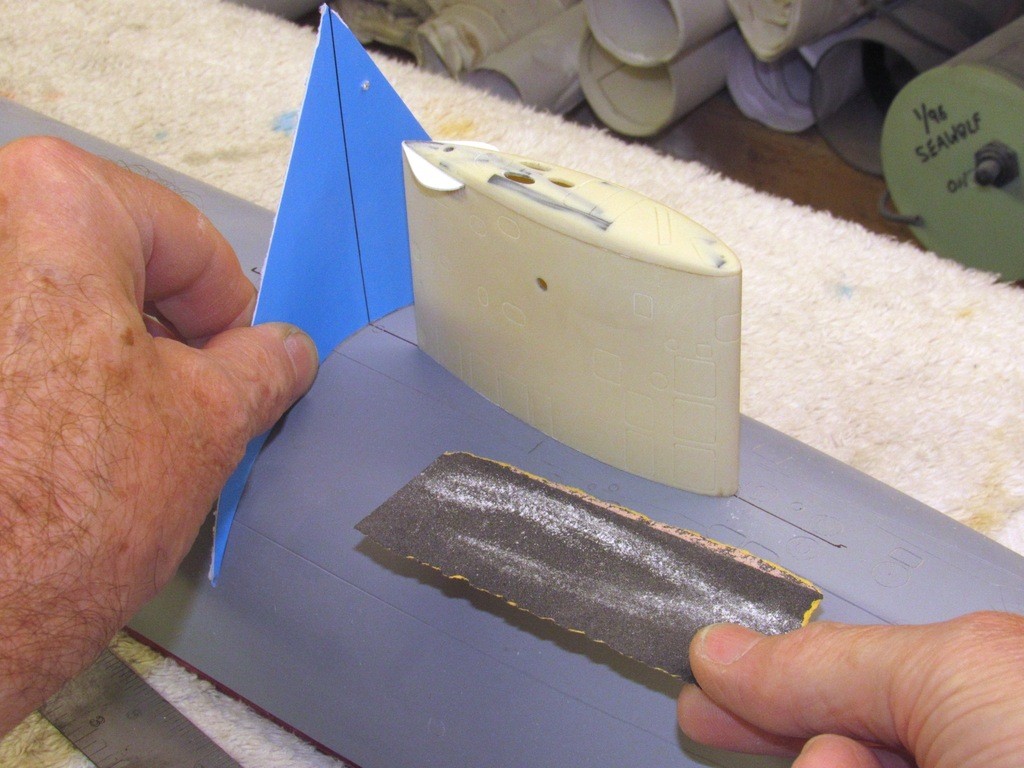
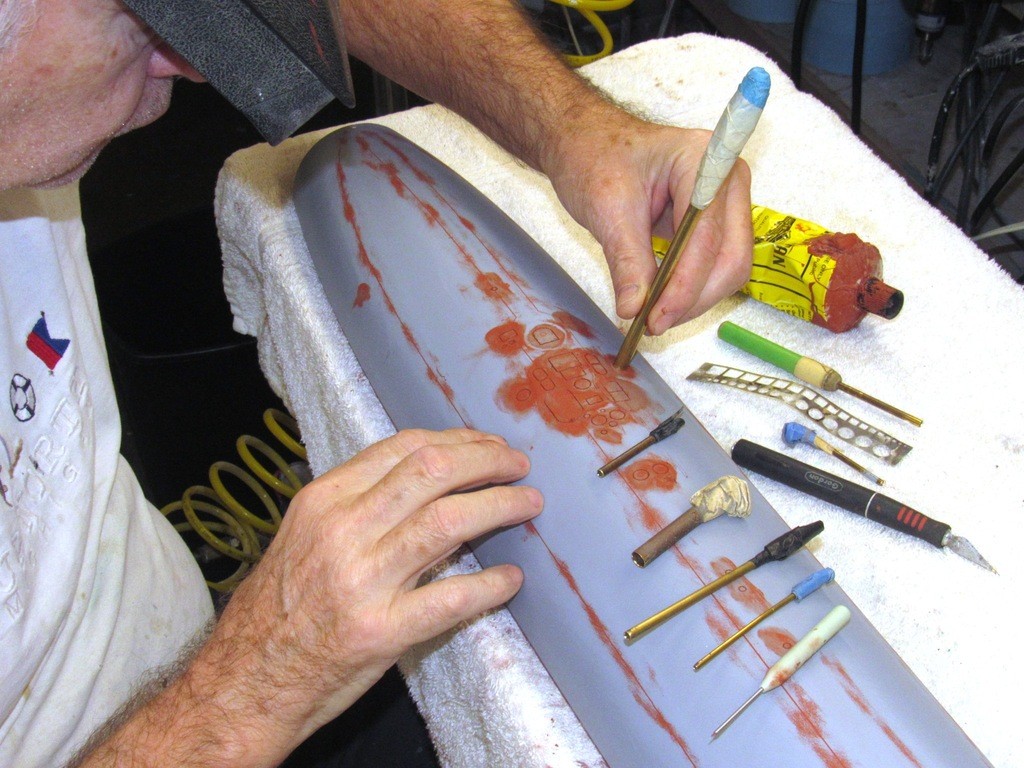
    Here I’m using commercially available, stainless steel and plastic sheet engraving stencils to guide my scribe along as I represent hand-holds and access panels on the sides and top of this submarine sail master.

    today's work RuH3bo

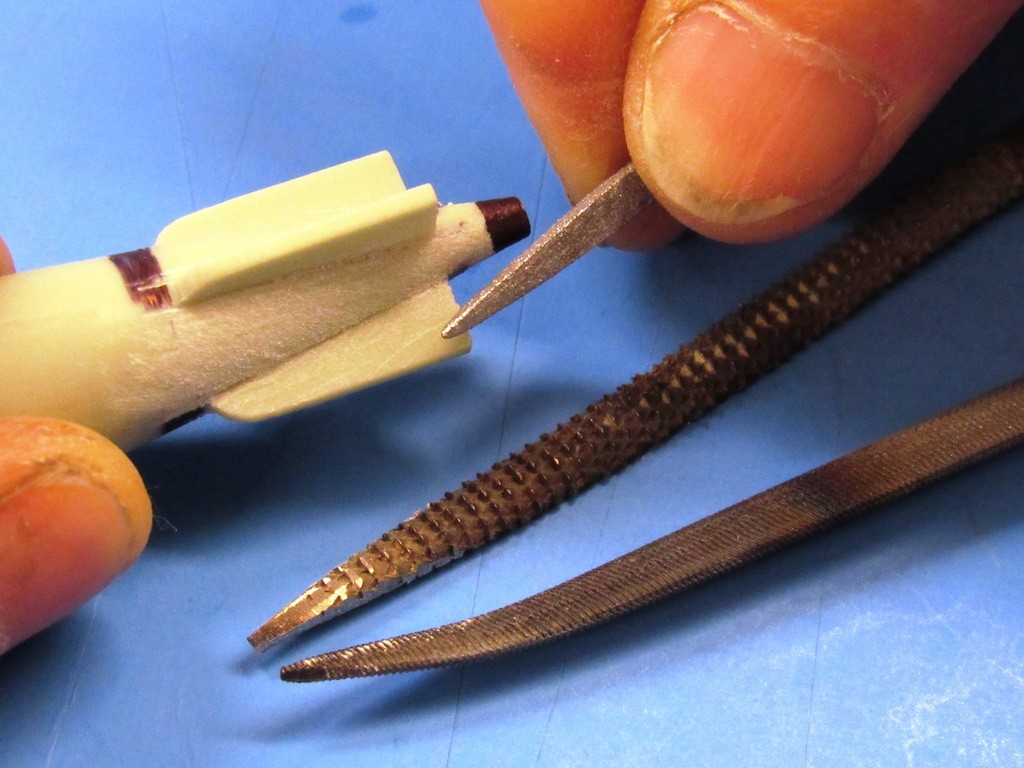
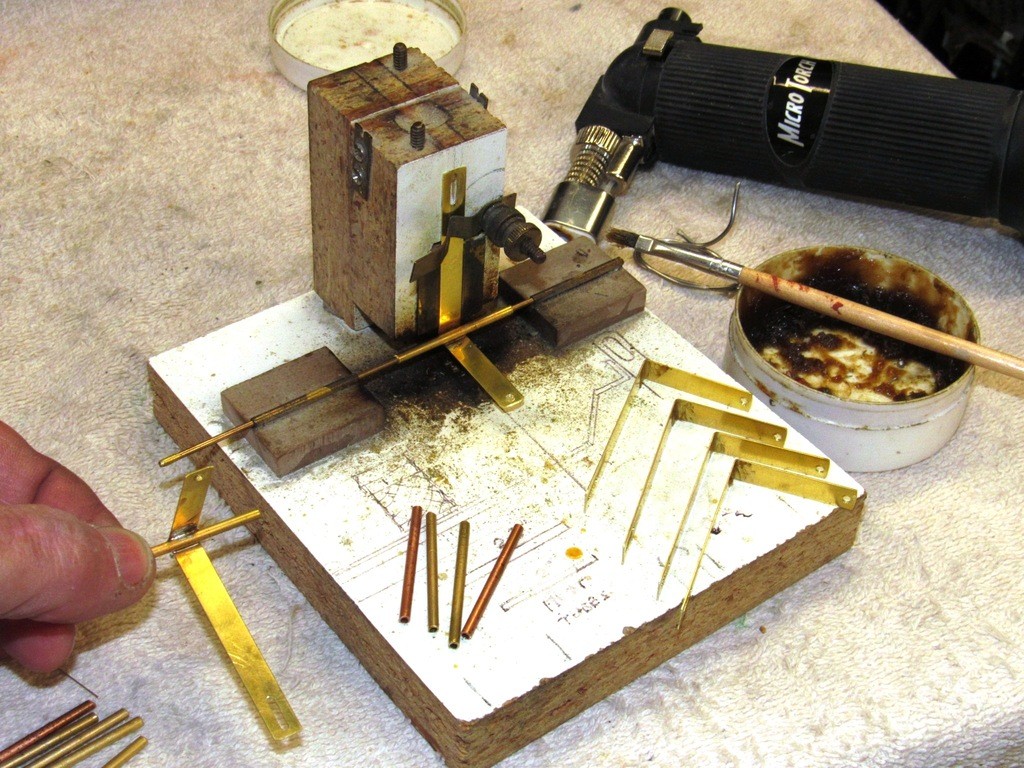
    I used to make my scribing tool by simply taking a rat-tail jeweler’s file and grinding its tip to the appropriately shaped point – a sharp tip for a starting tool, a blunt tip for a finishing tool. Today I make a scribe by starting with a blank, a rod of 1/16” diameter carbon steel (tool steel in some circles). This tough, brittle metal will dull slowly, keeping its shape and point longer than softer metals. An important consideration as some of the work involves dragging the tool through fiberglass laminate – and silica glass is a very tough customer.

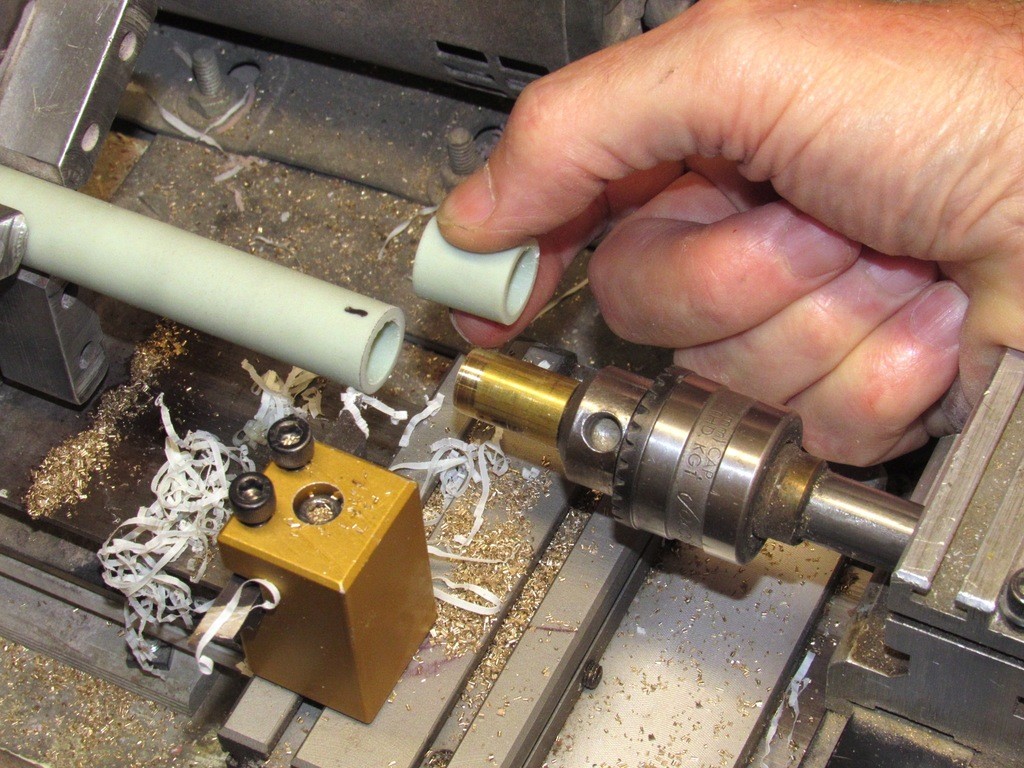
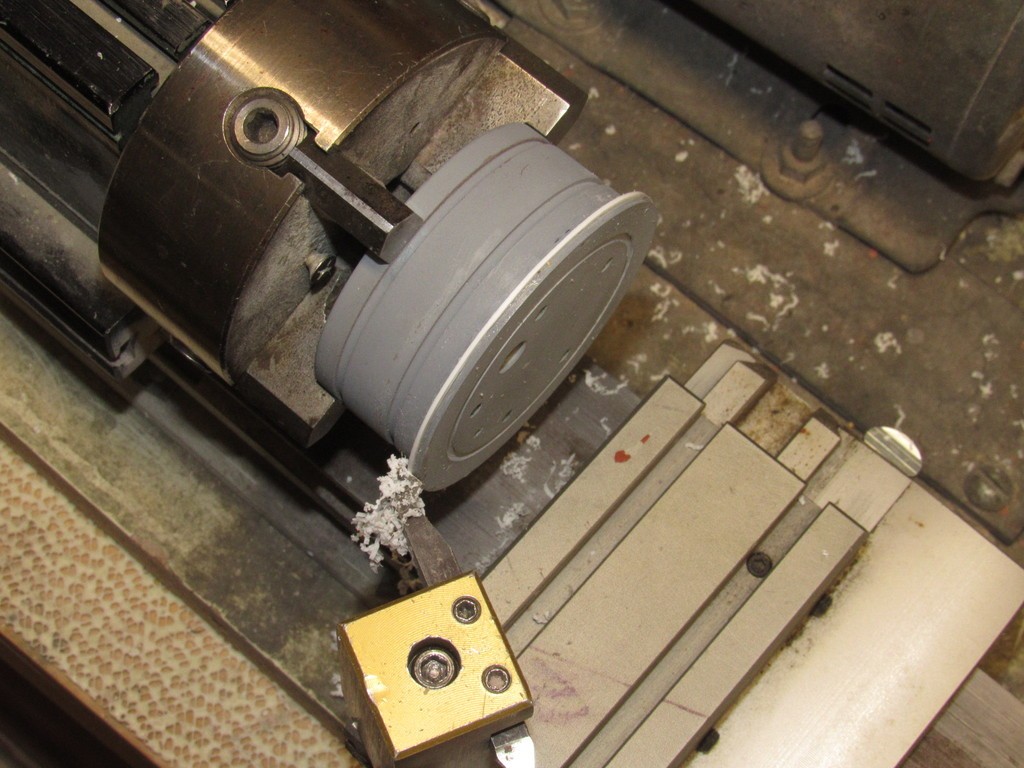
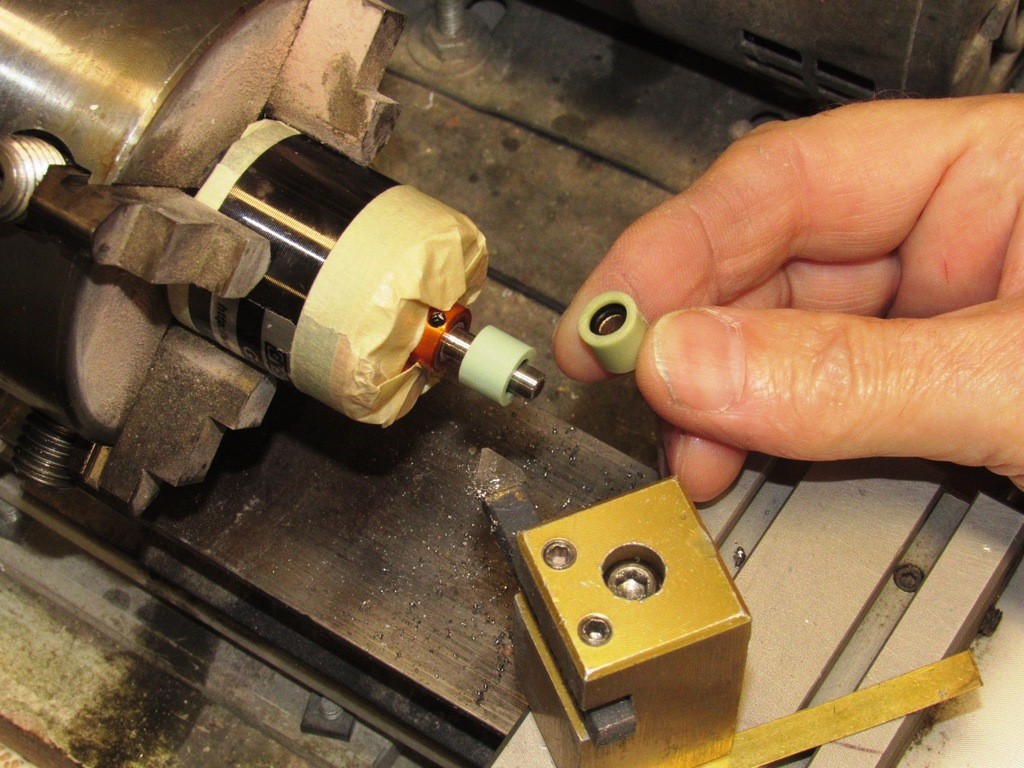
    I secure a length of the rod into the chuck of a mini-lath and turn it. While spinning I grind in the working end of the scribe with a Carbide cut-off wheel. I keep grinding till I’m within a few thousandths of the desired tip diameter and then finish the job with files and wet-stone.

    today's work 36cEC0

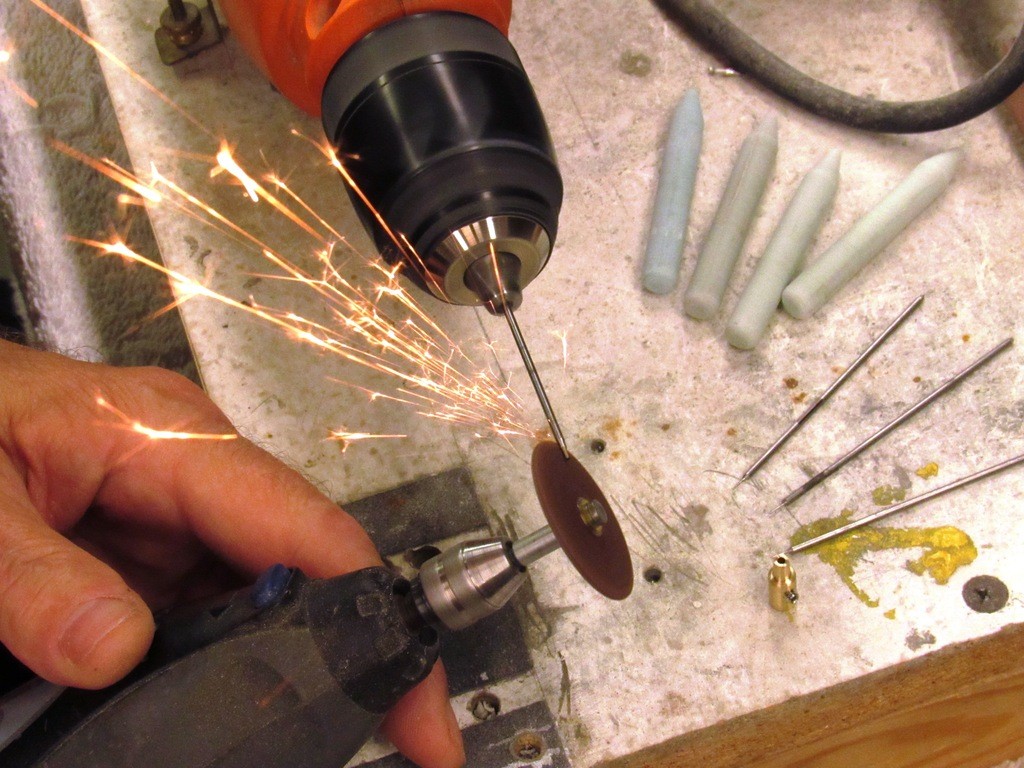
    Typical tip diameter of a scribe is .010-.015 inch. The shank is CA’ed to a handle and I’m good to go. It’s good practice to file, sand, and wet-stone and polish the sides near the tip to minimize ware on the stencil used to guide the scribe during the engraving operation.

    today's work DvDb0R

    Typically I’ll engrave using two types of scribing tools: the first passes are made with a pointed tip, this tool does the cutting to approximate depth. The finishing passes are done with a blunted tip, this tool only refining the sides of the engraved line. In some situations the finishing scribe will be outfitted with the depth-collar to insure uniform depth of cut.

    today's work 3GnDjw

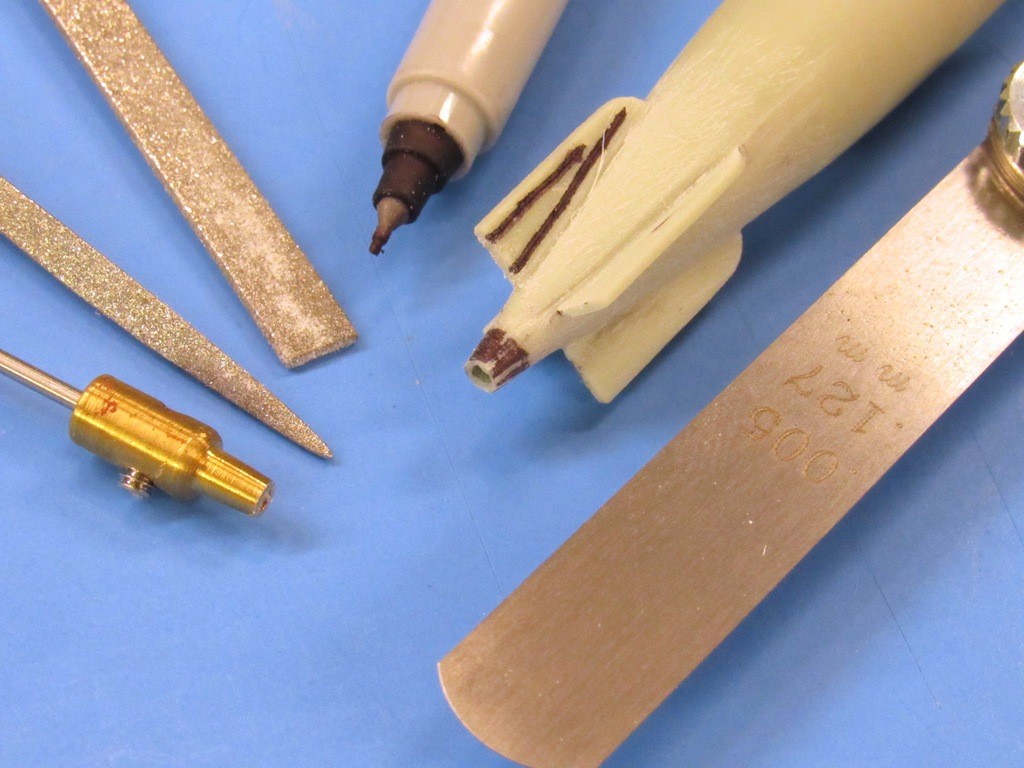
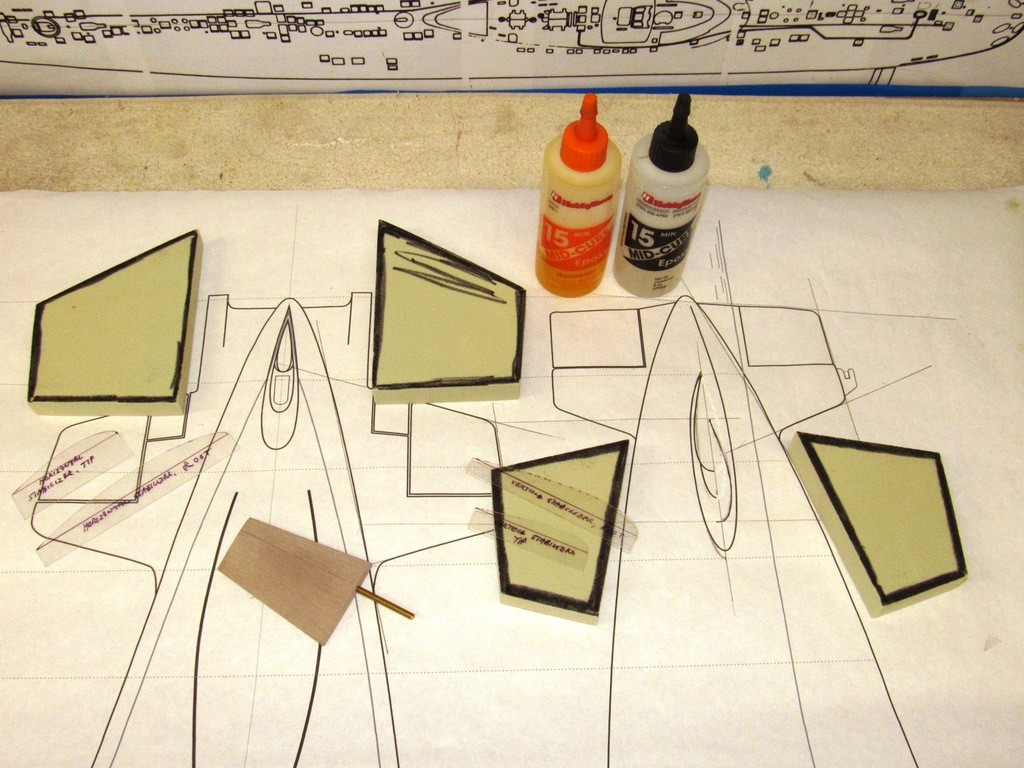
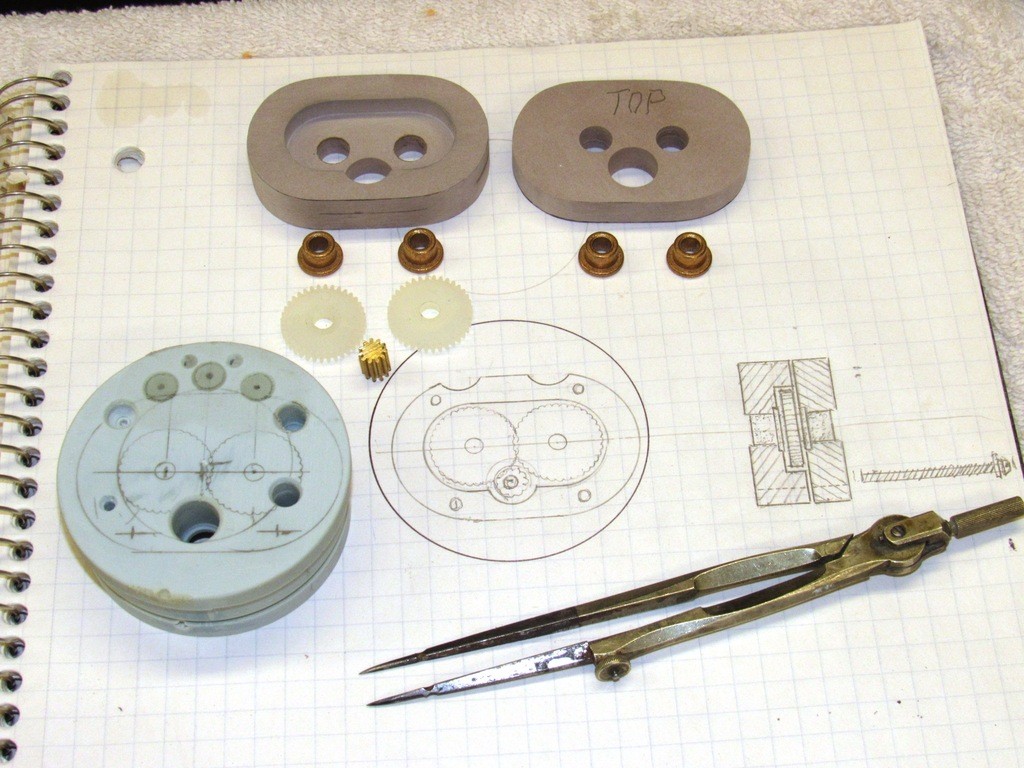
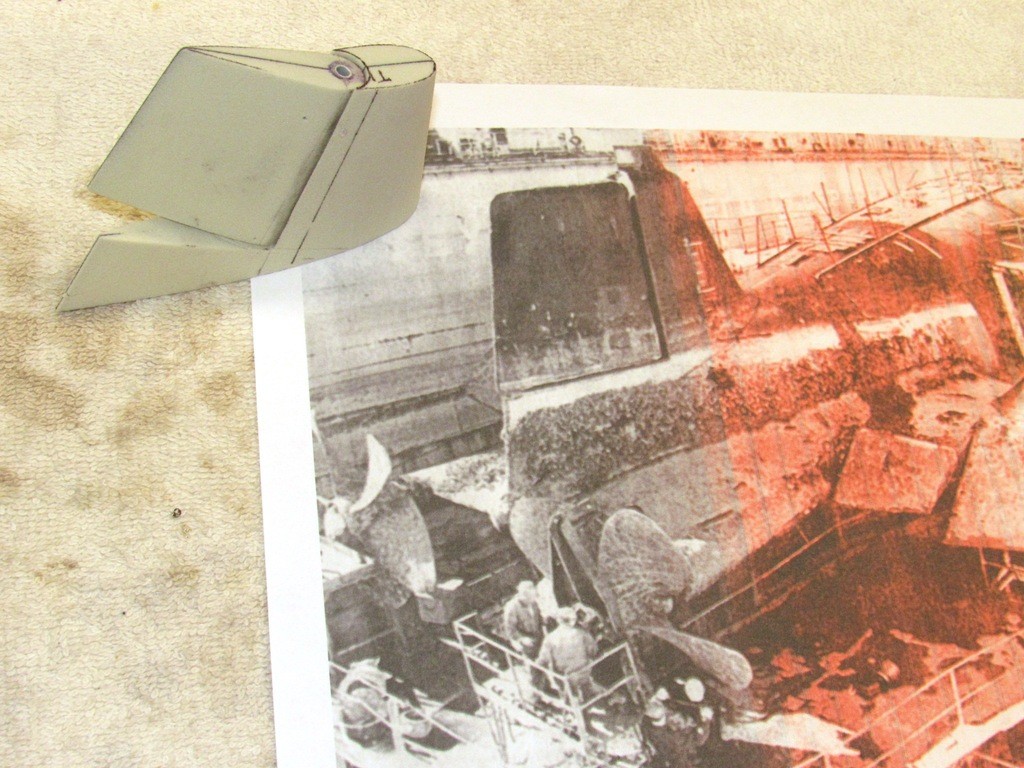
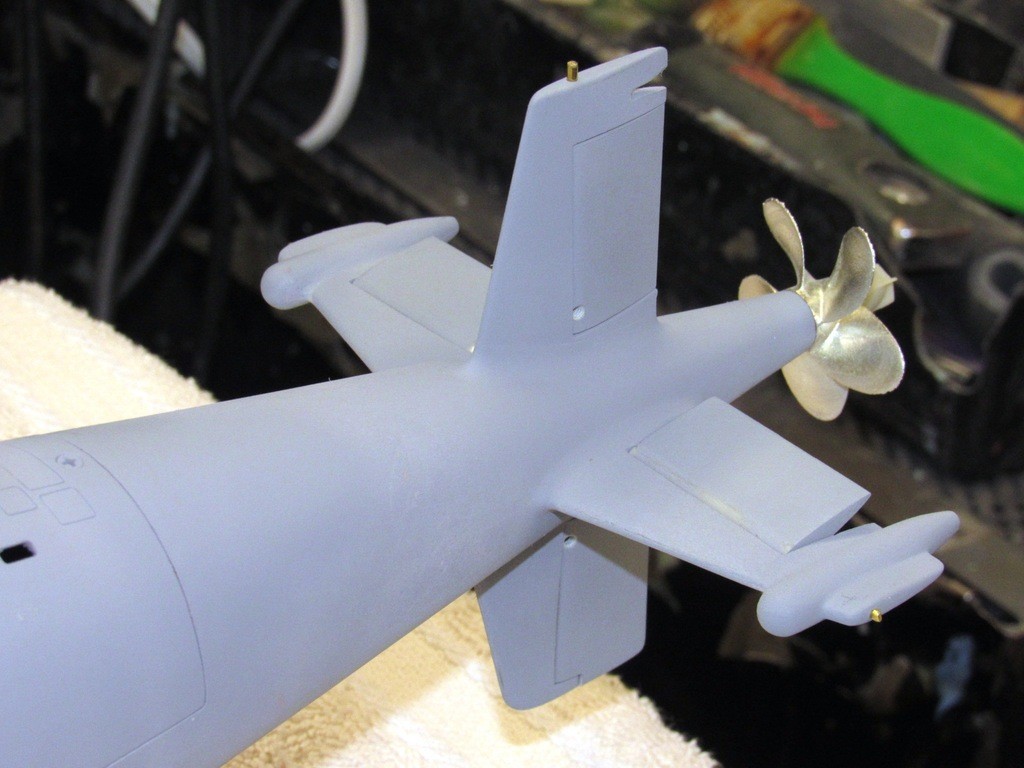
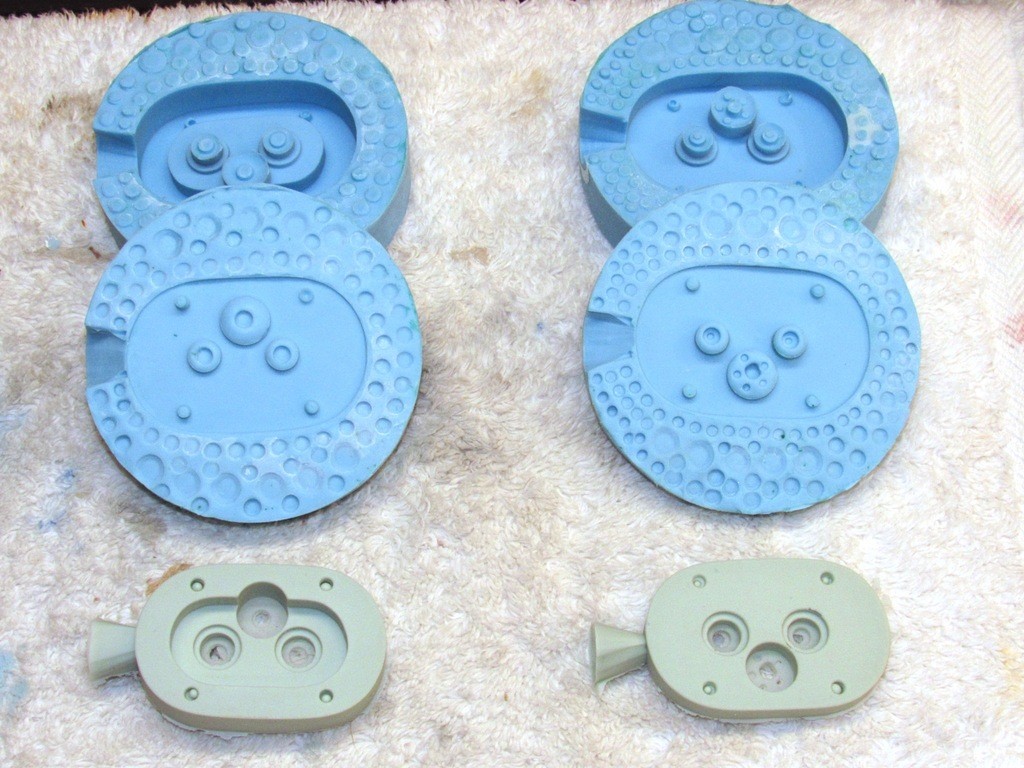
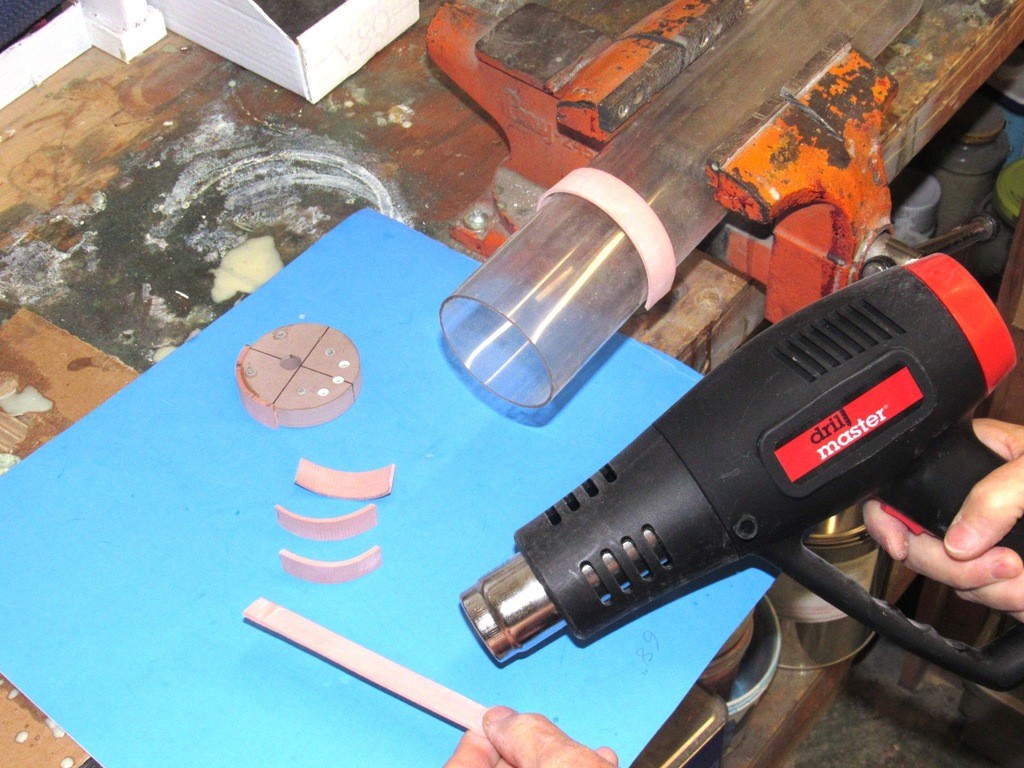
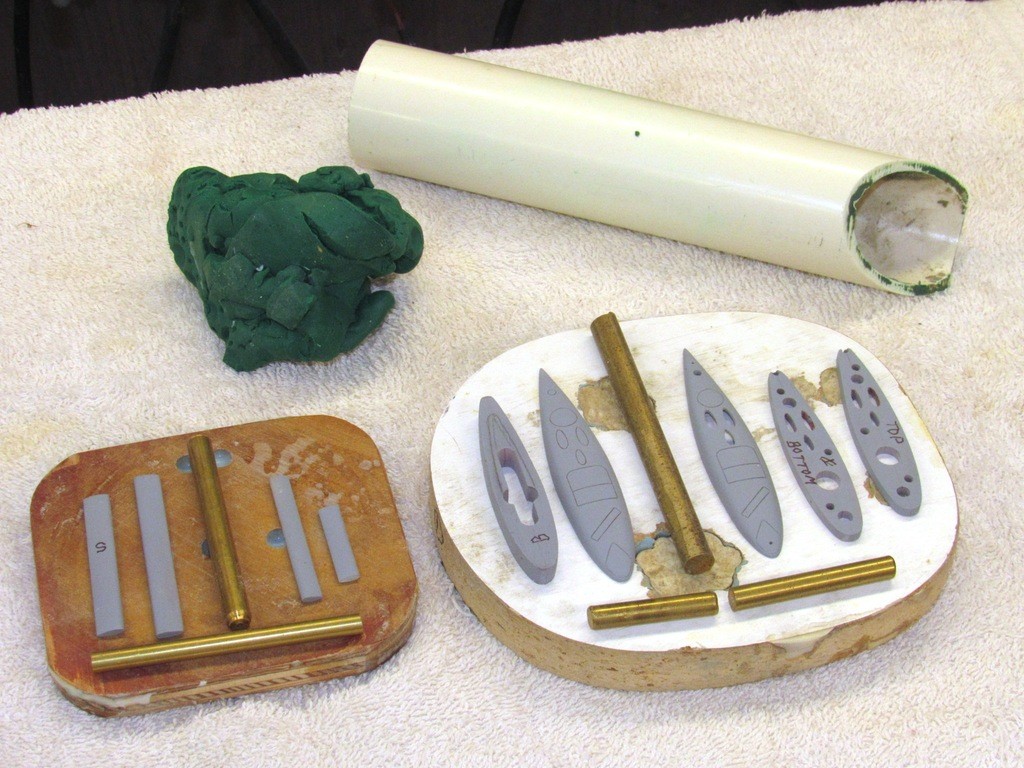
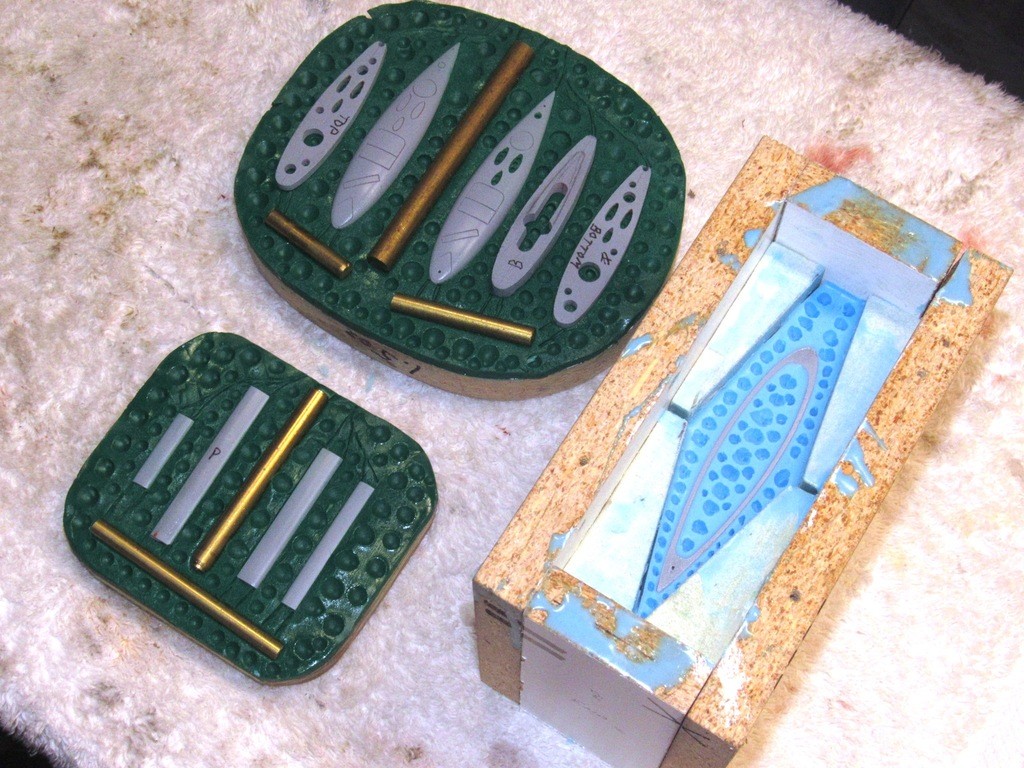
    Scribing stencils take many forms and materials. Most flat, but some stencils are made to adopt the compound curves of complex surfaces. Example here is the top of this sail; the plastic stencil blank was heat-formed over the master to assume the gentile compound curve, then appropriate opening were cut into the stencil, those holes would guide the scribing tool as I engraved in the periscope and mast outlines onto the sail.

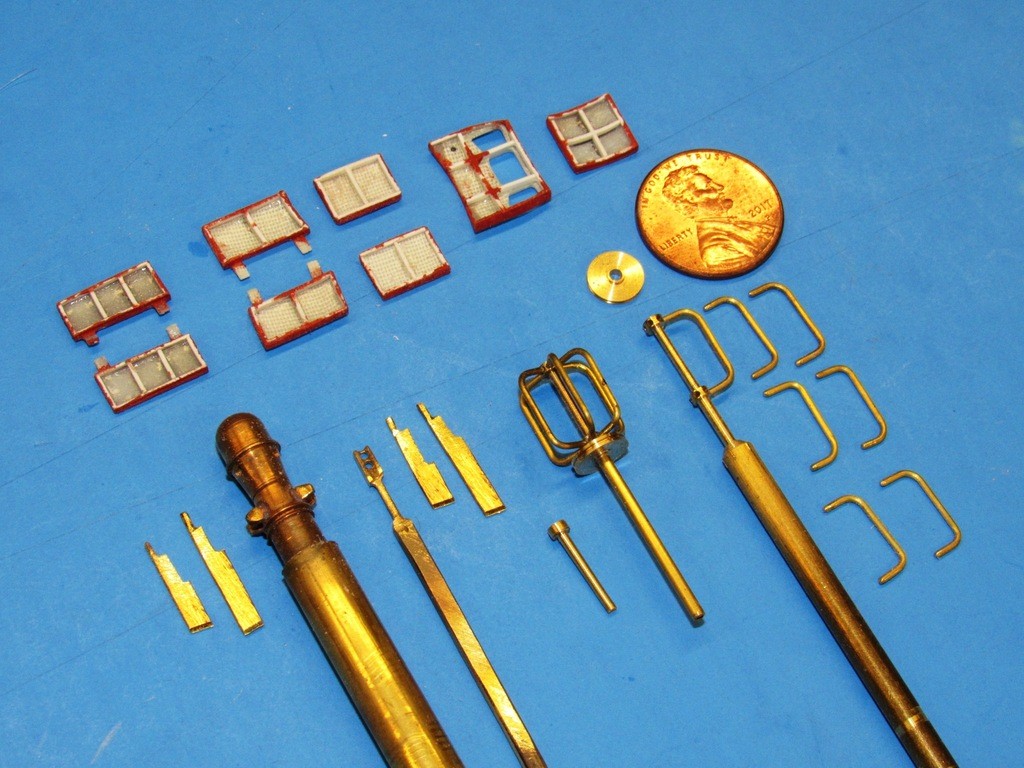
    I also acid-etch metal stencils for specific, unique scribing jobs. You see one to the extreme left.
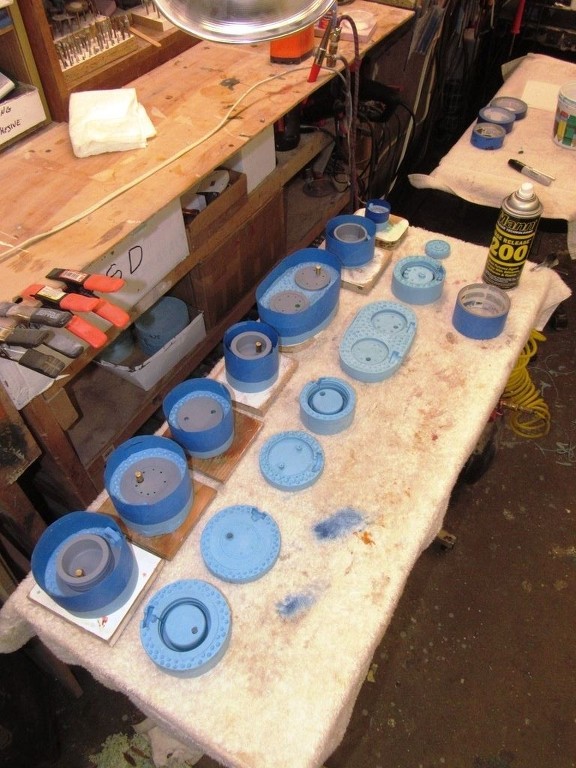
    And I never toss a stencil once a job is done – often an old stencil will find use on a future job. I’ve amazed quite a collection of stencils over the years. These stencils fabricated from acid-etched plate, heat formed plastic, sheet metal, to GRP glove-fit types.

    today's work WzWeHO

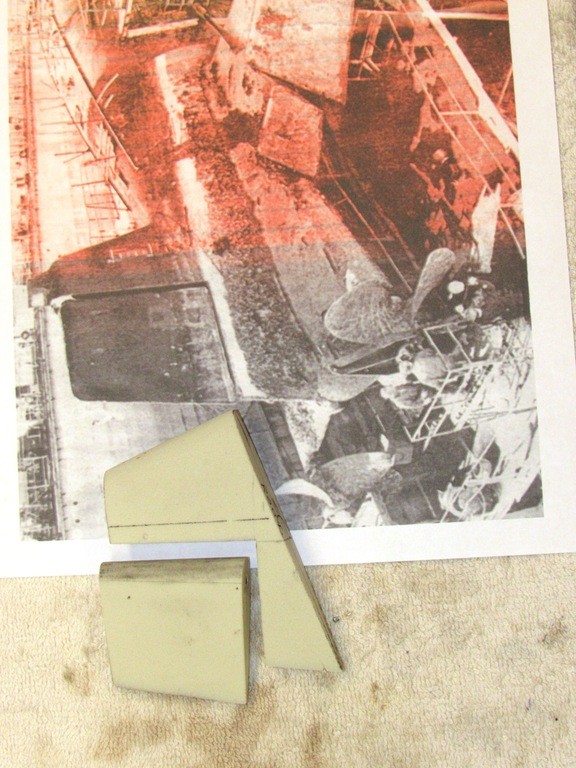
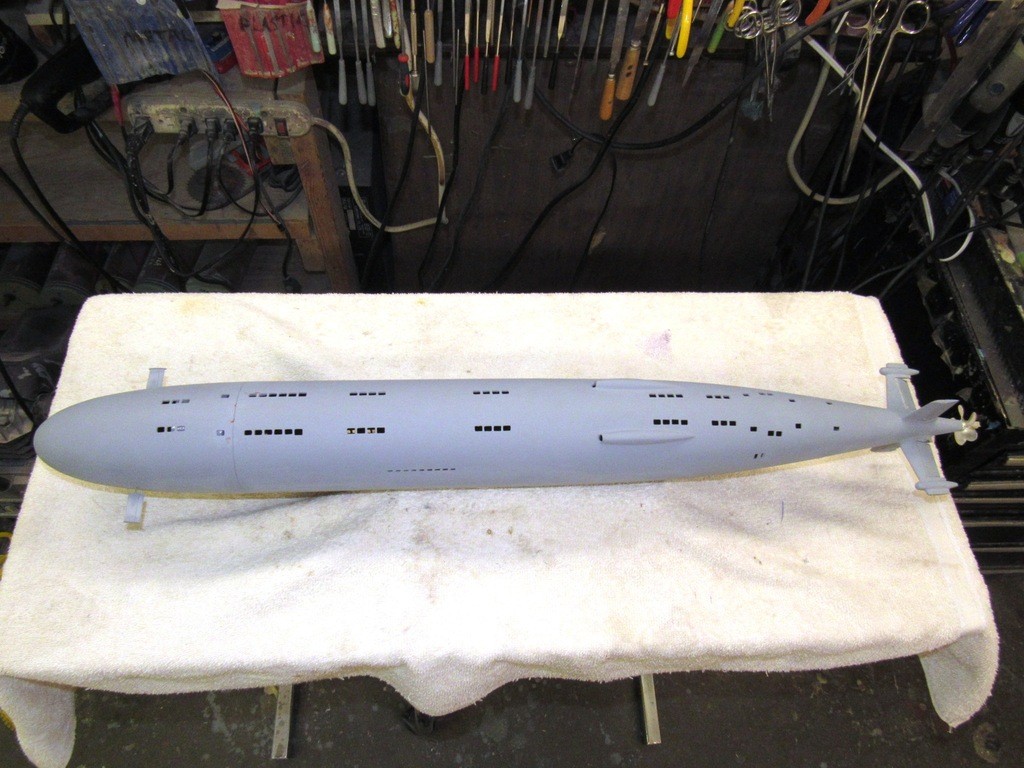
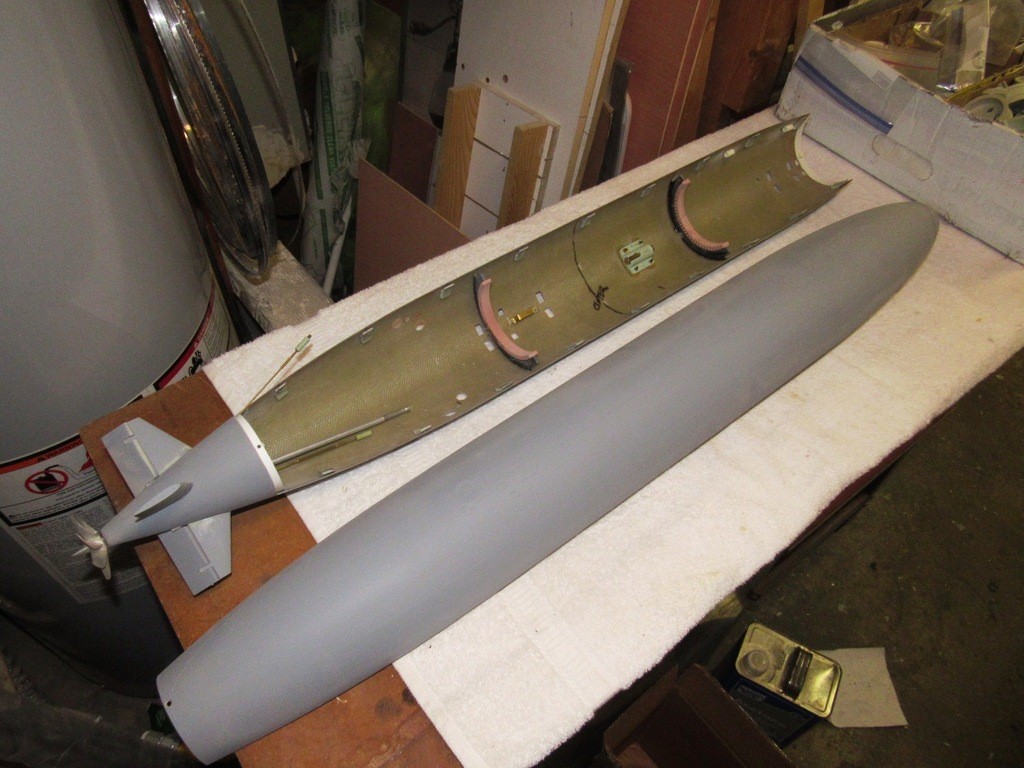
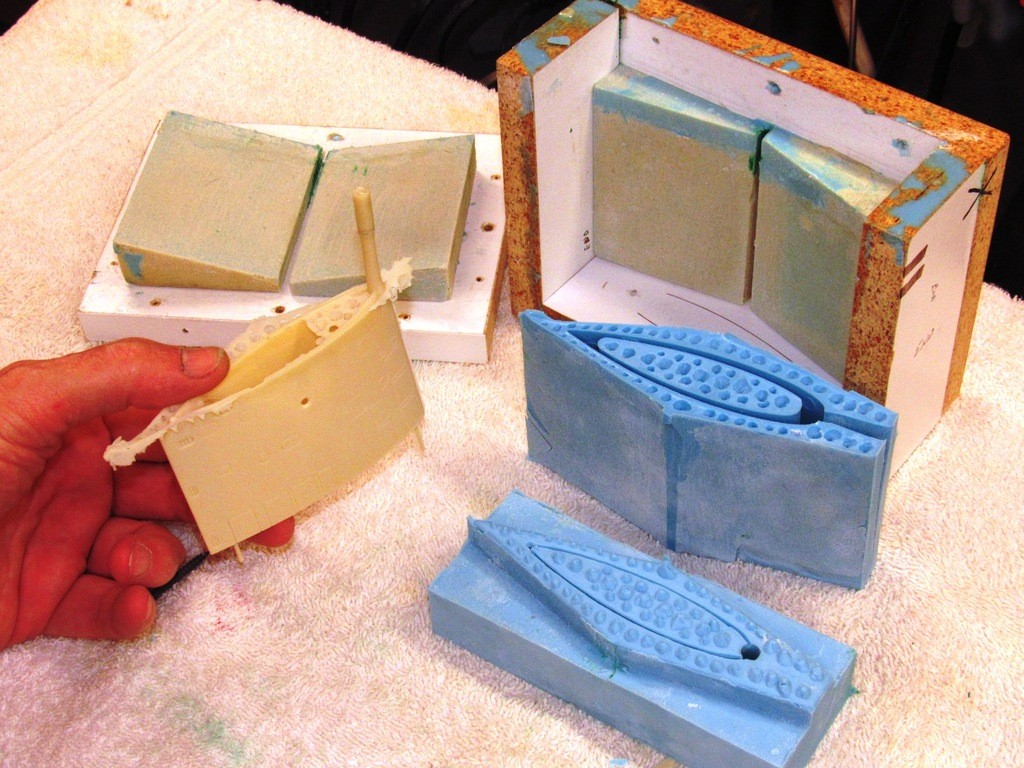
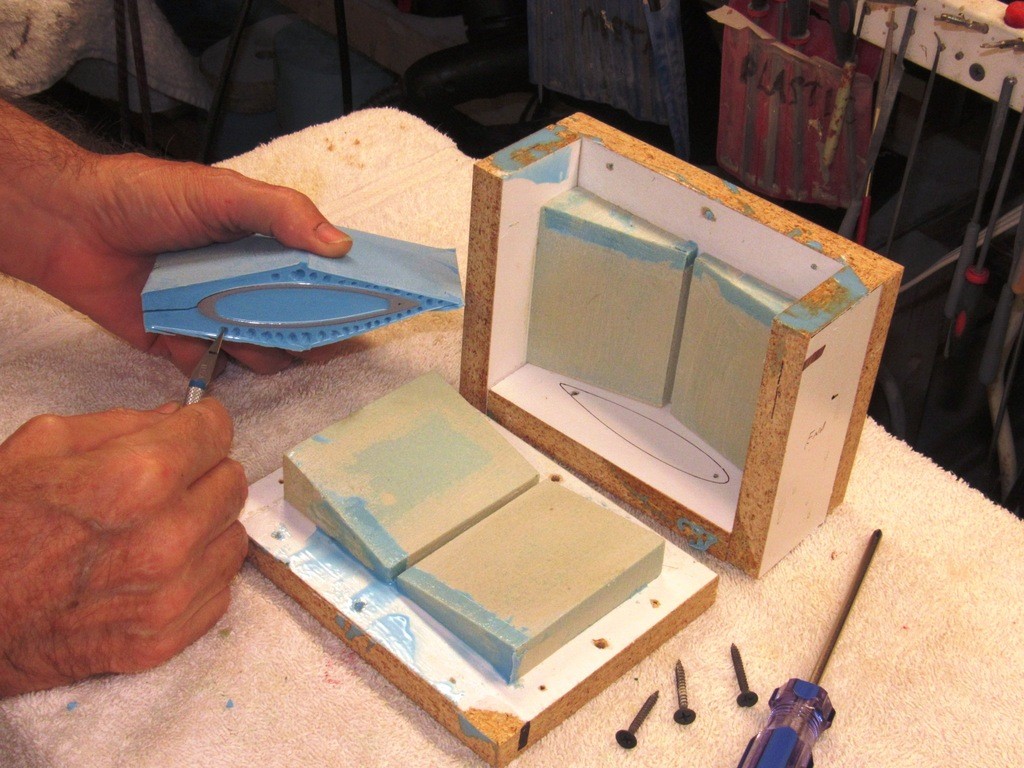
    For extreme compound curves, such as the bow of this 1/96 ALFA model, I’ll lay up a fiberglass stencil blank to make a glove fit, and cut out the engraving holes as required; then use that stencil to engrave the lines required. Here you see the elongated ovals representing the torpedo tube shutter doors.

    To insure a no-slip matting of the stencil to the bow I drilled and taped holes into the model itself, and secured the stencil with little 2-56 machine screws. No way no matter how much pressure I applied to the edges of the holes within the stencil would that stencil shift out of place! Once the job was finished it was an easy task to fill and fair over those holes.

    today's work K9MTZj

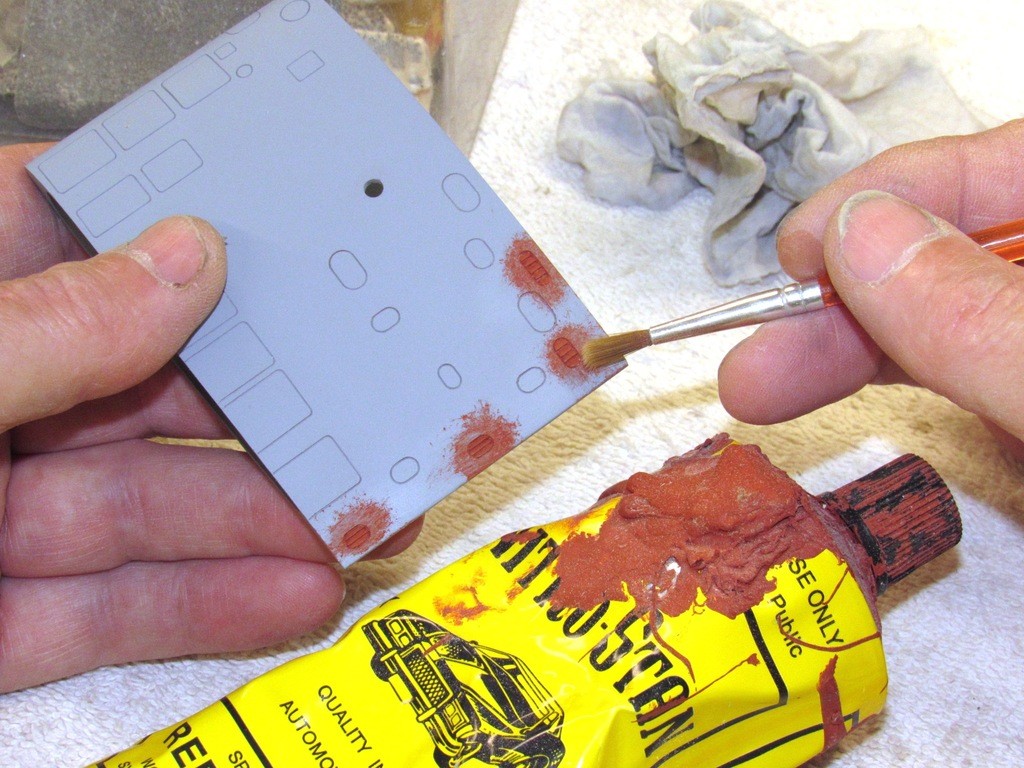
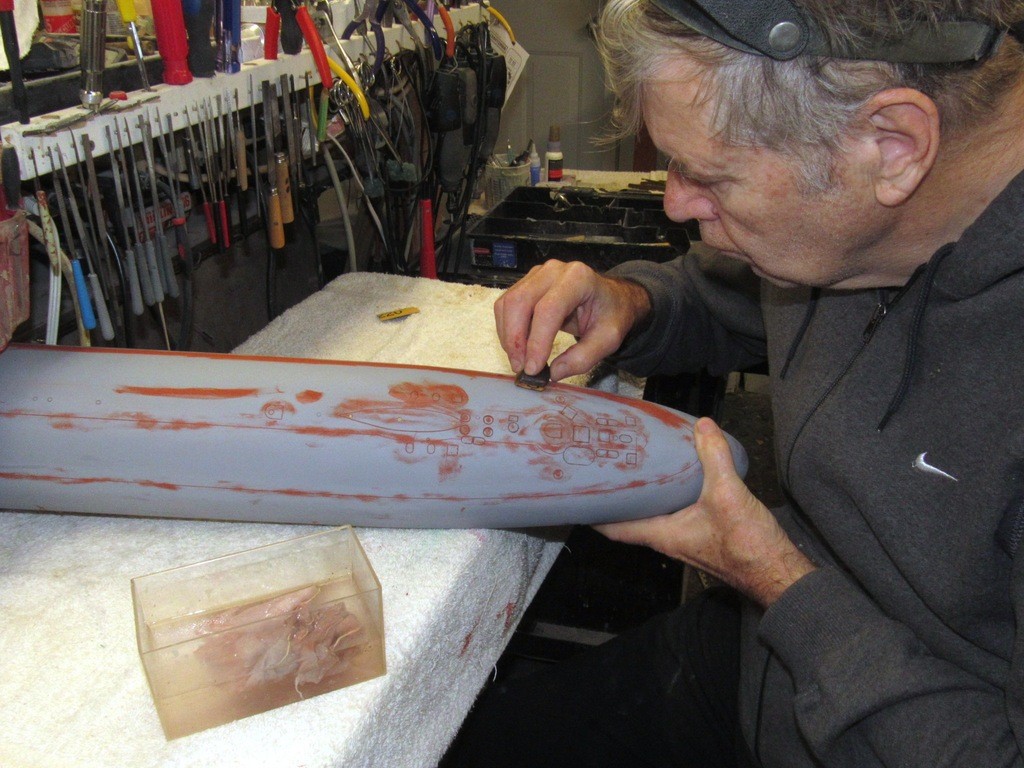
    It’s good practice to first use a pencil, instead of the scribe, for the initial ‘check’ pass on the work. At this stage if you get the position wrong, or have chosen the wrong hole in the stencil, then no harm and no foul –you erase the pencil mark and try again. After validation of position and outline with pencil the process moves on to the engraving tools.

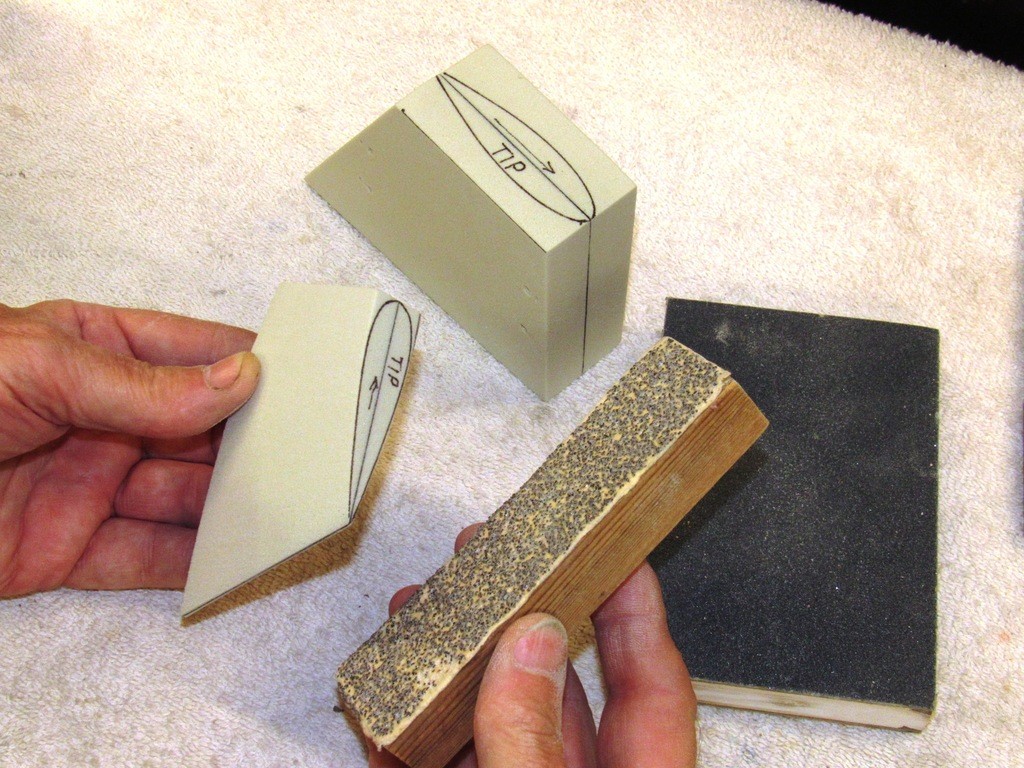
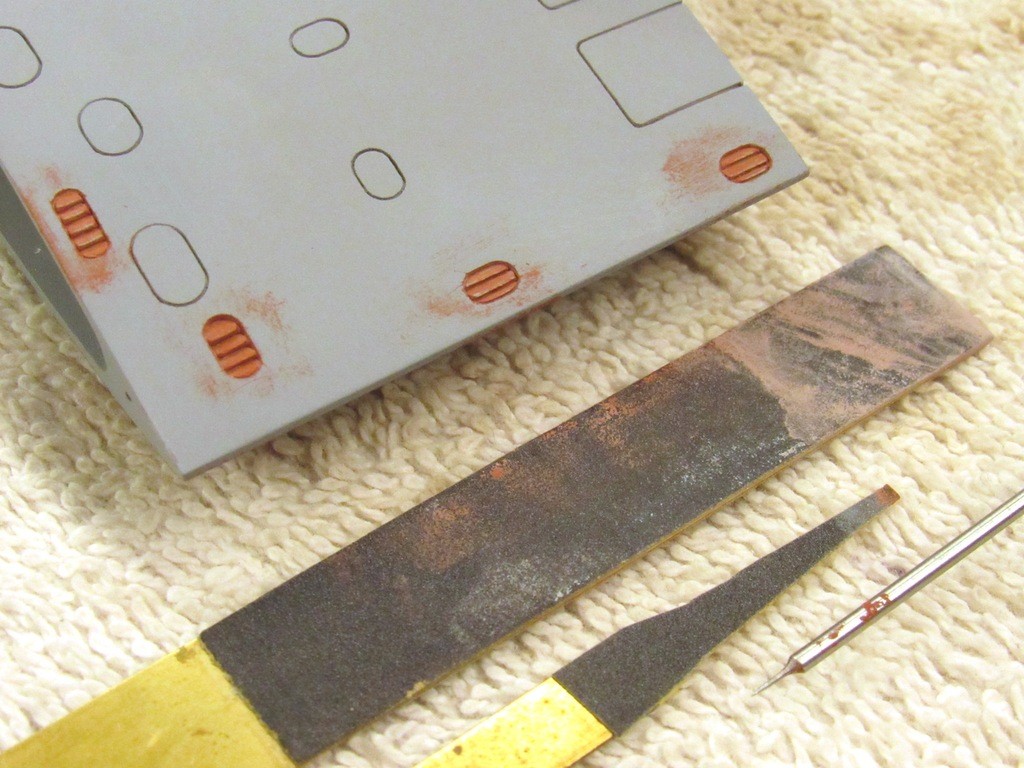
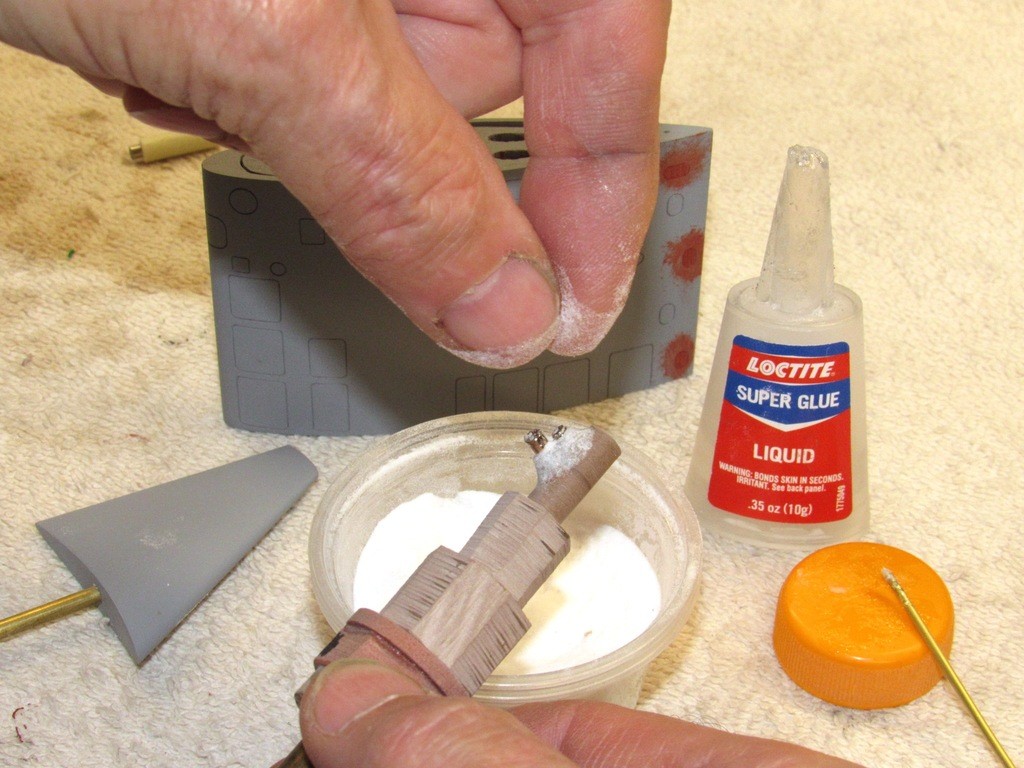
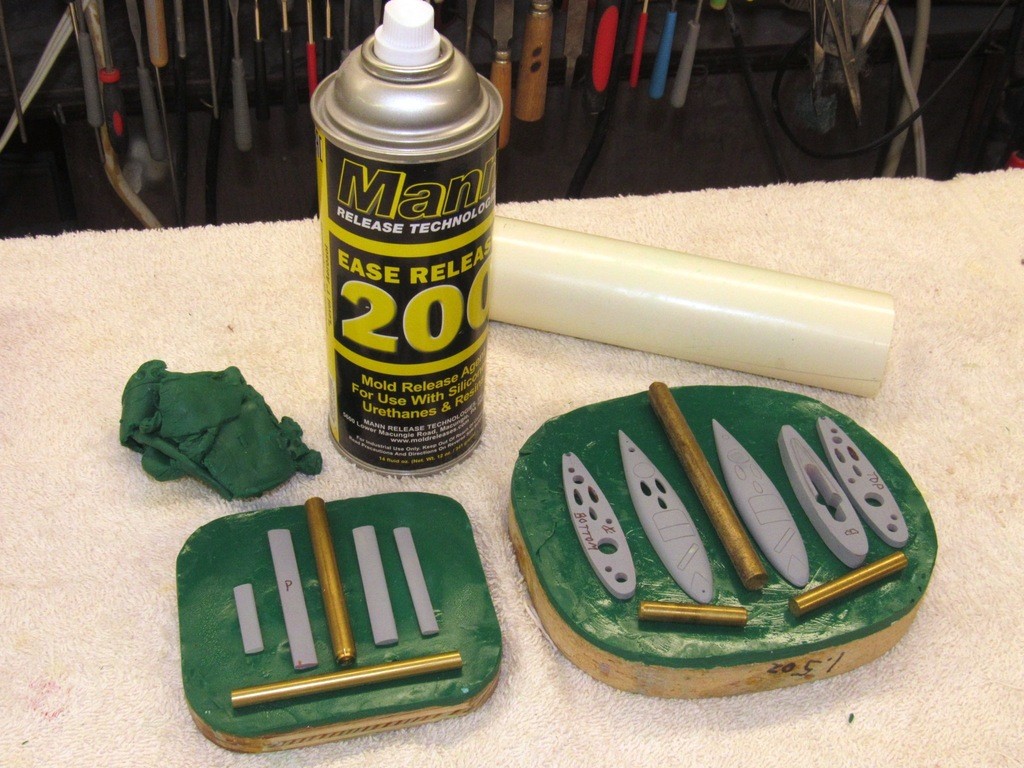
    Many of the scribing stencils I employ are outfitted with pieces of sandpaper where they make contact with the models surface. This assures a no-slip tool when just using hand pressure to hold it in place as I maneuver the scribing tool with the other hand.

    The scribe without the brass collar is sharp at the tip and makes the initial cuts. The ‘finishing scribe’, with the brass collar, is used to make the final passes and has a blunted tip – the adjustable collar insures a constant depth-of-cut.

    today's work KfyAki

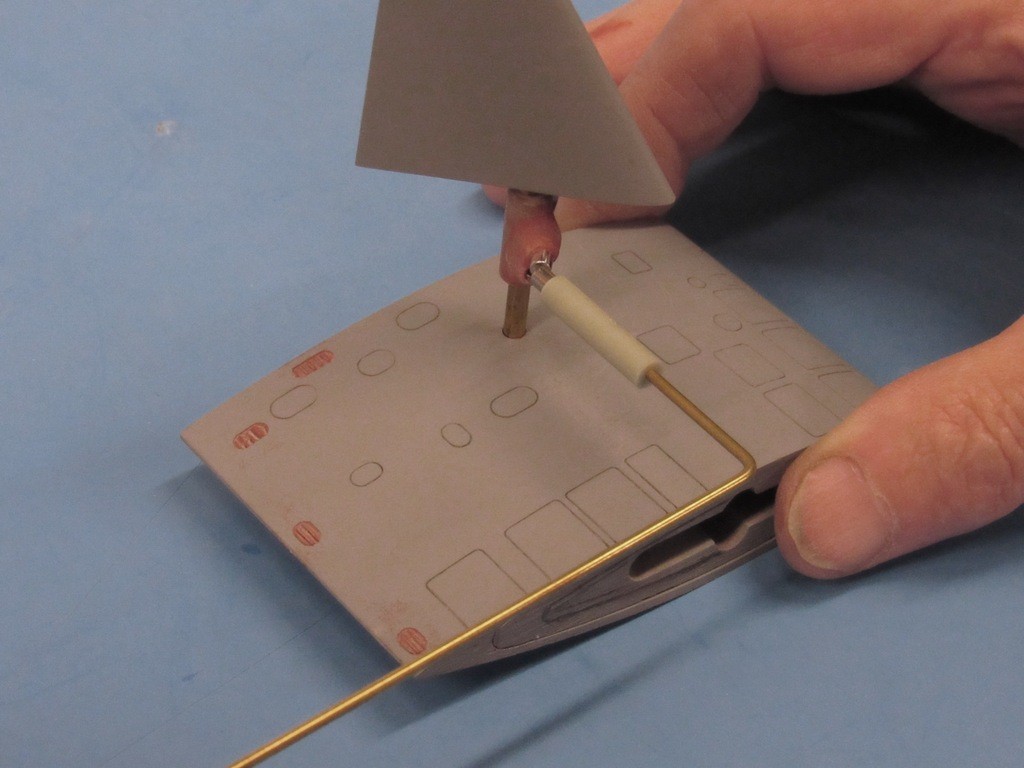
    A unique scribing tool is this two-point engraver, used to represent a submarines safety-track that runs the length of the deck.

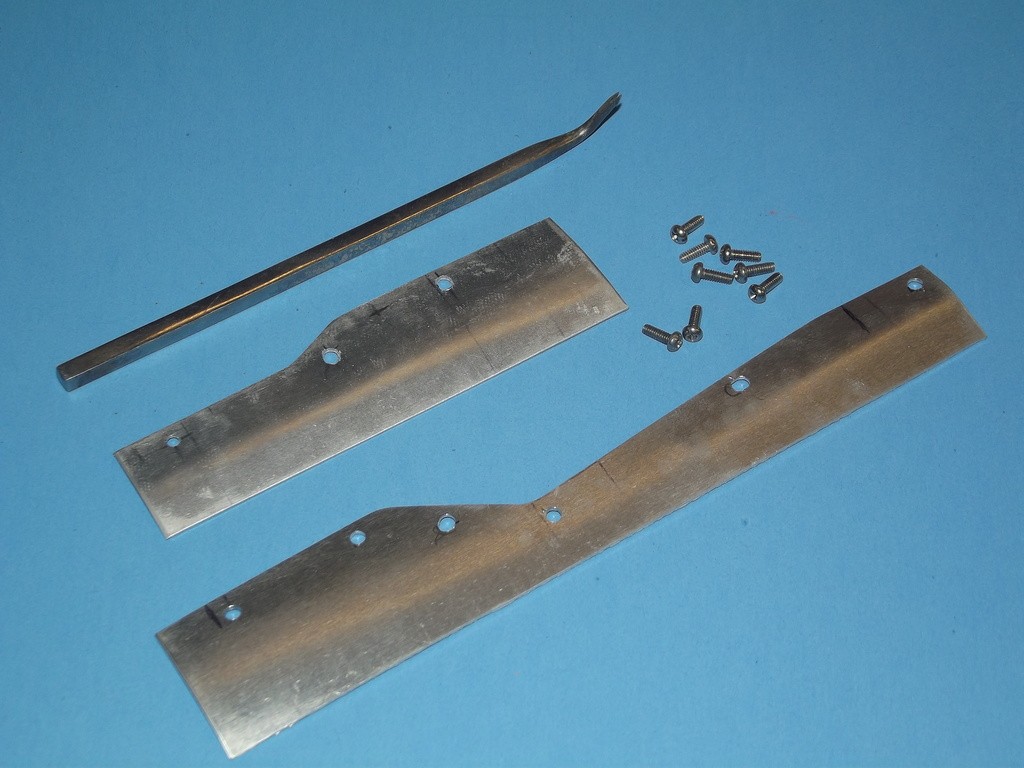
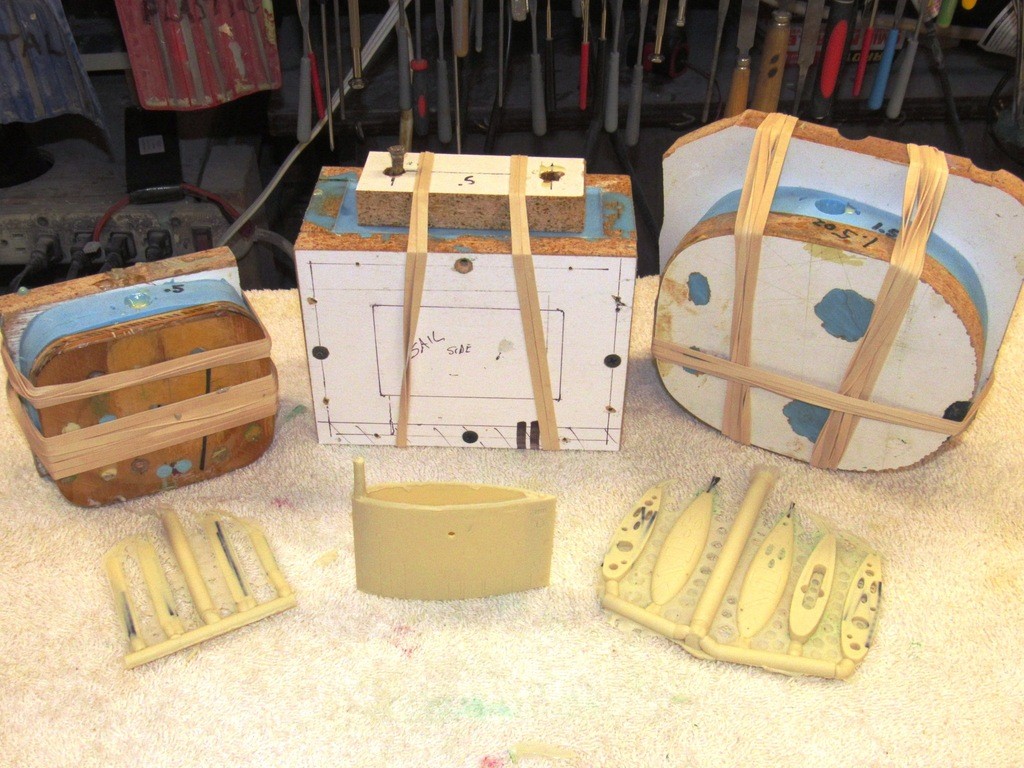
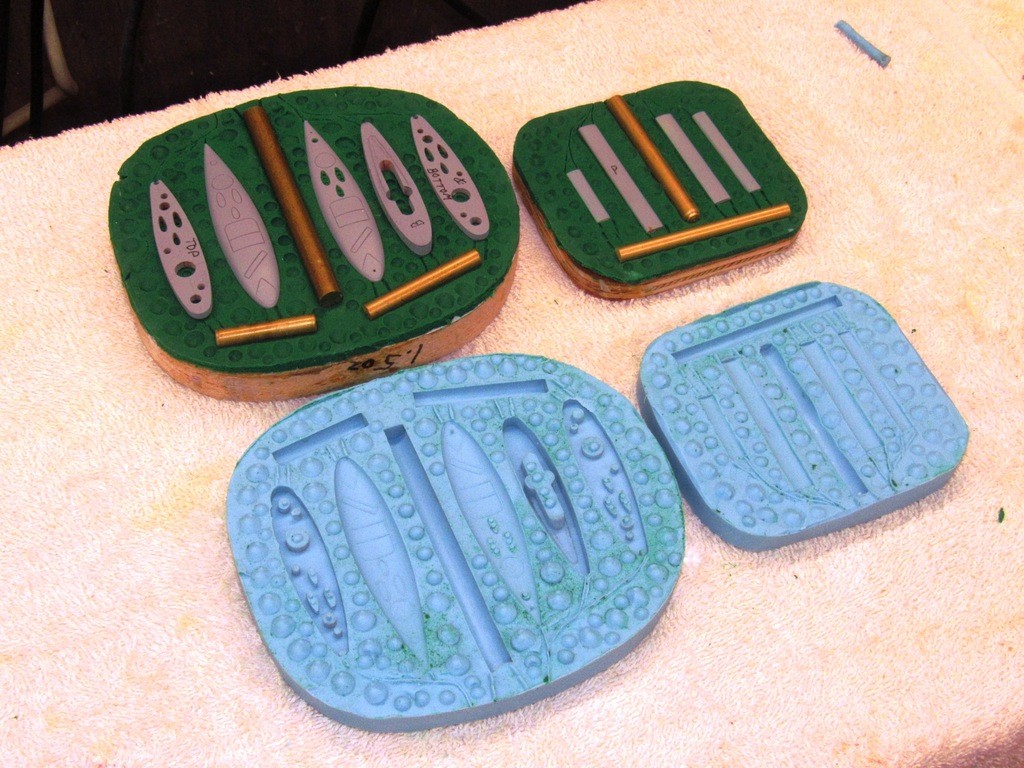
    Aluminum stencils are used to guide the scribing tool over the hull of this model. As considerable lateral pressure would be applied to the edge of the stencil I insured it against movement by literally bolting it to the model with machine screws. The two-point scribing tool is seen above two of these stencils along with the screws used to secure the stencils in place.

    today's work XdKobu

    With the aluminum stencil bolted down tight I used a two-point scribing tool to engrave the two perfectly parallel lines that represent the safety-track atop the hull of this r/c submarine model. The long curved shank of the tool permitted me to rotate the head of the tool with great precision as I twisted it to conform to the curves of the stencil – failure to do so would produce lines of varying distance from one another.

    After the engraving job was done the stencil was removed and the bolt holes filled and faired.

    today's work Xd9aYQ

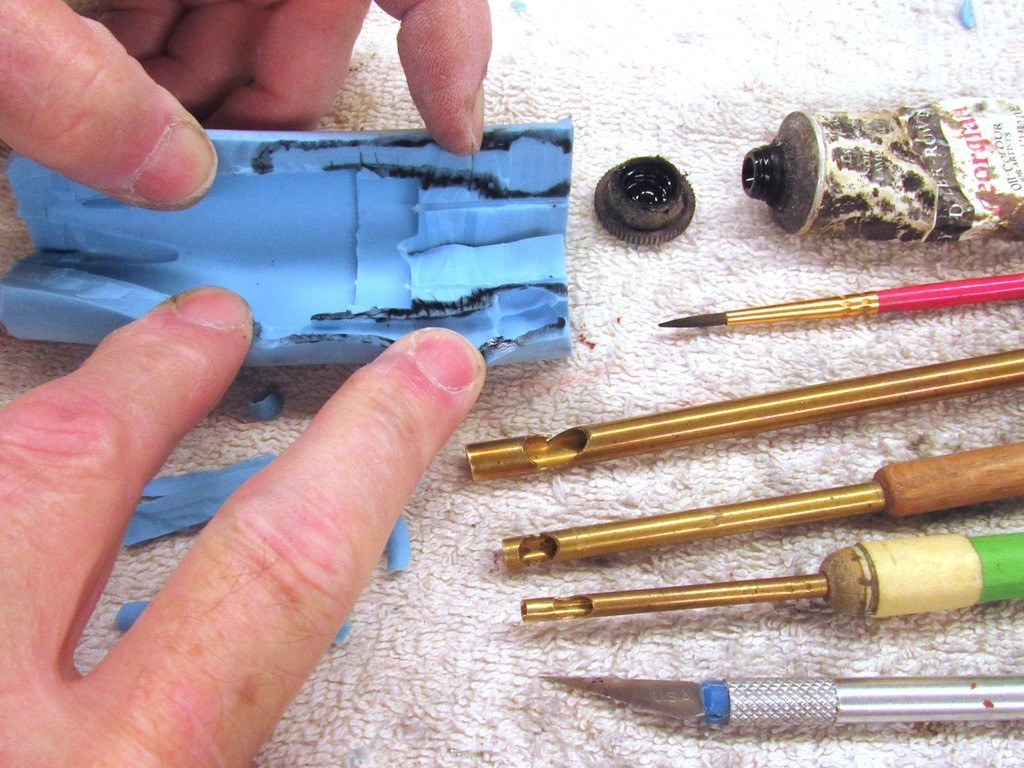
    Another ‘special’ scribing tool used to under-cut an installed length of square section styrene rod to change its section to that of a ‘T’ is shown here. Careful grinding of a #11 X-Acto blade produced this tool.

    today's work BDAdk3
    What was once square in section is now T in section. This feat of magic accomplished by scribing the two sides of the square rod.

    today's work YzgPQo

    A similar scribing tool at work forming the safety track on another submarine model.

    today's work JrJvrX

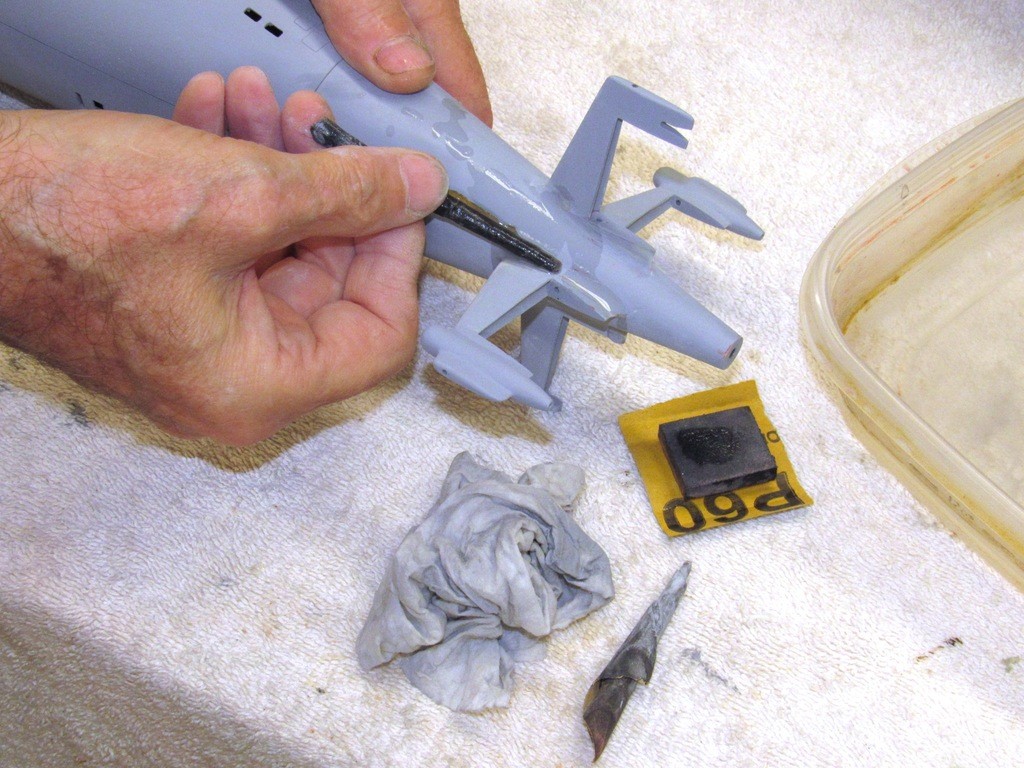
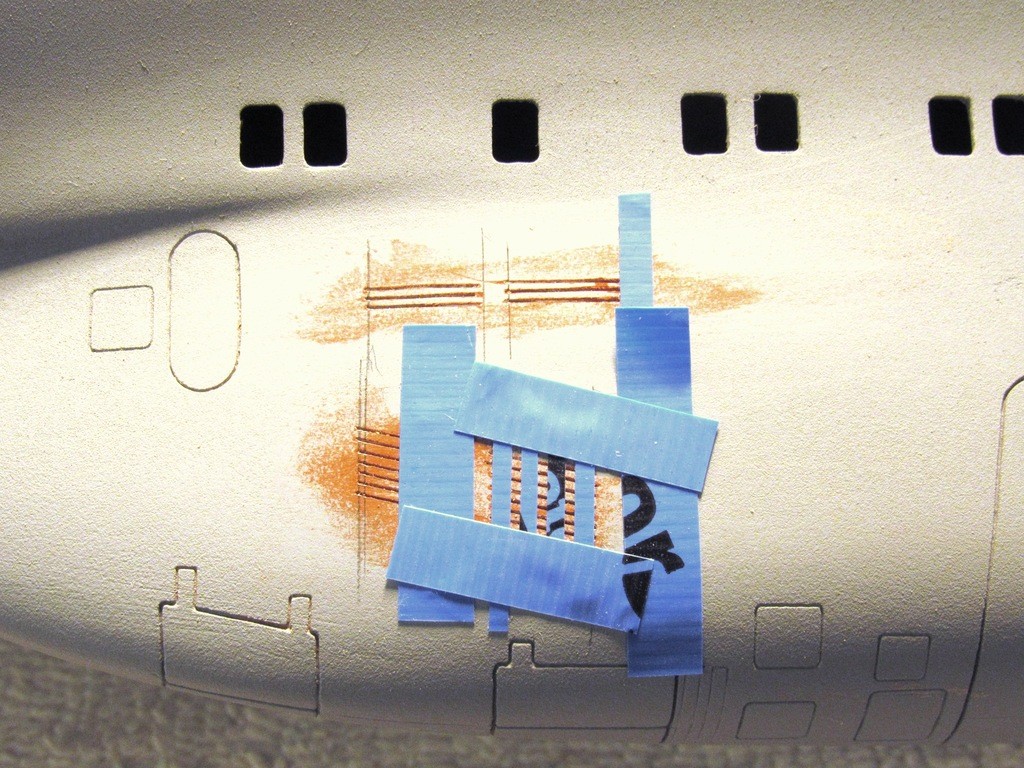
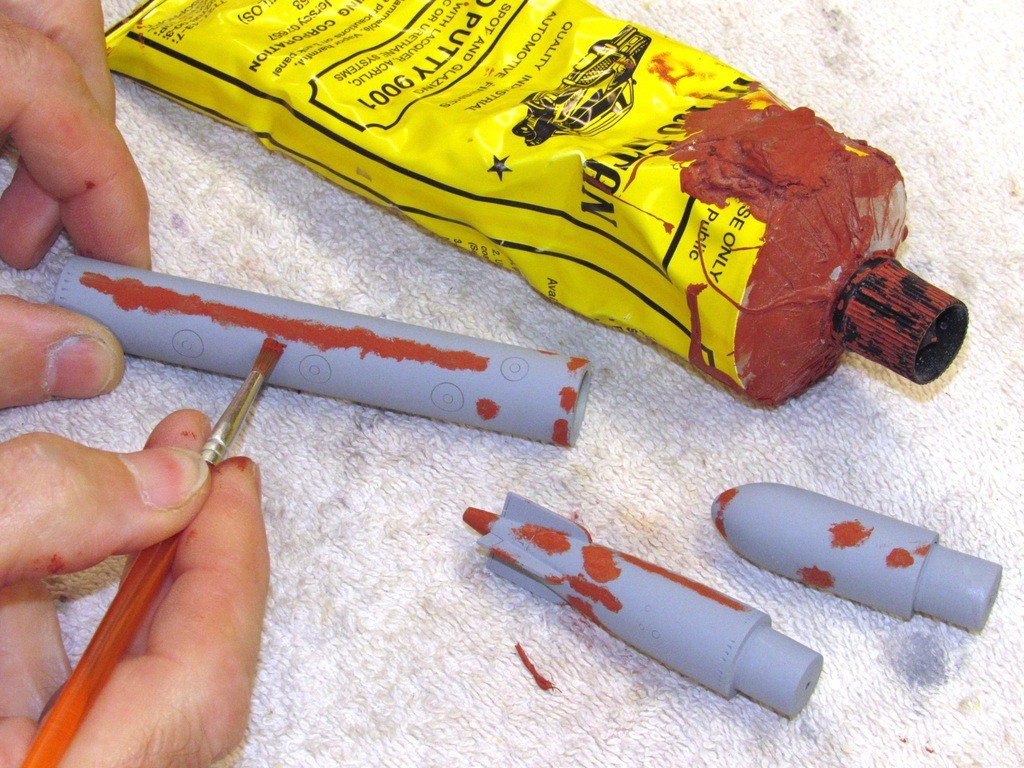
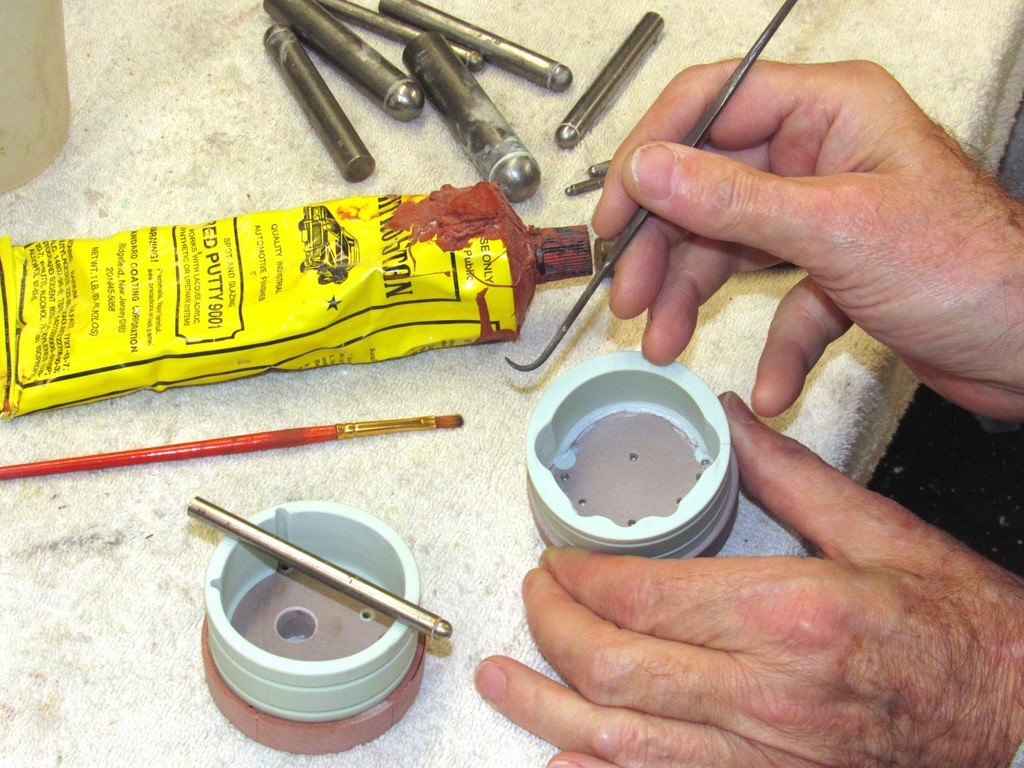
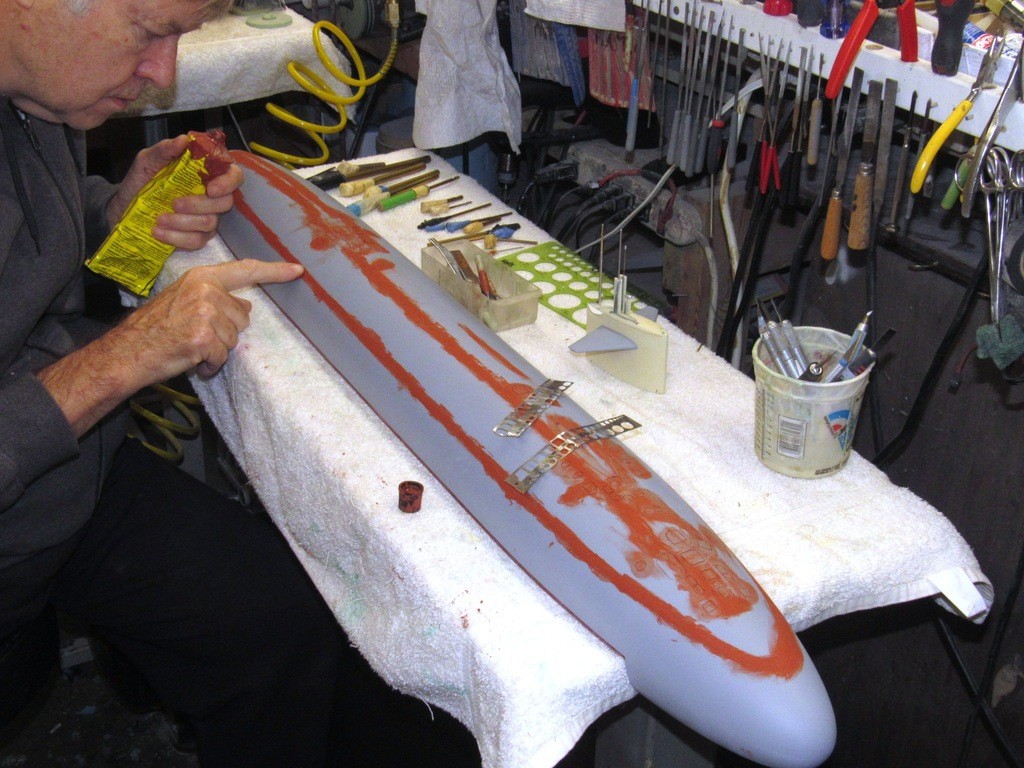
    Once the engraved lines were cut into the models surface its good practice to free-hand the scribe within the established engraved lines in order to refine the shape, depth, and to correct errors like over-strikes, and tool marks. Inevitably, such localized repairs with filler or putty result in the goo getting into the engraved lines, which have to be re-established with the scribe to chase it out before the filler or putty dries/cures hard.

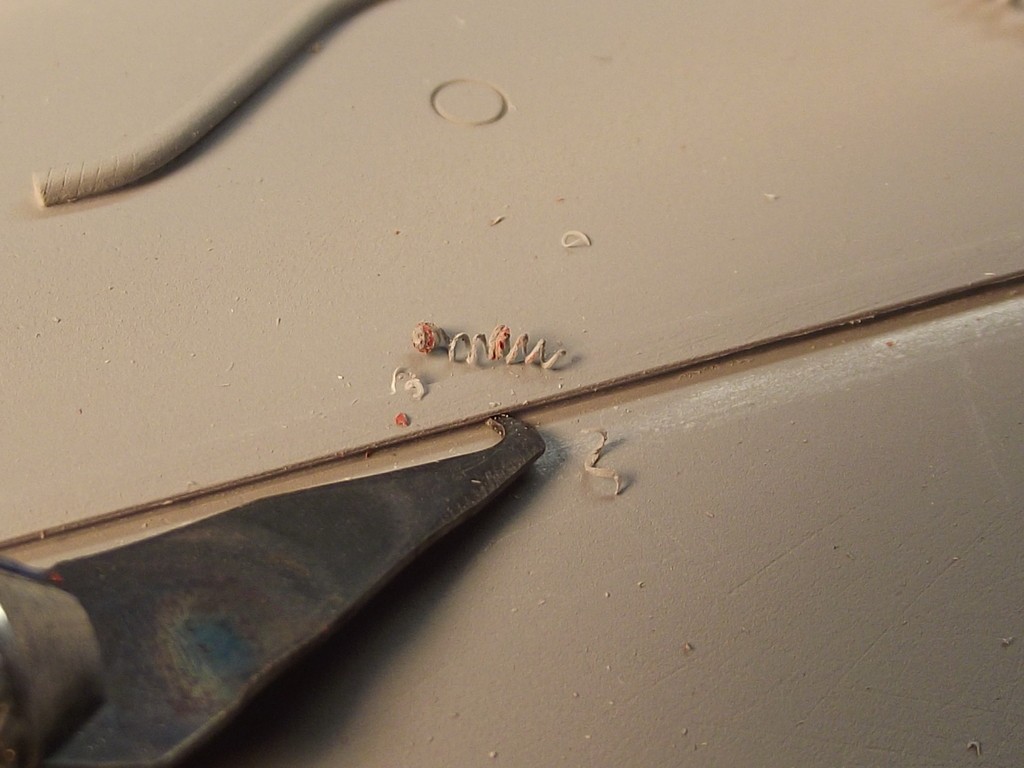
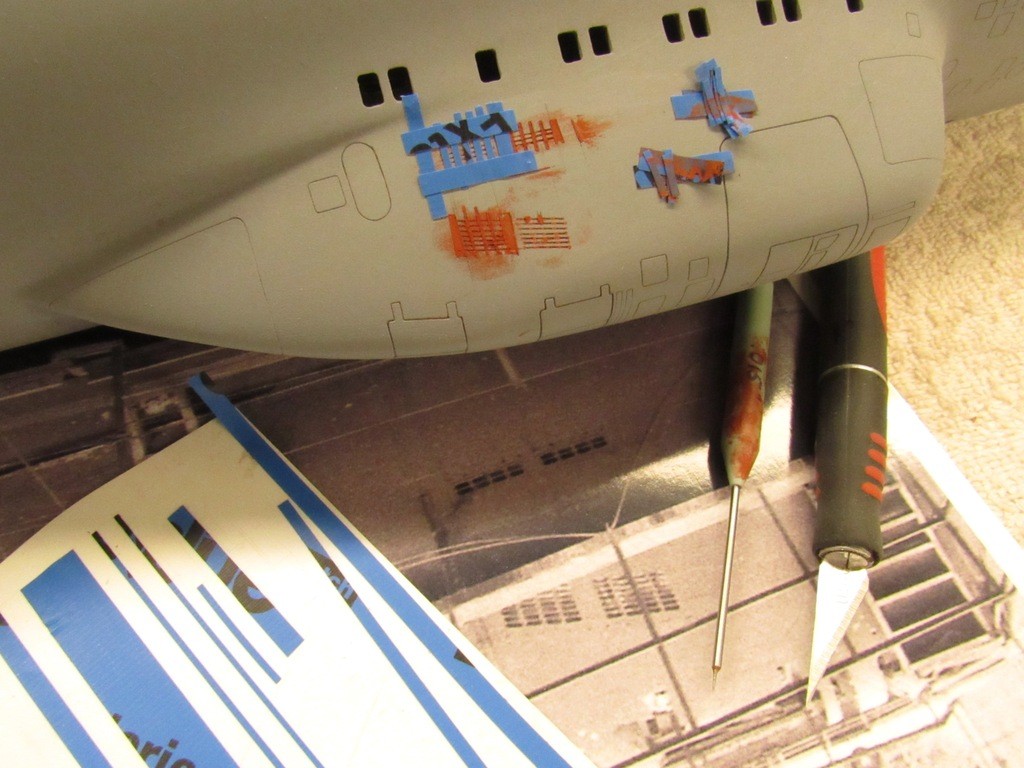
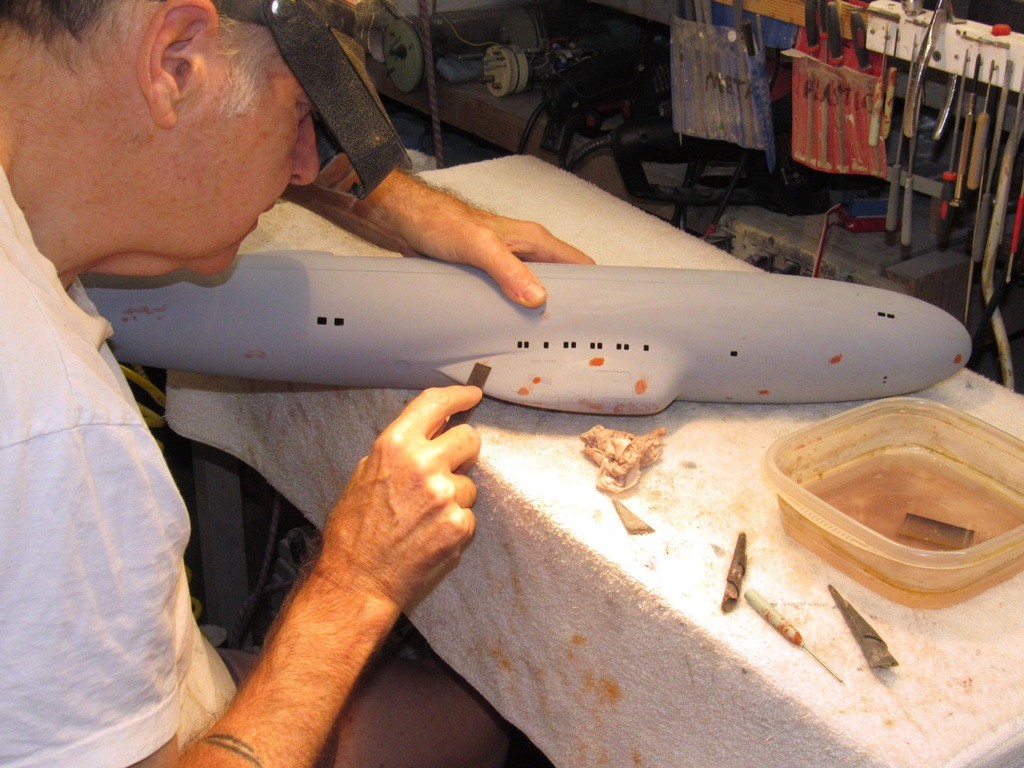
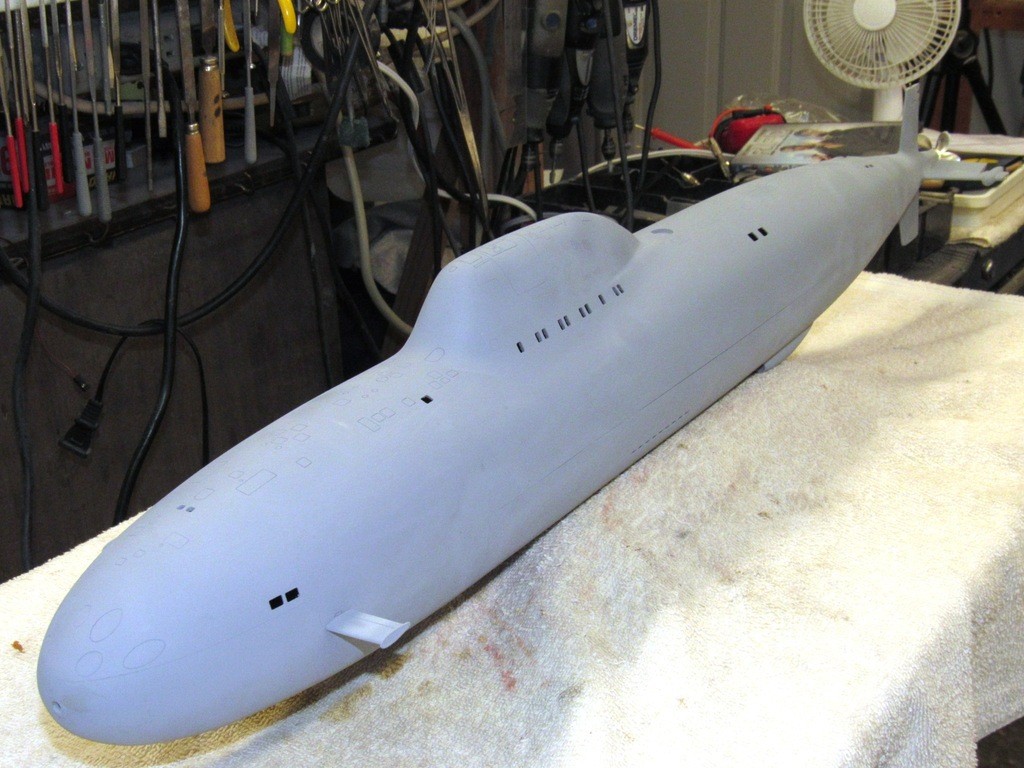
    You see such tool-marks, datum lines, and over-strikes on the surface of this model. They will be filled with putty and the scribe then used to remove the putty from the previously engraved lines.

    today's work CcwBCP

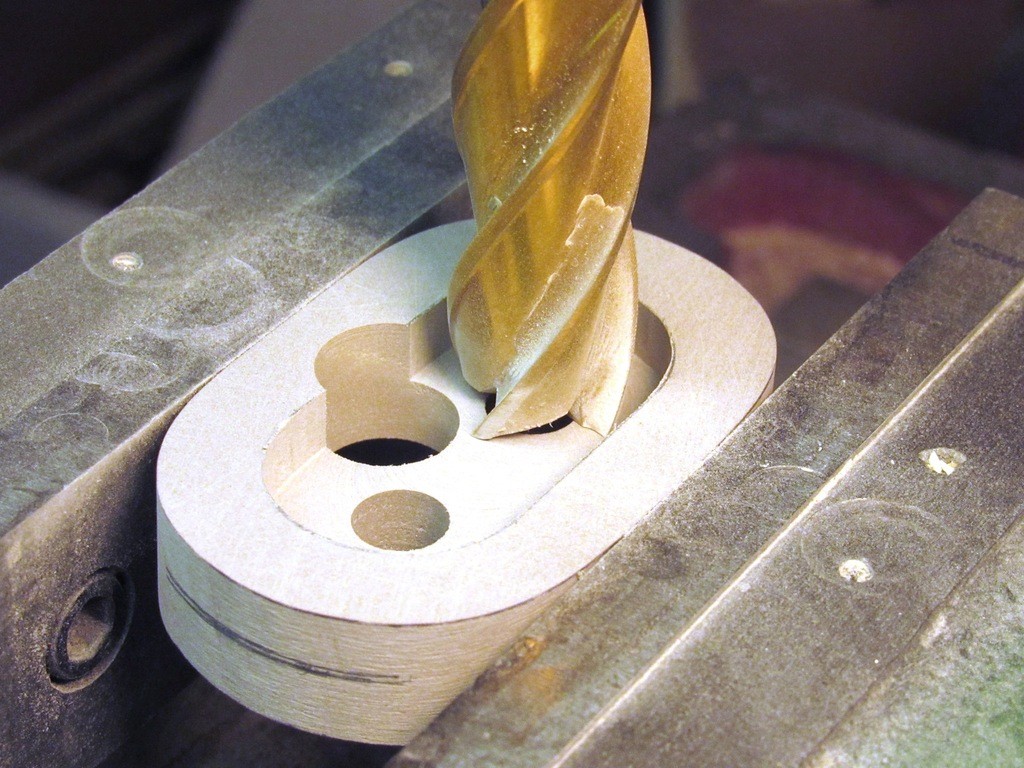
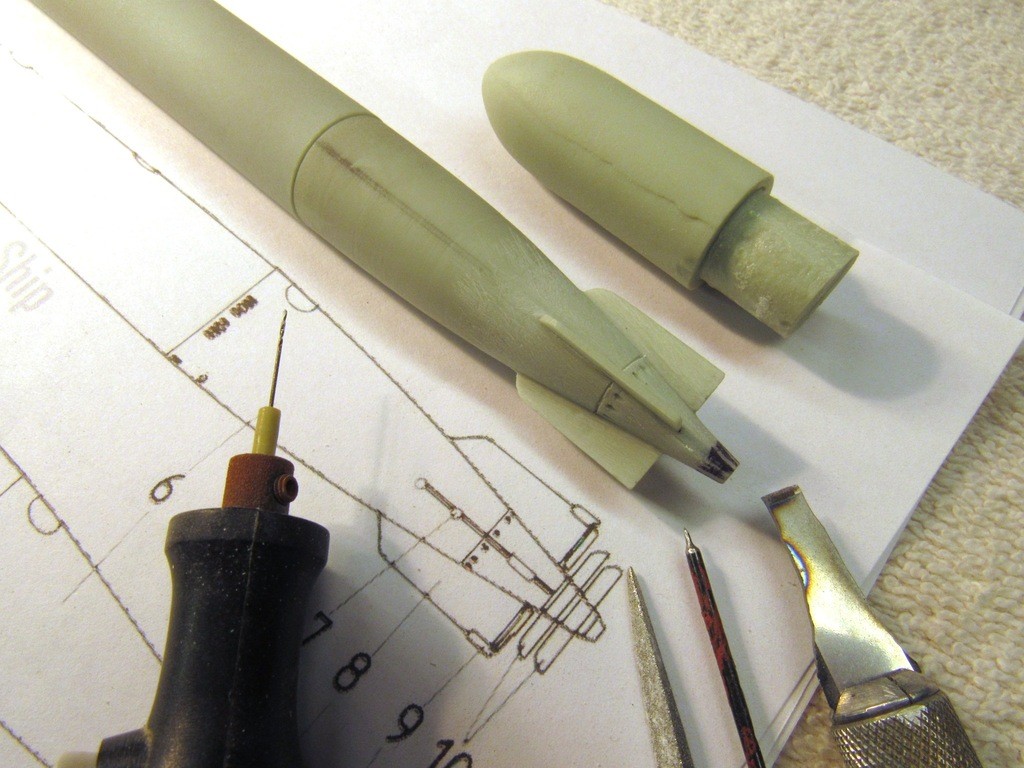
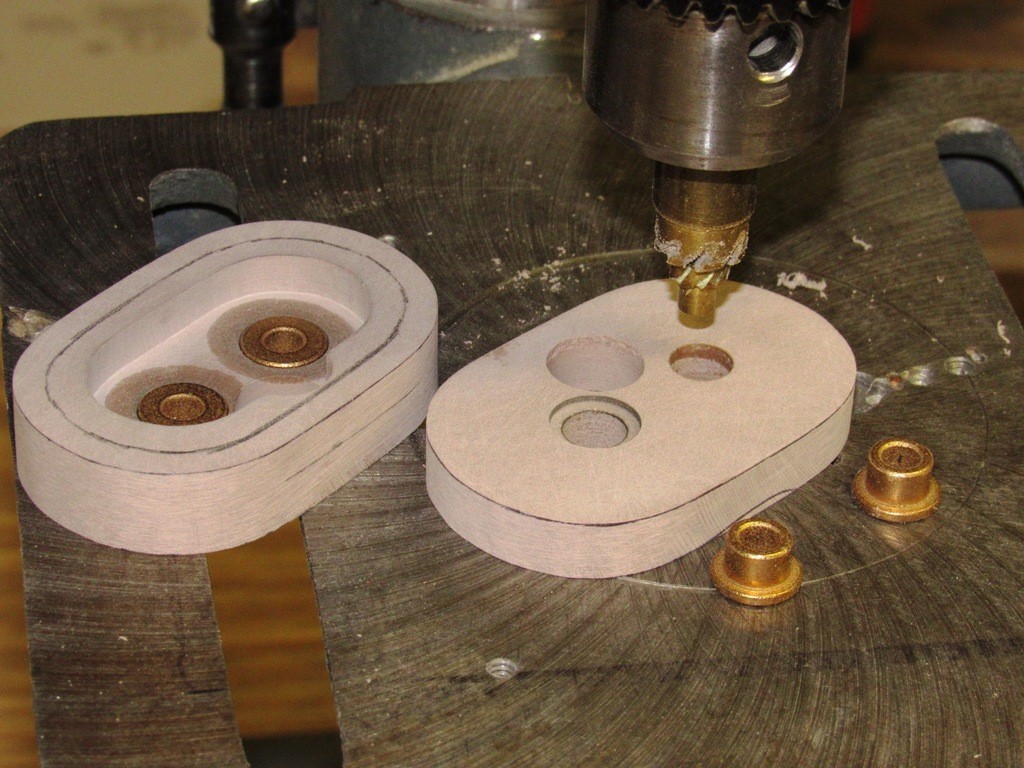
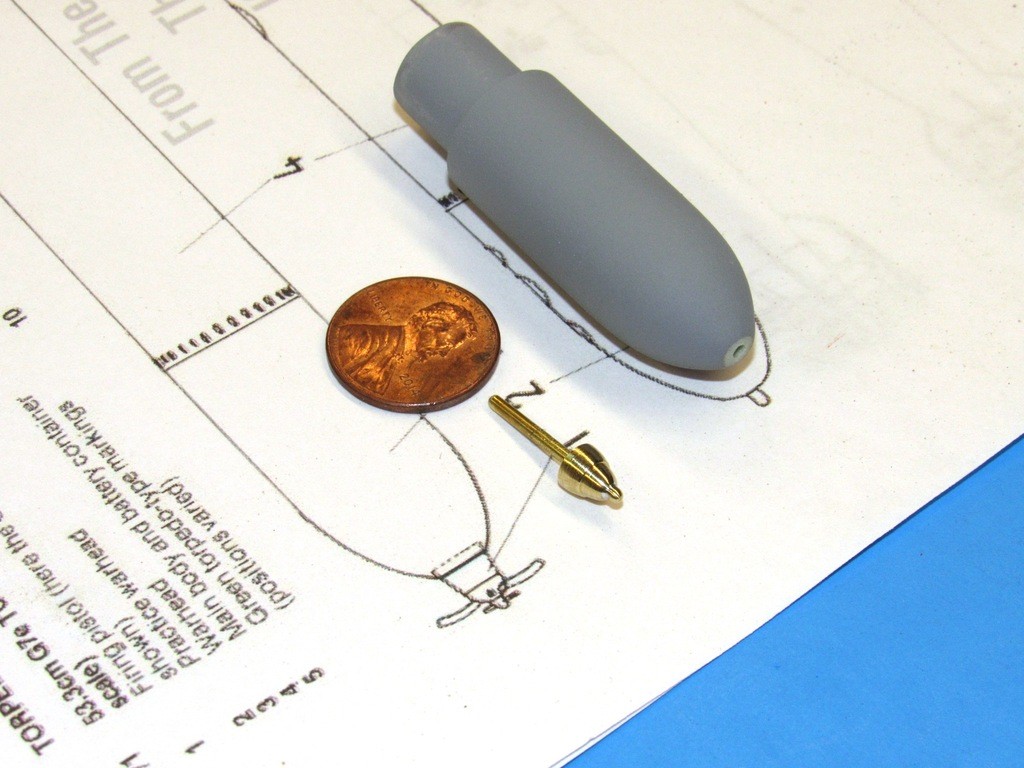
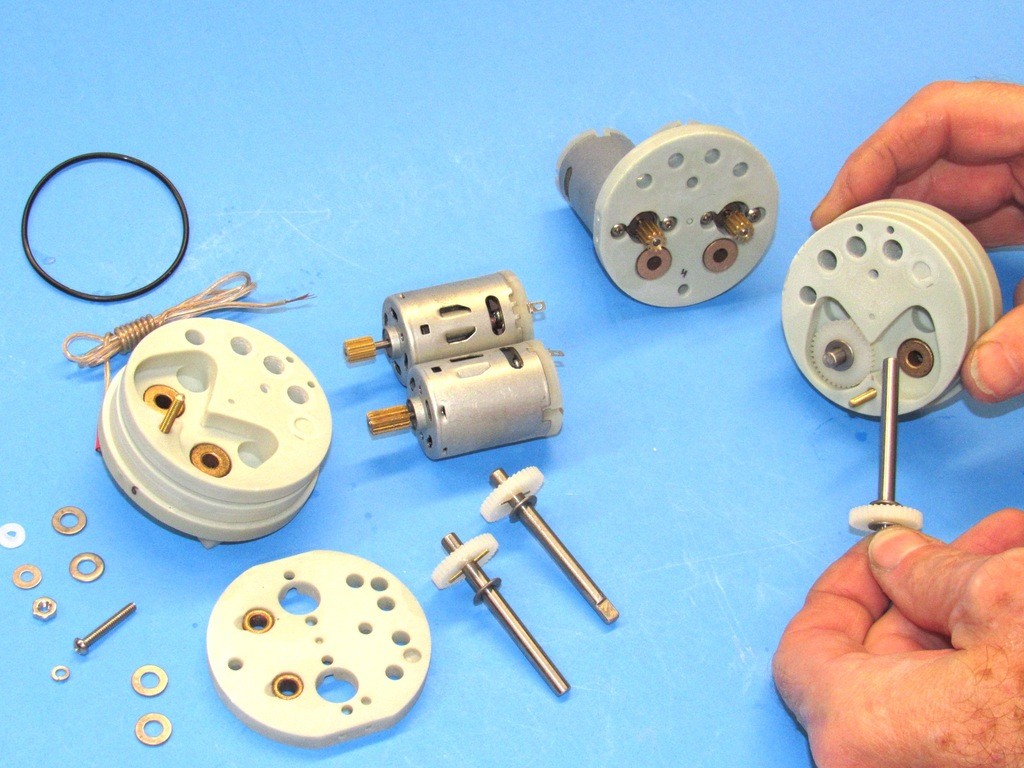
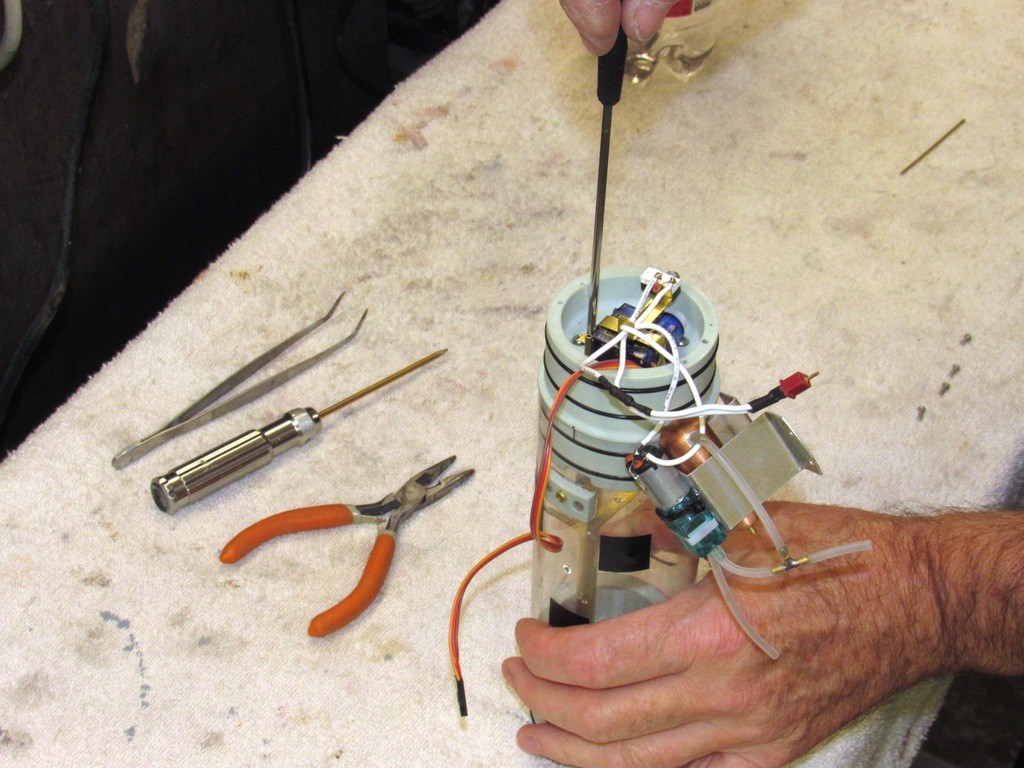
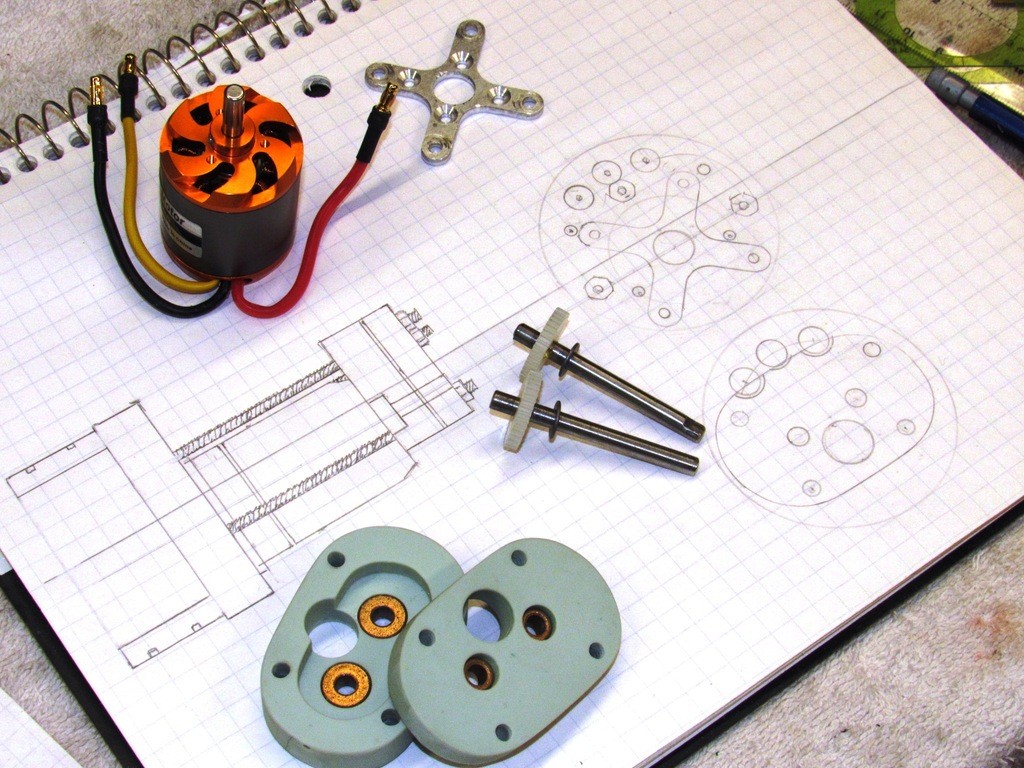
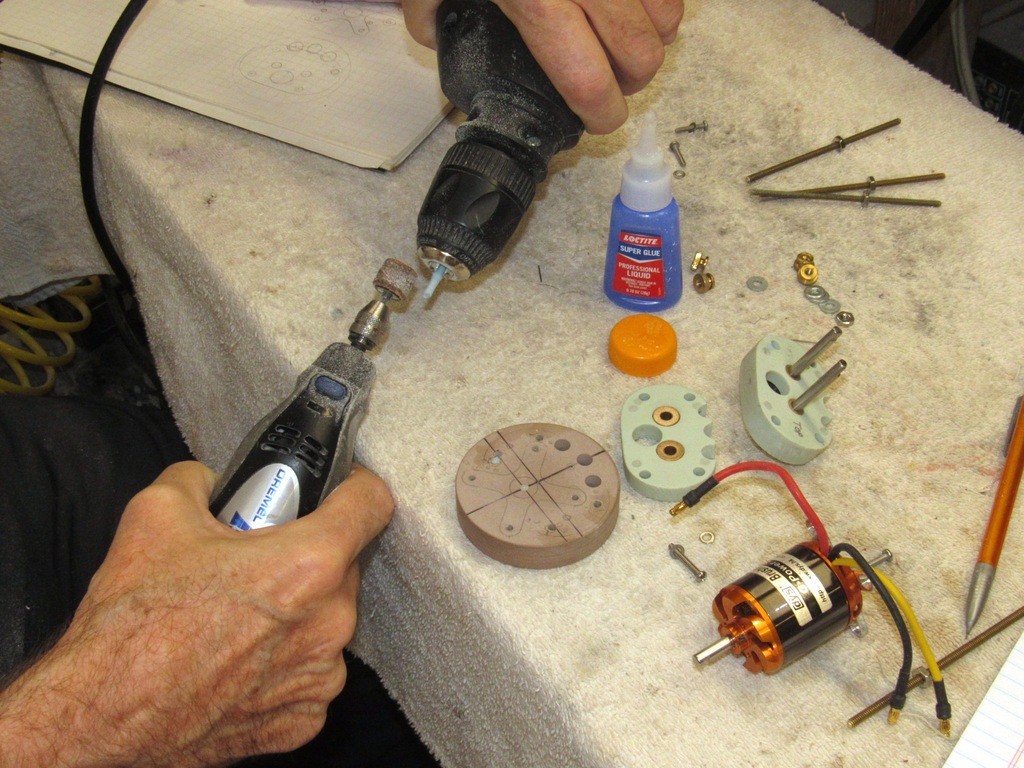
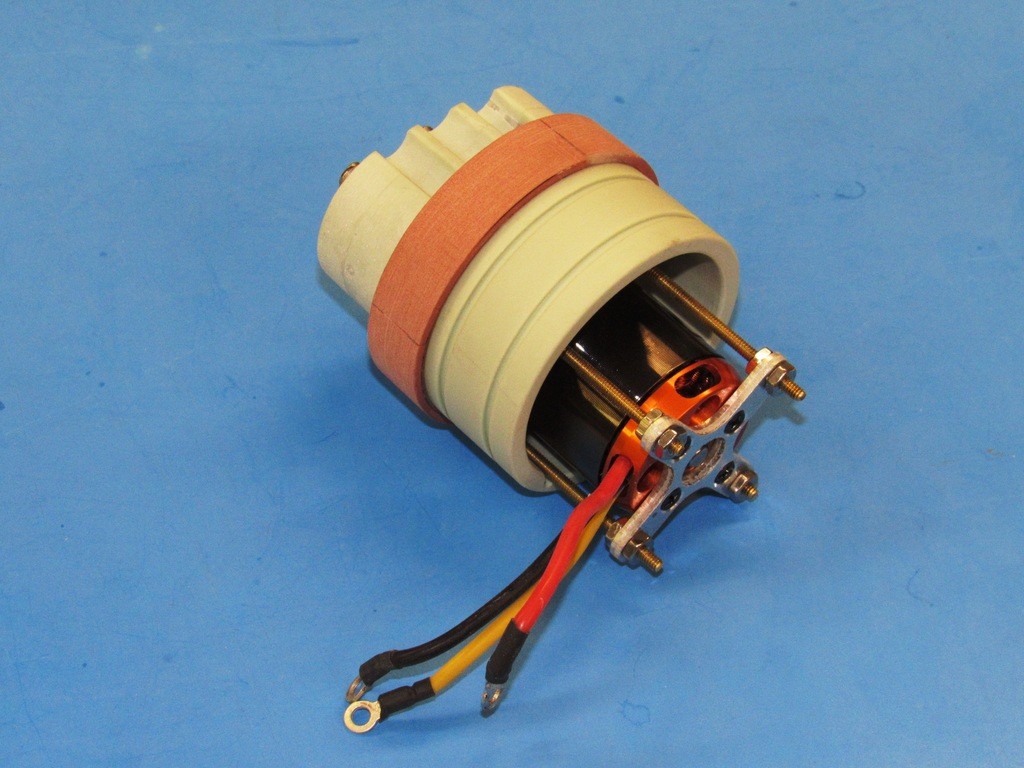
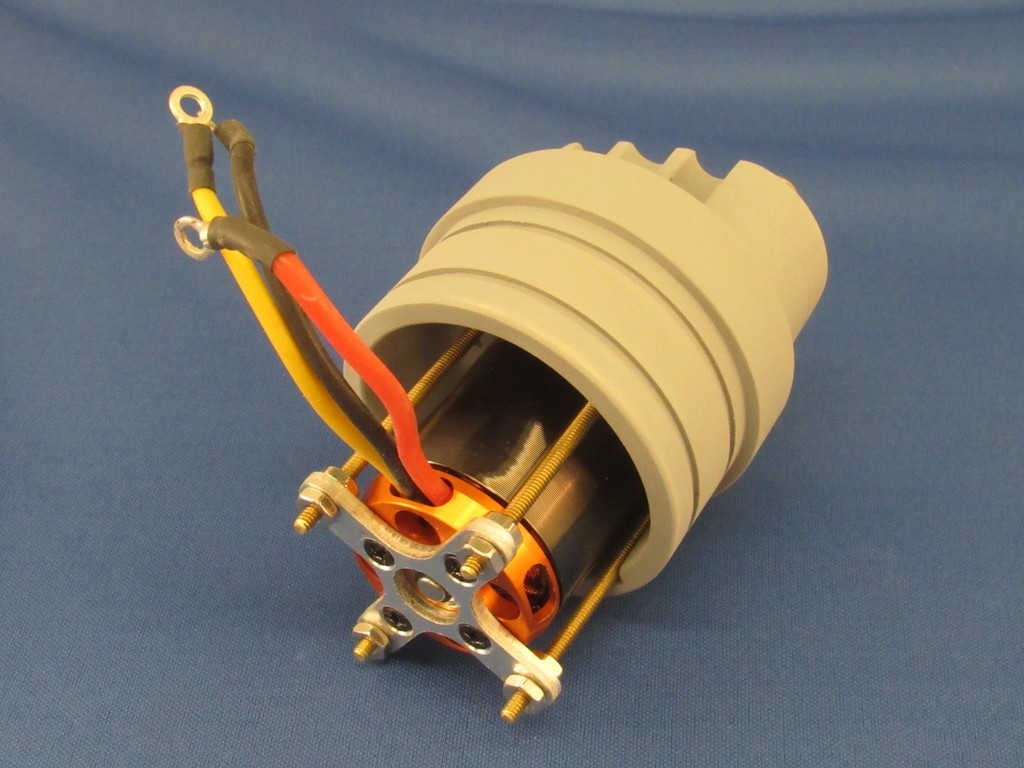
    Sometimes I will augment the scribing operation with a low-torque drill and small bits. In this case I first pressed oblique holes into the body of this torpedo master and refined them with the shank end of a small drill bit. Note the brass tube used as a spacing-drilling jig.

    today's work 8YxAmv

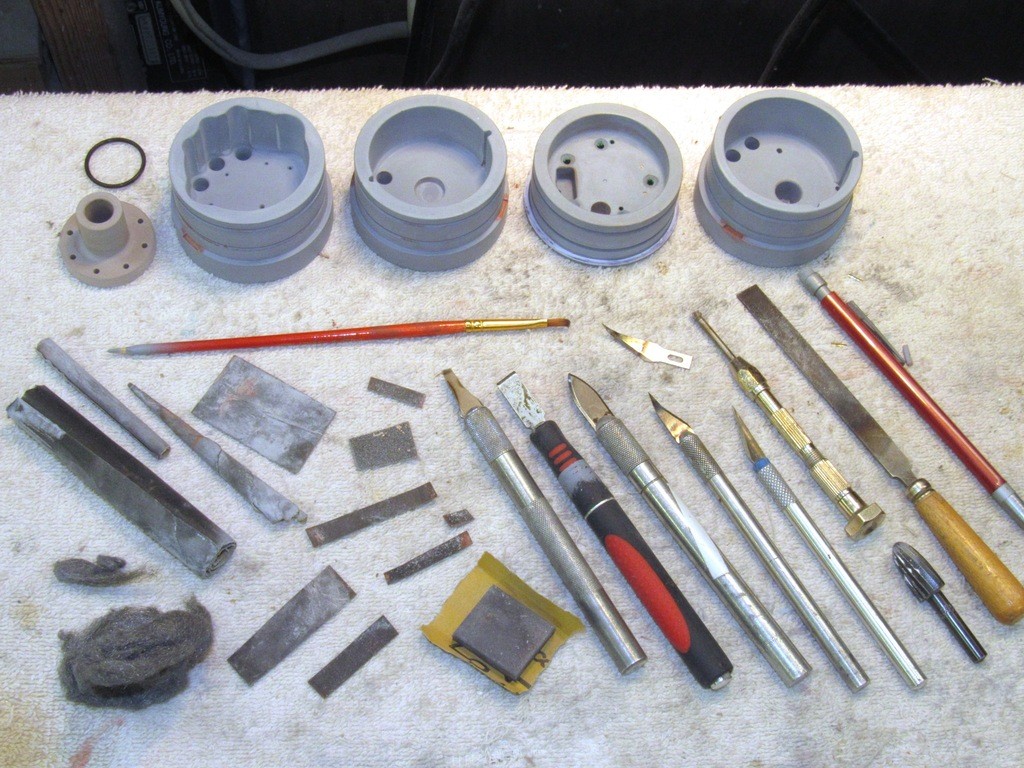
    The more exotic engraving tools are these punches/circle engravers. These tools are formed from brass tube with the working end sharpened. I serrate the ‘blade’ of the tube to give it the ability to function as a hand-held radial saw: I press the tool into the work and rotate it a few degrees, press hard again, and rotate, periodically removing the tool to determine the depth of the circle cut into the model. As you see, there are all sorts of diameters and metals used to fabricate this type tool.

    today's work DycXBH

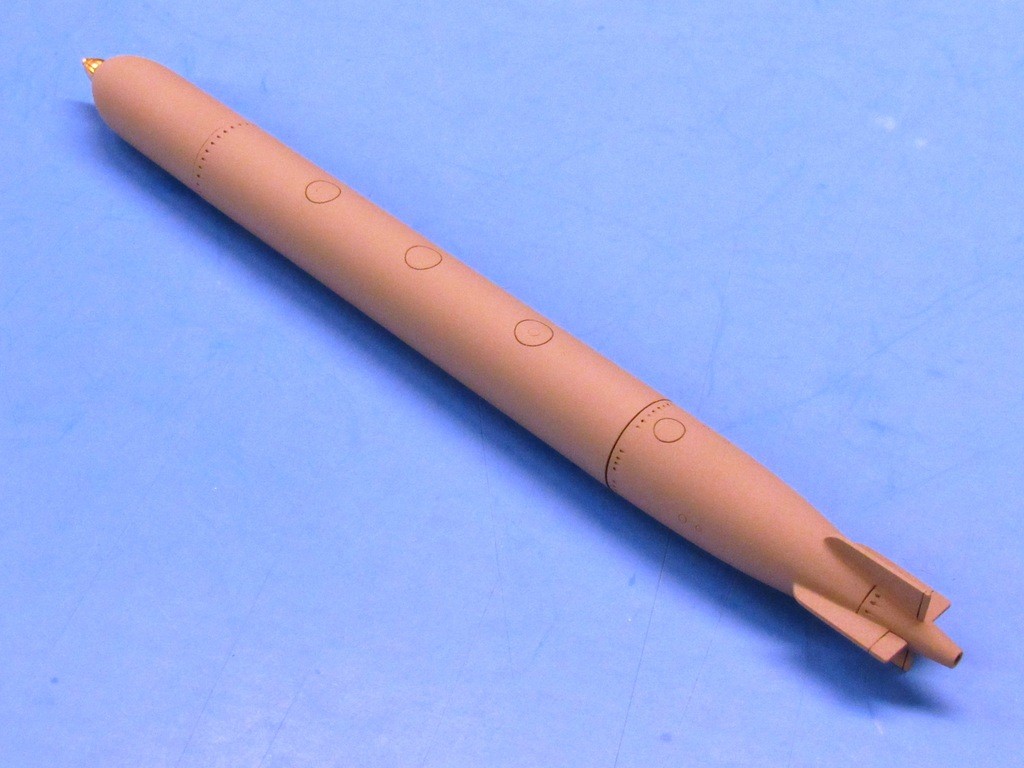
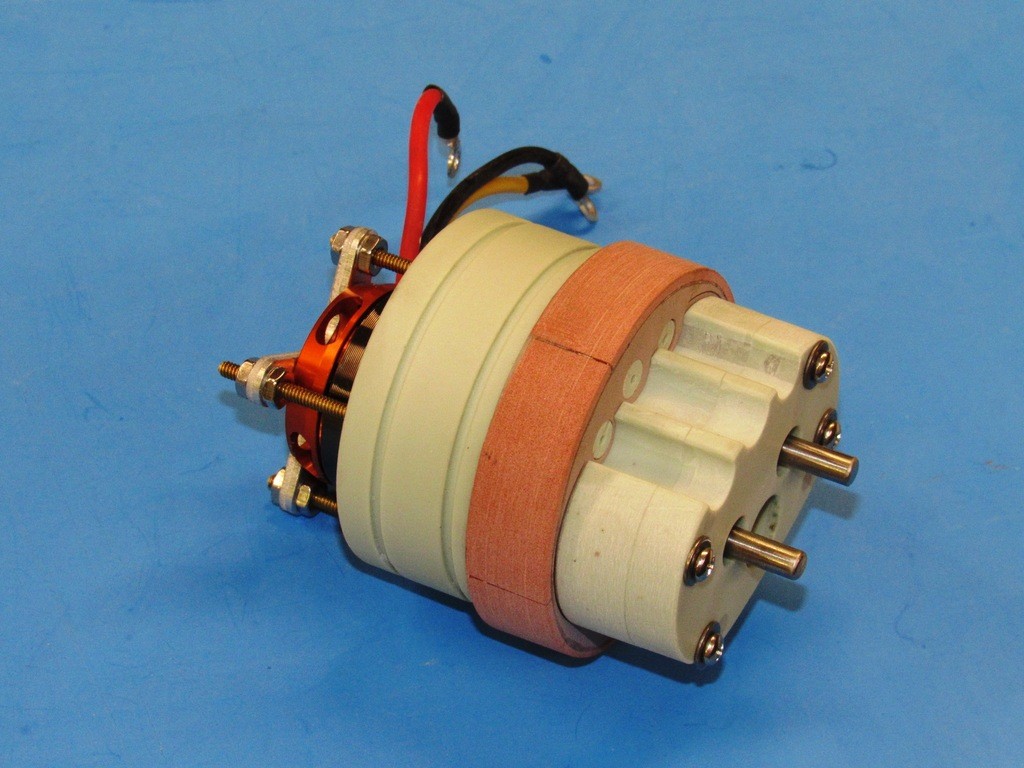
    However, for the larger circles that have to girdle a cylindrical body like this, it’s back to the stencil. Note how this thin stainless steel stencil easily bends to conform to the circumference of the torpedo body. The sandpaper I glued to the stencil serving me well here by preventing it slipping over the work as I press the scribing point tightly against the inside surfaces of the hole used to guide the tool.

    today's work JuPEBy

    BLADES   By blades I also include the sub-set of ‘cutting’ tool, the saw. The blade, or knife, is a cutting edge so shape that it forces the molecules that comprise a substance to break their bonds and to fracture along the draw of the blade. The knife induces a localized failure of the substrate. The blade leaves little kerf – material lost to the cutting process – but cannot be plunged too deeply into the work without encountering great resistance. However, the blade, pulled spanwise along the work will scrape material away and in this way works as an ablator.

    A saw, on the other hand, imparts many localized impact fractures (the teeth of the saw blade, each working as a gouge) causing localized failure of the substrate, little bits of which are thrown clear of the saw blade. A saw, unlike the blade, oblates the substrate. And in so doing produces a substantial kerf -- material lost to the thickness of the sawing blade. One has to account for this lost material during the layout process. Unlike a knife blade, a saw blade has the ability to dig deep into the work without experiencing an increase of resistance. Unlike the knife blade, the saw blade, because of the wide channel it cuts, relieves binding stress between the work and the saw blade.

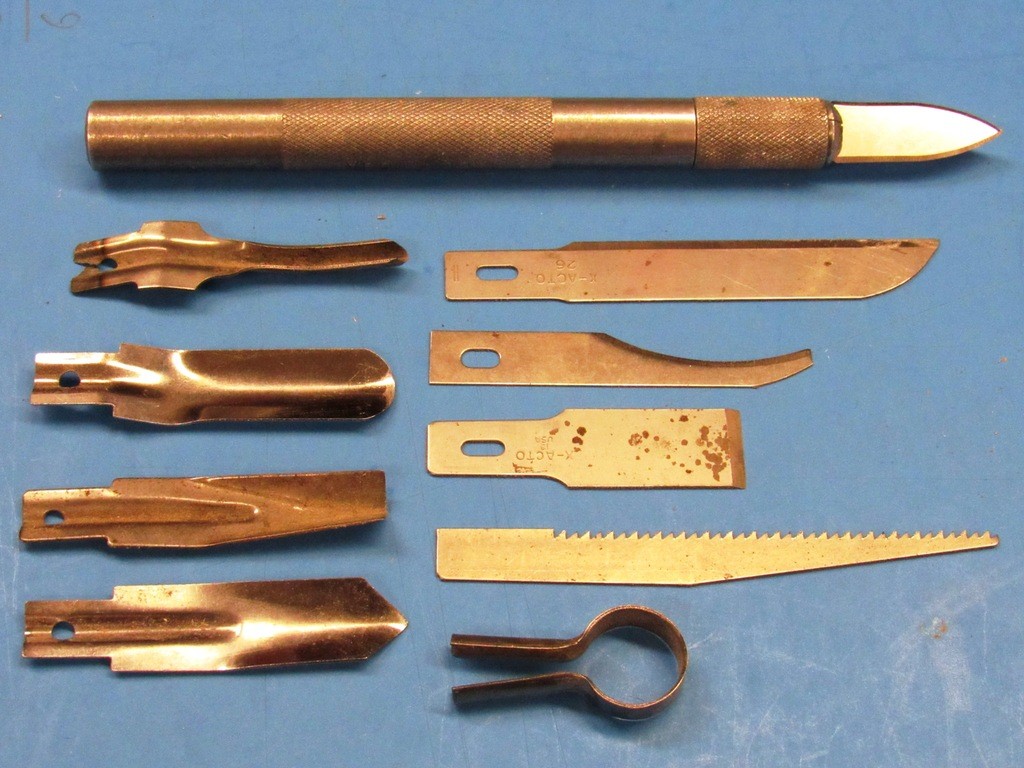
    OK. Below are typical commercially available X-Acto knife blades – these are representative of the bigger handle and blade types they offer.

    And here are modified X-Acto-blades, each to serve a specific purpose. They were ground and sometimes bent to suit the job at hand. Apparent here are the two sizes of handles and blades X-Acto offers. To the extreme right is their ‘swivel’ knife -- great for following tight radius stencils or free-handing some types of camouflage masks. These high carbon steel blades are easily bent once taken to a red-heat – once shaping is completed the blade is taken back to a red-heat and quickly quenched in water to restore its hardness.

    Here we see tools that work to saw, scribe, and cut the work. At the top is a simple hack saw blade; beneath it a knife; second from the bottom a razor saw blade set into a heavy brass handle for some ‘special’ work; and at the bottom a scribing tool.

    The four tools used to cut away the superstructure portion of this kits polystyrene hull. First, I scribe the separation line; then followed that engraved line with the knife to deepen the cut; followed by use of the razor saw which is steerable to large radius curves (those curves seen atop the bow of the model); and, finally, the hack saw to finish the job.

    Why the heavy brass handle on the razor saw? To ‘tune’ the tool to the job, that’s why. If you can get a cutting tool to resonate just right you will increase its cutting action substantially. Play with a tools shank or handle length and weight and, if you’re lucky, you’ll achieve this little slice of model-builders nirvana. More art than science.

    today's work JzGtOx

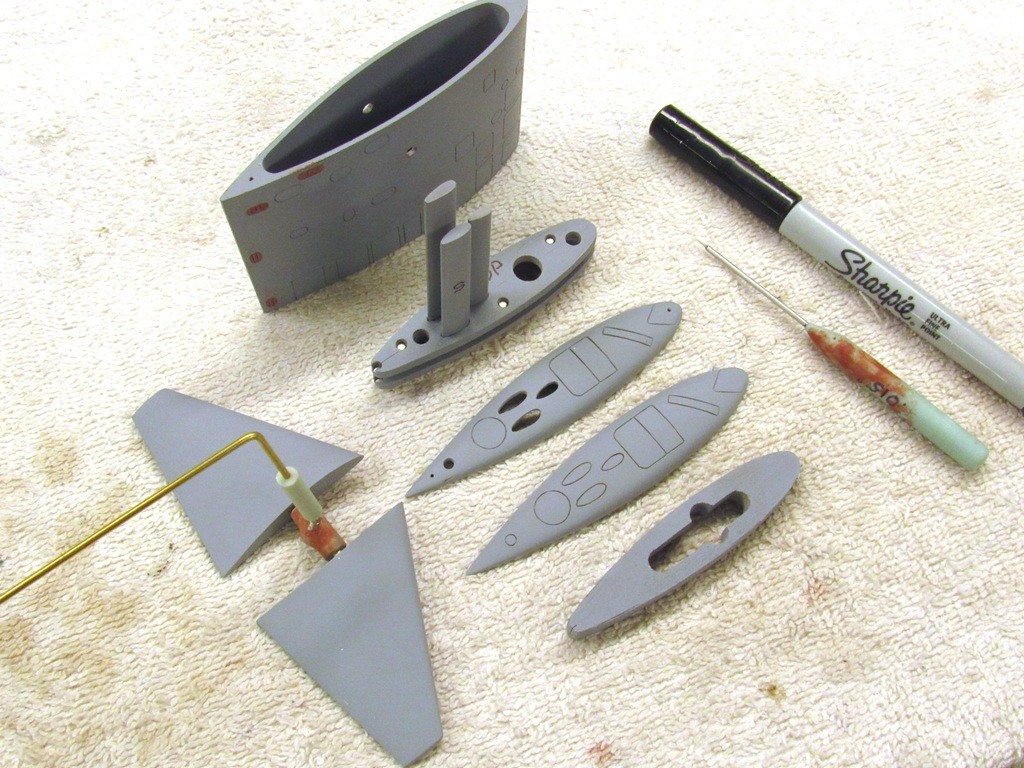
    These circular cutting tools are of the gouging type and are ideal for cutting concave trenches in the work. They are used to form the concave nesting trench within the trailing edge of a stabilizer that accepts the rounded leading edge of its rotating control surface. These tools are quickly made from brass tube. Note the sheet brass ‘handle’ soldered to the tool – to make pushing and guiding the circular cutting tool a relatively easy task.

    today's work EUVlOV

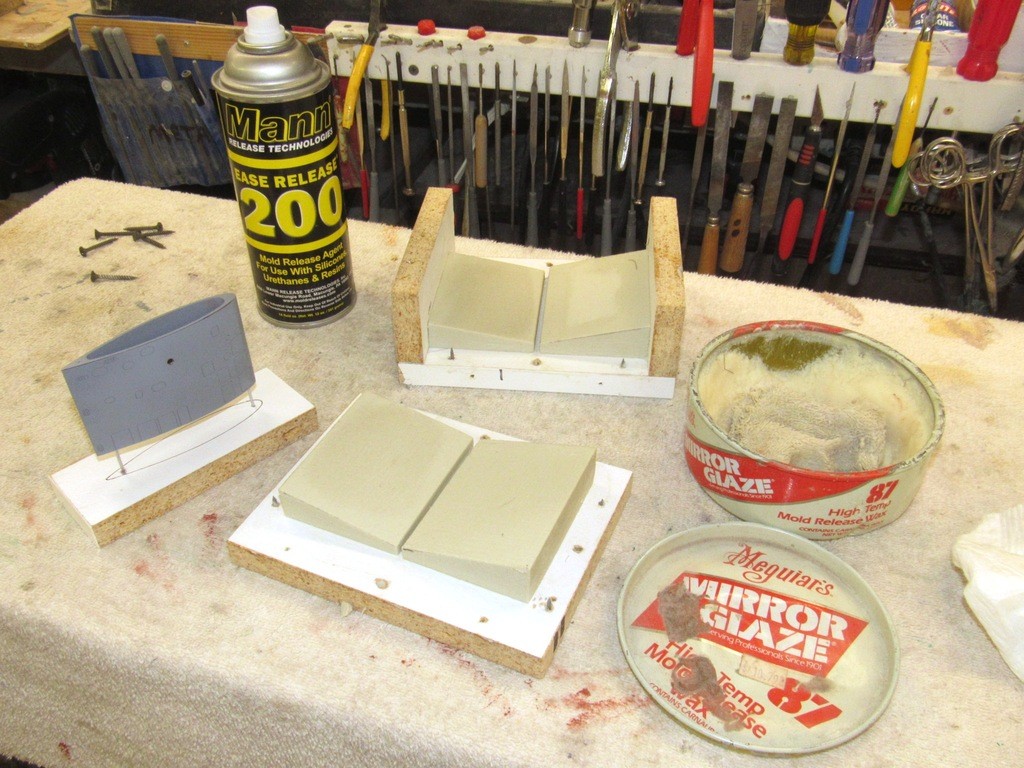
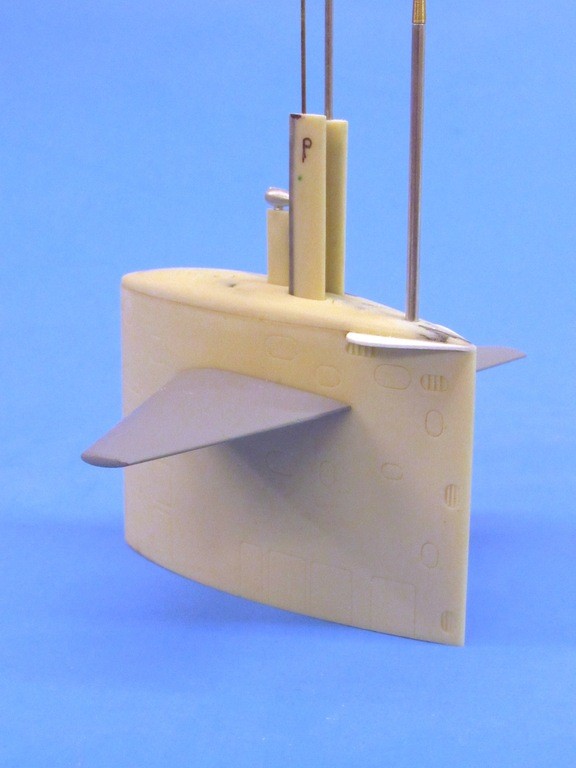
    Special cutting tools, here several types of ‘gouges’ have been ground to shape using standard X-Acto blades as blanks. Each of these tools serves a specific job on these little louvers I’m cutting into the trailing edge of this submarine sail master.
    The right tool for the right job!

    today's work LR2boH

    Initial shaping of the blade is done on the bench mounted grinding wheel. Final shaping is done with a hand held Carbide cut-off wheel spun in the chuck of a Dremel moto-tool. The blade is brought to razor sharpness with a wet-stone.

    today's work DSKeov
    merriman
    merriman
    Guest


    Posts : 347
    Join date : 2011-10-16
    Age : 75
    Location : Virginia Beach, Virginia

    today's work Empty Re: today's work

    Post  merriman Thu Dec 19, 2019 2:56 am

    today's work 77lB9G

    today's work SbQTVK

    today's work 1WIKLW

    today's work 4JcT4i

    today's work D7TQ8U

    today's work 21IaTi

    merriman
    merriman
    Guest


    Posts : 347
    Join date : 2011-10-16
    Age : 75
    Location : Virginia Beach, Virginia

    today's work Empty Re: today's work

    Post  merriman Sat Dec 21, 2019 10:56 pm

    today's work X6QIx4
    today's work Jw6B3Q
    today's work UxXHFM
    today's work 11KYoB
    today's work 0qm3ej
    today's work EhZlQH

    today's work XuXmXH

    today's work YFHX4i

    today's work BW17i3

    today's work Tic5nM

    today's work QVqBA9

    today's work D1RaLQ

    today's work GVhHWY

    today's work LB1iHf
    merriman
    merriman
    Guest


    Posts : 347
    Join date : 2011-10-16
    Age : 75
    Location : Virginia Beach, Virginia

    today's work Empty Re: today's work

    Post  merriman Mon Dec 23, 2019 12:45 am

    I've completed most of the grunt-work on the masters of a motor bulkhead that will mount a brushless propulsion motor for one of our SubDriver r/c submarine systems. I use the raw masters to check fit and operation in mock-up form. Once everything is working as planned (best laid plans … and all that happy horse-shit), I refine the finish of the masters and turn them into rubber tooling from which production items will be cast.

    today's work SwsMLk

    today's work KvIErr

    today's work FLfVBO

    today's work H4KUR4

    today's work QLBbMa

    today's work IE1nwZ

    today's work 7N3wiL

    today's work KFicCy

    today's work ZT9jNo

    David
    merriman
    merriman
    Guest


    Posts : 347
    Join date : 2011-10-16
    Age : 75
    Location : Virginia Beach, Virginia

    today's work Empty Re: today's work

    Post  merriman Tue Dec 24, 2019 4:47 am

    This version of the motor-bulkhead puts the motor in the water. Suspended aft of the motor is a gear splitter which outputs two counter-rotation shafts from the single motor input. This is still in the mock-up stage where I check fit and non-interference of the parts. I have yet to add the radial flange.

    today's work 41rL09

    today's work UpBEg3

    today's work B20yvm

    today's work HdYpR5

    today's work KqVQ6W

    today's work X8XoxU

    today's work CBLYzt

    today's work URFzkP
    merriman
    merriman
    Guest


    Posts : 347
    Join date : 2011-10-16
    Age : 75
    Location : Virginia Beach, Virginia

    today's work Empty Re: today's work

    Post  merriman Thu Dec 26, 2019 3:34 am

    today's work FN8Xc9

    today's work ErwICb

    today's work CGhPbW

    today's work Uuetzy

    today's work OpmzOA

    today's work 9p0wuS

    today's work ARH6KL

    today's work DvBfB0

    today's work 9Yw0AU

    today's work ZoccZq
    merriman
    merriman
    Guest


    Posts : 347
    Join date : 2011-10-16
    Age : 75
    Location : Virginia Beach, Virginia

    today's work Empty Re: today's work

    Post  merriman Fri Dec 27, 2019 2:12 am

    I'm just about ready to use these Modular SubDriver bulkhead masters to give form to the rubber tools from which cast resin production parts will be produced. Some last-minute machining, putty work, wet-sanding, primer, and things are now good to go. Fine with me, I'm sick of this grunt work, I want to get back to proper model-building, damnit! I use them to mock-up a practical demonstrator -- this is the stage where you want to find faults, not after you've committed to production tooling!

    today's work N5kt6P

    today's work Skd4e0

    today's work N2zhAs

    today's work YzmyVC

    Last item on the MSD work list is this forward bulkhead used to give access to the forward dry space where the battery is stored. We wanted to provide the option of outfitting this bulkhead with two servos -- some customers would rather take the direct route with their linkages rather than run a long pushrod forward from the motor bulkhead mounted servos. Typical items needing r/c activation at the bow include bow plane, bow plane retract/deploy, anchor, and torpedo launching.

    today's work AN8tac

    today's work OCXWUJ

    today's work JnBK48

    today's work QPg3vP

    today's work SzsIbR

    today's work Bsnz10
    merriman
    merriman
    Guest


    Posts : 347
    Join date : 2011-10-16
    Age : 75
    Location : Virginia Beach, Virginia

    today's work Empty Re: today's work

    Post  merriman Sat Dec 28, 2019 2:17 am

    We’re familiar with the trick of bending a straight piece of plastic or soft metal rod, be it square, hexagonal, or other cross-section shape. You just pinch the rod between thumb and forefinger, and pull through with the other hand at an angle and so doing impart a constant radius curve to the rod; the more radical the angle, the tighter the radius. I wanted to fatten the flange on one of the masters and required a ‘circle’ of styrene strip that would be bonded to the existing flange.

    To keep the wide strip from twisting away from the desired curl I pulled it through a circular channel cut into a big wooden dowel. Three passes of the plastic strip and I had the circle required, which was then super glued to the flange, building it up to the desired thickness.

    Clamps held the circular piece of strip to the flange as I applied the glue. As the added strip was a bit bigger in diameter than needed, I trimmed it back on the lathe.

    today's work 5cCmtU

    today's work UtDvfF

    today's work YsVBo3

    today's work KyEy0q

    I spent the afternoon getting the modular SubDriver bulkheads, and gear-splitter masters ready for tool making. Some putty work, sanding, and setting each master in a clay backing.

    today's work B9rXCD

    today's work QkMv9U

    The clay creating the separation plane between the eventual two halves of the rubber tool used to make the cast resin parts. The face of the masking clay dimpled to form a network of registration keys in the rubber that would insure proper alignment of the tool halves. Containments (flasks) of Lexan cylinder and masking tape would hold the catalyzed rubber as it cured from liquid to solid.

    today's work C8DKay

    today's work 2ZyDr7

    today's work TZWbGF

    today's work PozZ67


    merriman
    merriman
    Guest


    Posts : 347
    Join date : 2011-10-16
    Age : 75
    Location : Virginia Beach, Virginia

    today's work Empty Re: today's work

    Post  merriman Sun Dec 29, 2019 1:29 am

    The last half of the two-part tools poured and cured, the masters were removed and placed into safe storage for possible future use. I then cut out the sprue and riser cavities, and the tools were ready for use.

    My client directed me to denote this new product with a proprietary color (or, if you will, no color at all), gray. Breaking out the tint I doped a sample quantity of my production resin and made the first shot of the new tools with this … ugh! … color. I dub thee, 'puke gray'!

    today's work 3VGfAm

    today's work XFwNPB

    today's work R6qJD7

    The tools were filled with catalyzed resin, pressurized, and once the castings were hard enough, they were extracted from their respective tools.

    today's work EjkB3J

    today's work BP4qBQ

    today's work JfNeEW


    merriman
    merriman
    Guest


    Posts : 347
    Join date : 2011-10-16
    Age : 75
    Location : Virginia Beach, Virginia

    today's work Empty Re: today's work

    Post  merriman Tue Dec 31, 2019 4:05 am

    Time had come to find a model submarine to serve as a test-mule for this new type SubDriver.

    I selected a nearly completed 1/72 scale THRESHER class model that has been sitting on the wall for a few years waiting for me to finish it. Now was the time.

    Here I'm preparing the sail master by fitting it inside a flask. The job of the flask is to contain the rubber that forms the tool (mold) and give it rigidity during the eventual casting process. The trick is to make the flask stout, but of a geometry that will prevent excessive use of the expensive tool making rubber.

    The best way I've found of determining how much rubber to prepare is to first pour rice into the flask, with master in place, to the desired level, then pour the rice into the rubber mixing pail and mark the level of the rice. That tells me how much rubber to use. Neat trick I got from a local chapter of the Nautical Research Guild. A rather stuffy group of old farts, but populated by some real sharp model-builders.

    today's work SNW7ye

    today's work RrdEej

    today's work 8LTrP6

    today's work EMmasc

    today's work MeNsir

    And this is when the wheels came off!

    My over forty-year-old Vigor (they make machines and tools for the Jewelry trade) vacuum de-airing machine shit-the-bed! One use of this vital shop tools is to deair entrapped bubbles in the thick rubber mix before pouring it into a flask. Failure to do so will result in entrapped bubbles in the hardened rubber, which will evidence as positive dimples on the surface of a pressure cast resin piece. Can't have that! Must fix … must fix now!

    I took the machine apart and found that the coupler between vacuum pump and motor had stripped out. I've ordered replacement parts, but can't wait. I've got jobs to get out of here! So, I ran over to Harbor Freight -- I LOVE HARBOR FREIGHT! -- bought a cheapy low CFM vacuum pump and pressed it into service using the old Vigor's table, plumbing, and bell-jar.

    Back in business!

    today's work YQjMcc

    today's work OrR7HB

    today's work THKG7y

    today's work UwNfZg

    today's work YnrZbA

    All fixy-poo, I went on to finish the THRESHER sail tooling by claying up the smaller sail masters. One sail top representing retracted masts, the other sail top representing extended masts; internal platforms; and masts. I'll pour the rubber to complete the sail tooling tomorrow, I'm dead tired and its getting late.

    today's work 00e0nX

    today's work XJEFr3

    today's work KJIvz9
    merriman
    merriman
    Guest


    Posts : 347
    Join date : 2011-10-16
    Age : 75
    Location : Virginia Beach, Virginia

    today's work Empty Re: today's work

    Post  merriman Wed Jan 01, 2020 5:06 am

    The test-mule for the new modular SubDriver will be this 1/72 THRESHER class model that has been sitting idle for a few years. I'm now working to complete it to the point where it will be water ready and outfitted with the MSD for a proper evaluation of the system. I've also included a shot of a previously completed model to show you what it will eventually look like.

    My model is based on the HMK Creations kit produced by Joel Stadnick. Though it's not currently in production there is talk of it being re-introduced to the market with new features.

    today's work DkOA5j

    today's work JvuAJJ

    I spent the last two days finishing up the tooling for all the parts that make up the 'improved' sail structure. And from that I produced the cast resin parts, just a few hours ago. Tomorrow I assemble a sail unit and integrate it with the hull.

    today's work YzyIOo

    today's work ETb5gF

    today's work QKGKLZ

    today's work UL8GFe

    today's work IXLMNo

    today's work GnCkNF

    today's work FHVDYh

    today's work SgPpZh
    merriman
    merriman
    Guest


    Posts : 347
    Join date : 2011-10-16
    Age : 75
    Location : Virginia Beach, Virginia

    today's work Empty Re: today's work

    Post  merriman Fri Jan 03, 2020 1:11 am

    I took the cast resin sail parts and stuck them together. Assembly was straight forward: the three internal platforms were glued within the sail, the sail top piece (the one with the openings through which the raised mast fairings project) glued atop the main structure, and two holes drilled and tapped at the bottom platform to accept the screws that would pass up through the upper hull to secure the sail in place.

    today's work 4vX73V

    A simple poster-board alignment jig insured I sanded the base of the sail so it would sit level atop the upper hull. Any significant gaps between sail top and sail proper were filled with CA and flashed to hardness with either a sprinkling of baking soda or a good wetting with 'accelerator', followed by careful file work.

    today's work FSwC3A

    today's work 0NdhmJ

    today's work Oo2Npq

    The engraved lines on the kits upper hull were not up to my standard: though an appreciated attempt the hull featured both non-skid and waterline cheat-lines -- these were way too deep and had to be filled to the point were once the model is painted, those cheat-lines will be barely perceptible. I spent the entire day using circular cutters and scratch awls to dress up the original work. Lots of putty to fill dings errors and overly aggressive cheat-lines. Once dry the excess putty was knocked down through some spot wet-sanding, followed by careful re-scribing.

    today's work J7gHh3

    today's work 32vFRq

    today's work 1vVYg3


    merriman
    merriman
    Guest


    Posts : 347
    Join date : 2011-10-16
    Age : 75
    Location : Virginia Beach, Virginia

    today's work Empty Re: today's work

    Post  merriman Mon Jan 06, 2020 2:36 am

    Spent the better part of the weekend building duplicate tools so I could get into series production of the Modular SubDriver parts.

    today's work QFud5W

    today's work VWiyIA

    today's work PLYNnq

    While waiting for the new rubber tools to cure I streamlined the methodology of reducing the diameter of my demonic metric brushless motor shafts to God's own Imperil standard of shaft size. In this case reducing the useless 5mm to a more rational 3/16" diameter. Gotta love tungsten tipped cutting tools! The masking tape keeps the metal chips away from the rotors internal magnets as I shaved down the stainless steel shaft. The object of the exercise was to match the motors shaft to my standard drive-shaft watertight seal.

    today's work YuHGvz

    today's work OFL2mp

    Most of today was spent casting resin parts from the tools. I'll spend this week machining these bulkheads to fit Lexan cylinder and then integrate things into proper MSD's for my customer, Nautilus Drydocks. They wanted me to adopt a proprietary 'color' for this new product. We agreed on gray. you'll note that I played with various shades of gray to give my boss a choice.

    today's work 7k8UUh

    today's work JEISSl


    david f
    david f
    AMS Treasurer


    Posts : 2400
    Join date : 2010-11-10
    Age : 73
    Location : Cumbria

    today's work Empty Re: today's work

    Post  david f Mon Jan 06, 2020 9:38 am

    Very interested to see you turning down stainless steel motor shafts. Not for the faint hearted!

    Great work.

    David

      Current date/time is Fri May 10, 2024 2:14 am