


Fantastic work. It shows great attention to details.
Who is online?
In total there are 2 users online :: 0 Registered, 0 Hidden and 2 Guests :: 1 Bot
None
Most users ever online was 180 on Tue Nov 05, 2019 6:03 am
Latest topics
Search
Most Viewed Topics
Statistics
Our users have posted a total of 12449 messages in 1981 subjects
We have 1010 registered users
The newest registered user is Chris Shelley
Similar topics
+6
John Wrennall
merriman
david f
Dr.Schmidt
bwi
tattooed
10 posters
Akula 1/144 scratch build

Tom(ADMIN)- AMS Forum Owner
- Posts : 3026
Join date : 2010-11-05
Age : 64
Location : Nevada, USA


bwi- AMS member
- Posts : 81
Join date : 2015-01-17
Location : Belgium
Thks Tom!
Grtz,
Bart
Grtz,
Bart
bwi- AMS member
- Posts : 81
Join date : 2015-01-17
Location : Belgium
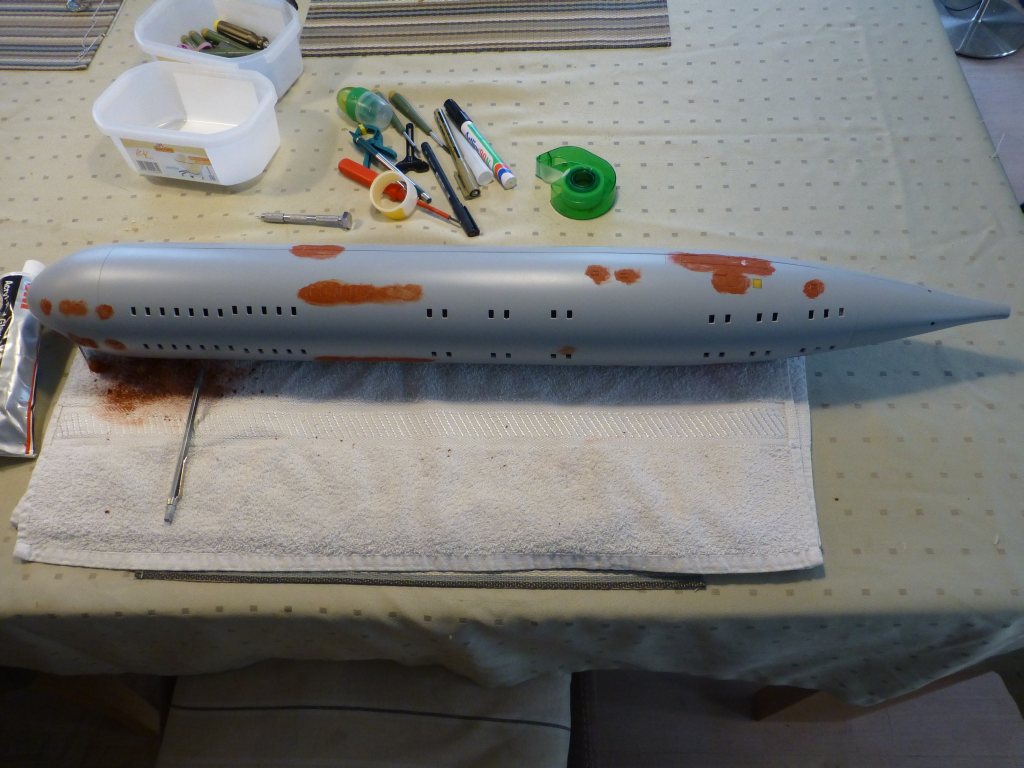
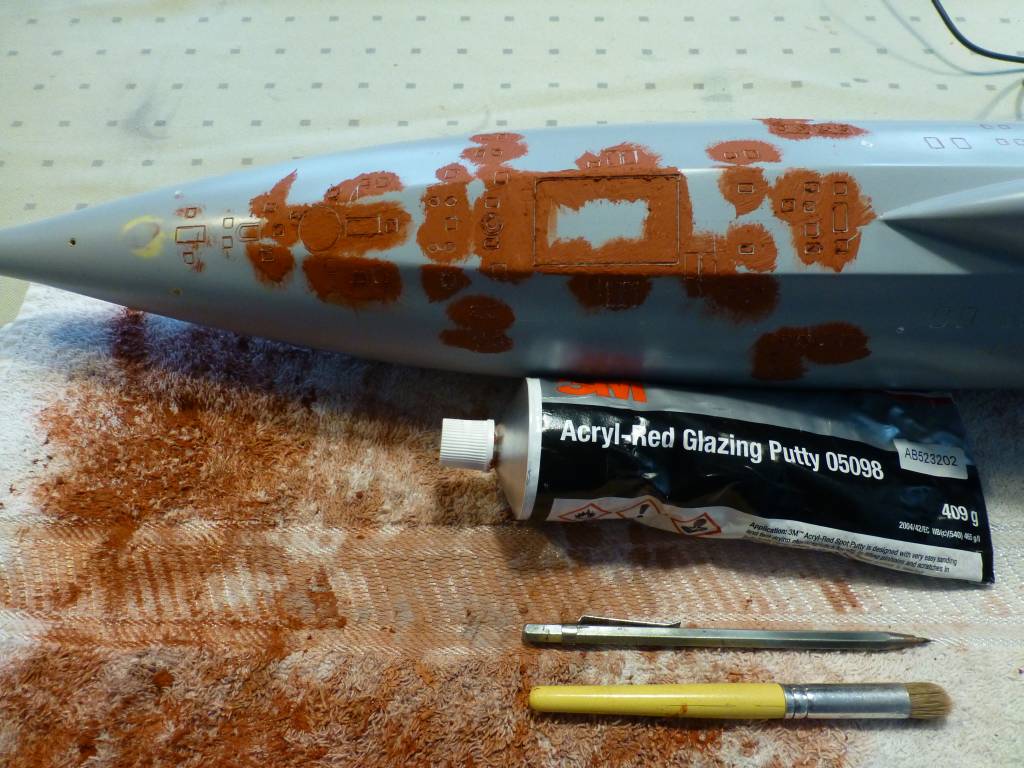
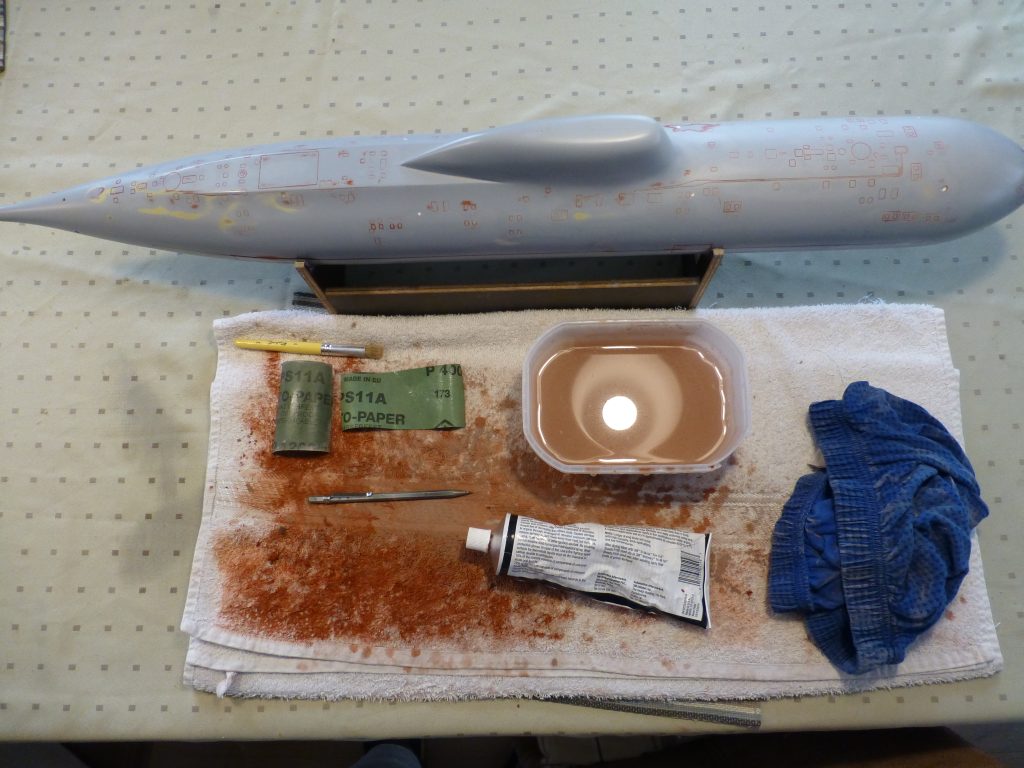
I did the touchup of the scribing lines (thks to Andrew Lawrence I found the right putty that does not affect the paint) ......time consuming but afterwards I was amazed with the amount of damage that became visible when it was filled with red putty (most of the damage were broken off paint chips around the edges).Its was worth the effort.
Grtz,
Bart


Grtz,
Bart
bwi- AMS member
- Posts : 81
Join date : 2015-01-17
Location : Belgium
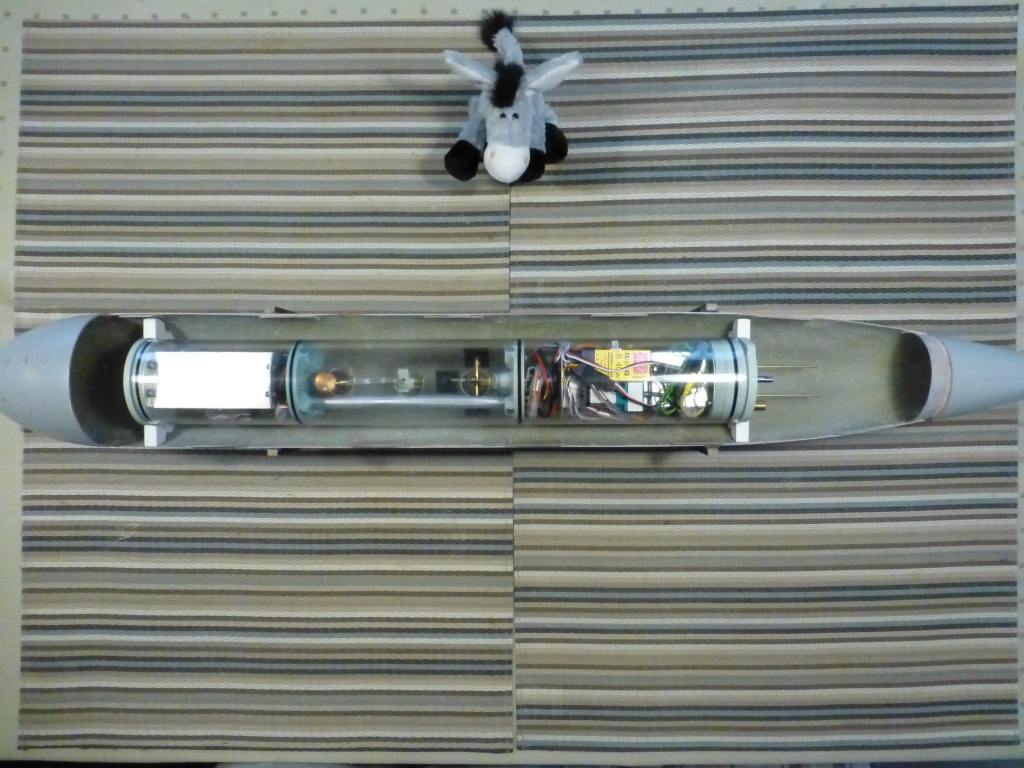
Made the saddles for the SD. The saddles are made of 9mm styrene sheet (3 pieces of 3mm glued/melted together).
I will provide some hooks in the saddles to keep the SD pushed in the saddles with rubber bands, yep that's why they are 9mm wide, need some flesh to screw the hooks in.
They are both provided with a recess, to prevent the longitudinal movement of the SD, and when the SD is placed in the sub it will always sit in the same position.
As my SD is hanging, the saddles are partly above the water in surfaced condition. So I needed to keep the weight of the saddles as low as possible. The lift capacity of the SD is limited, I previous calculated I have some spare but I need to keep things light above the waterline. That’s why I drilled some holes in it, 25 gr (0.88 oz) together, not bad at all.
To let prevent air pockets when diving I provided some channels on the edges of the saddles. One suggestion drill the holes before you cut out the desired shape of the saddles else you will not be able to drill those holes i.w.o. the edges.
And YES I thought about it before I made the cut
Grtz,
Bart
bwi- AMS member
- Posts : 81
Join date : 2015-01-17
Location : Belgium
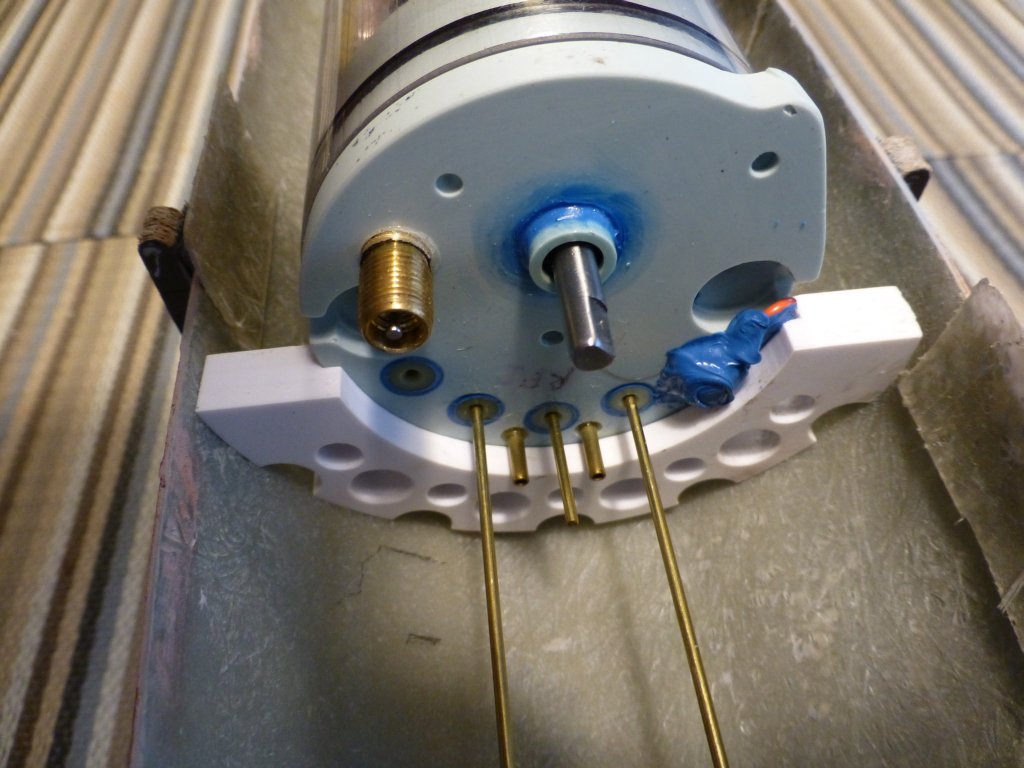
Design and fabrication progress of the bow planes linkages. Two days’ work…….......need one more day to finish it
Grtz,
Bart
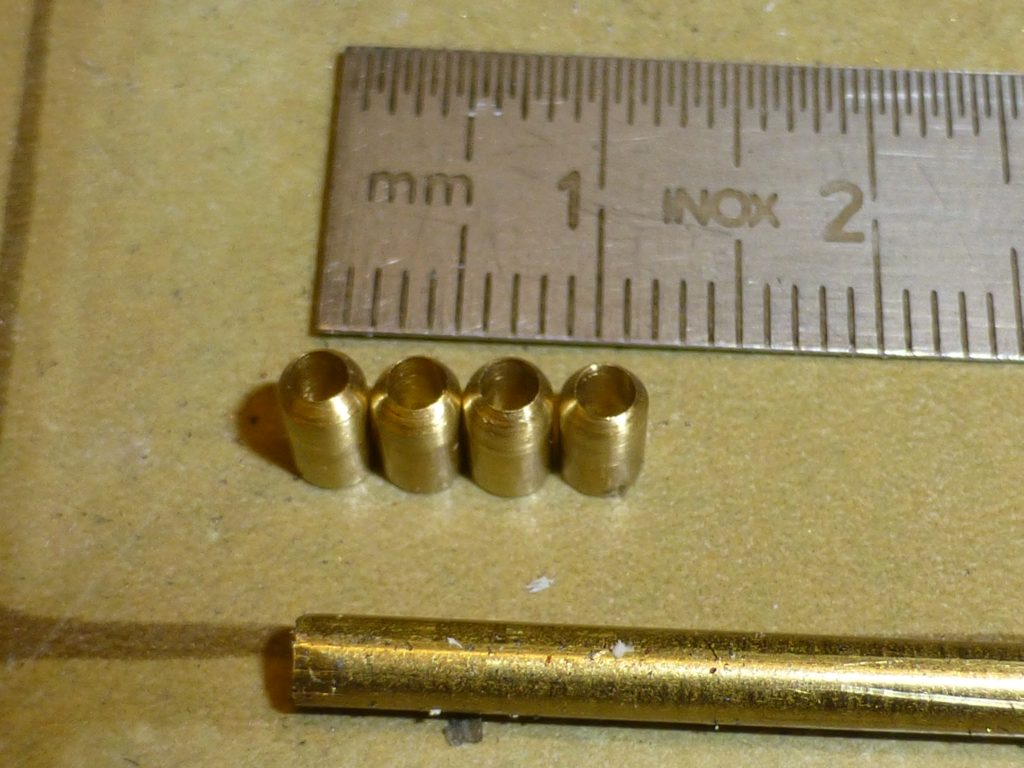
Bushings:
Bushings dia 3mm, bore dia 2mm length 5mm

Supports:
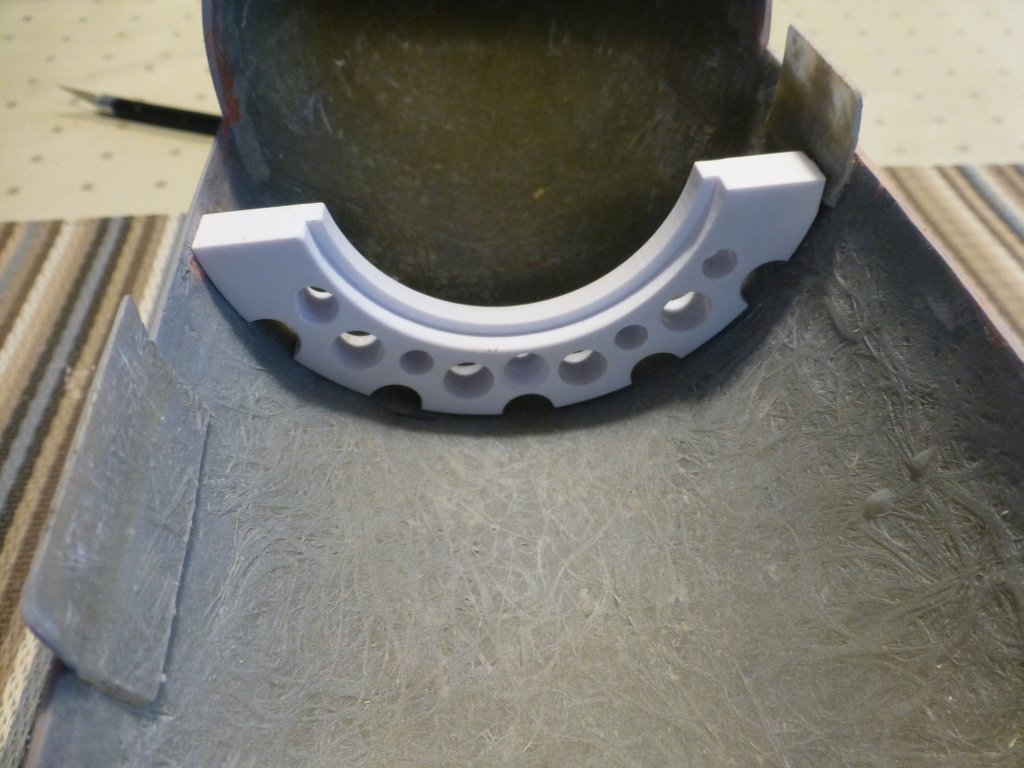
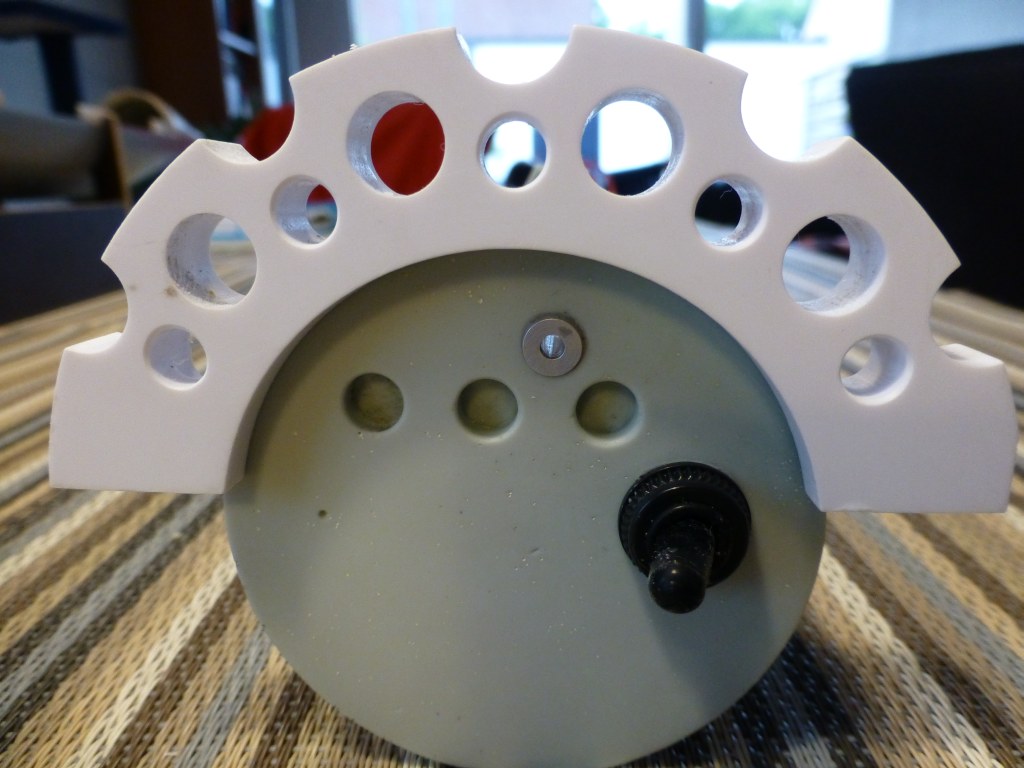
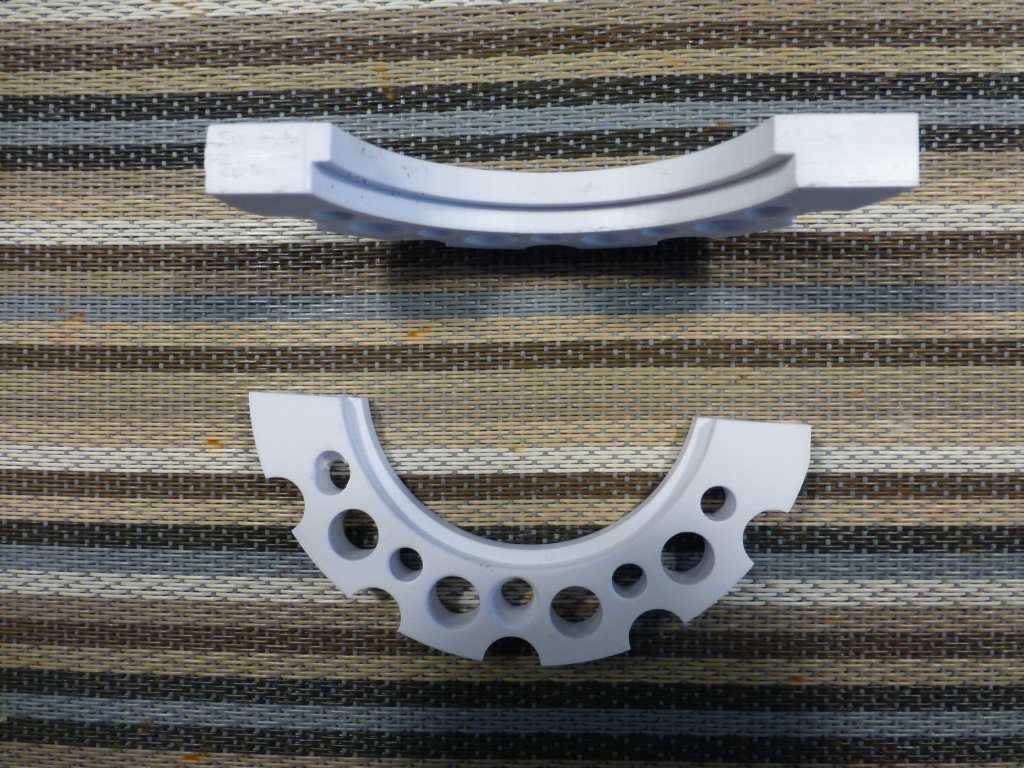
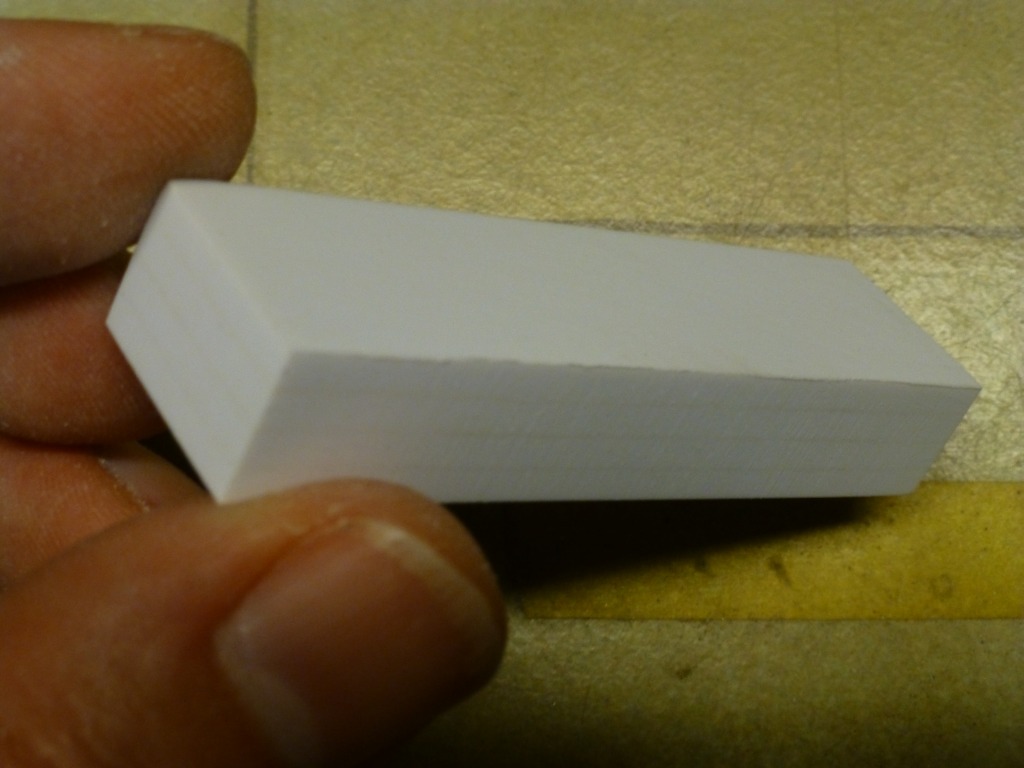
Everything starts with making the required materials, 4 pc of 3mm styrene glued together to the required thickness of 12mm. Sanded everything square/perpendicular so I had a good base to start with. Strange shape? No I have to give room to the Fwd index lip of the lower hull, see below for the assembly.
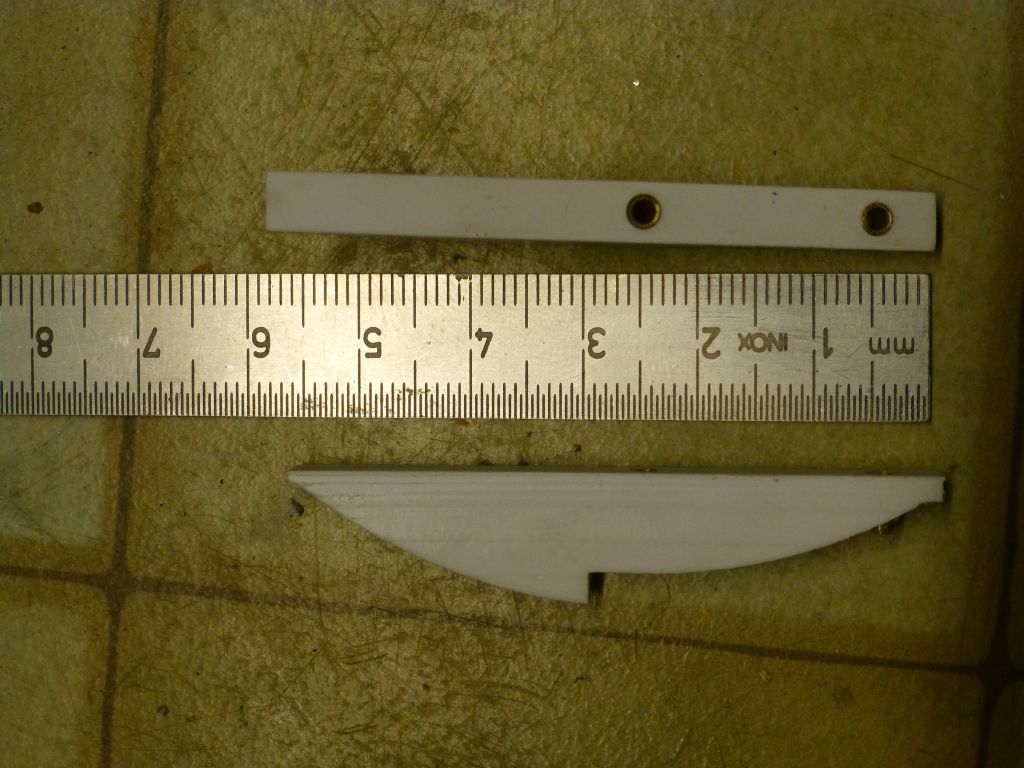
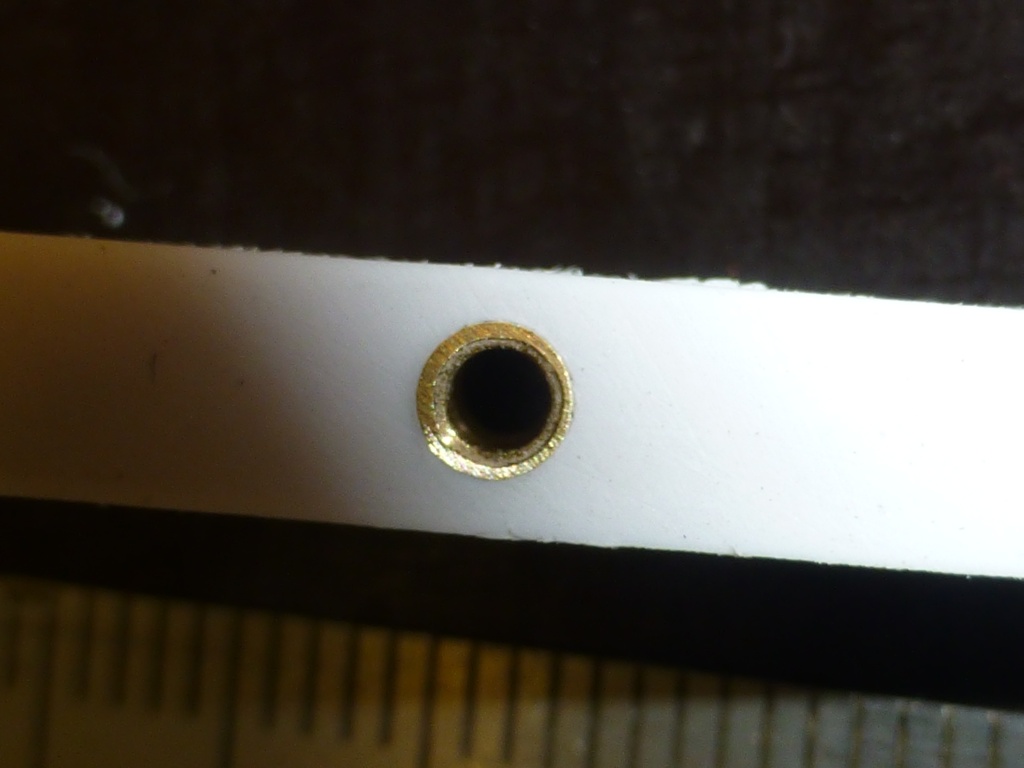
Cut out the desired shape, provided with 3mm bores to take the bushings.

Bell-cranks:
made out styrene sheet, provided with a 2mm bore in the center piece and the arms are provided with a 1.5mm bore. Pitch is 10mm except the one with the longer arm pitch of that one is 15mm, will see which one I will use (probably the one with the 10mm pitch. That will give me app 30° deflection as per David Merriman's instructions.

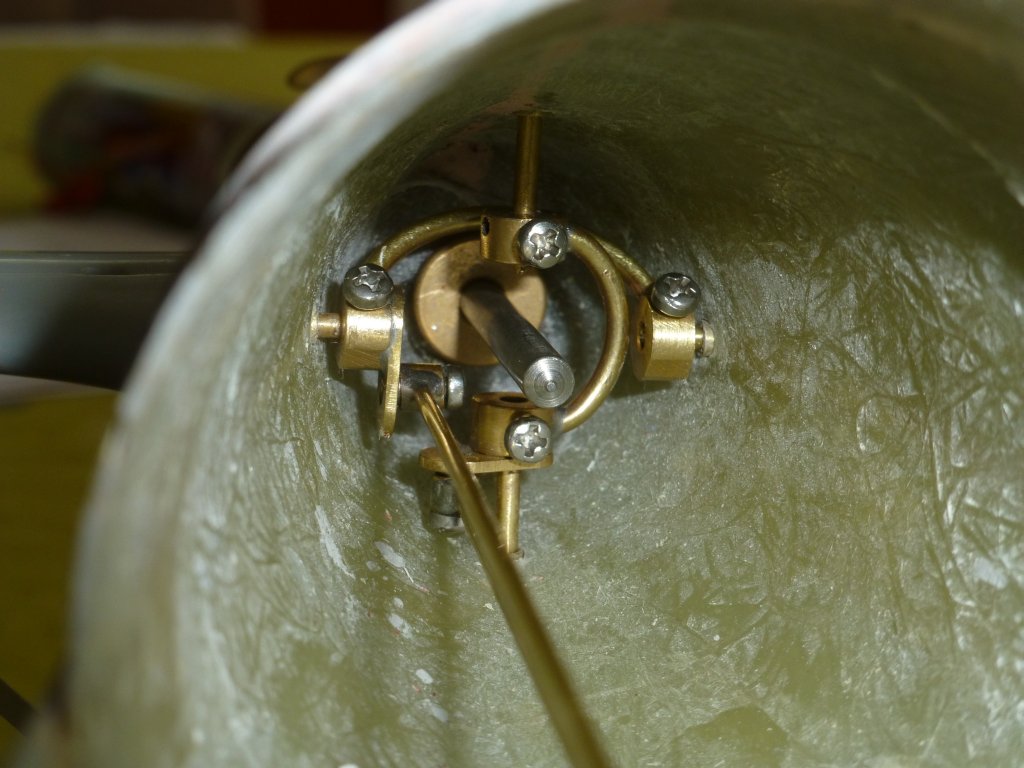
Assembly
Test fitting the assembly (parts are not yet completed).


Grtz,
Bart
Bushings:
Bushings dia 3mm, bore dia 2mm length 5mm
Supports:
Everything starts with making the required materials, 4 pc of 3mm styrene glued together to the required thickness of 12mm. Sanded everything square/perpendicular so I had a good base to start with. Strange shape? No I have to give room to the Fwd index lip of the lower hull, see below for the assembly.
Cut out the desired shape, provided with 3mm bores to take the bushings.
Bell-cranks:
made out styrene sheet, provided with a 2mm bore in the center piece and the arms are provided with a 1.5mm bore. Pitch is 10mm except the one with the longer arm pitch of that one is 15mm, will see which one I will use (probably the one with the 10mm pitch. That will give me app 30° deflection as per David Merriman's instructions.
Assembly
Test fitting the assembly (parts are not yet completed).
bwi- AMS member
- Posts : 81
Join date : 2015-01-17
Location : Belgium
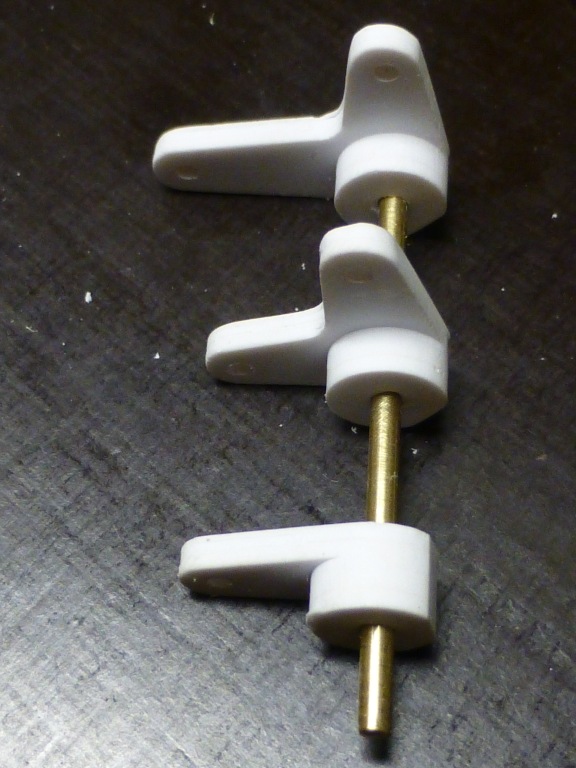
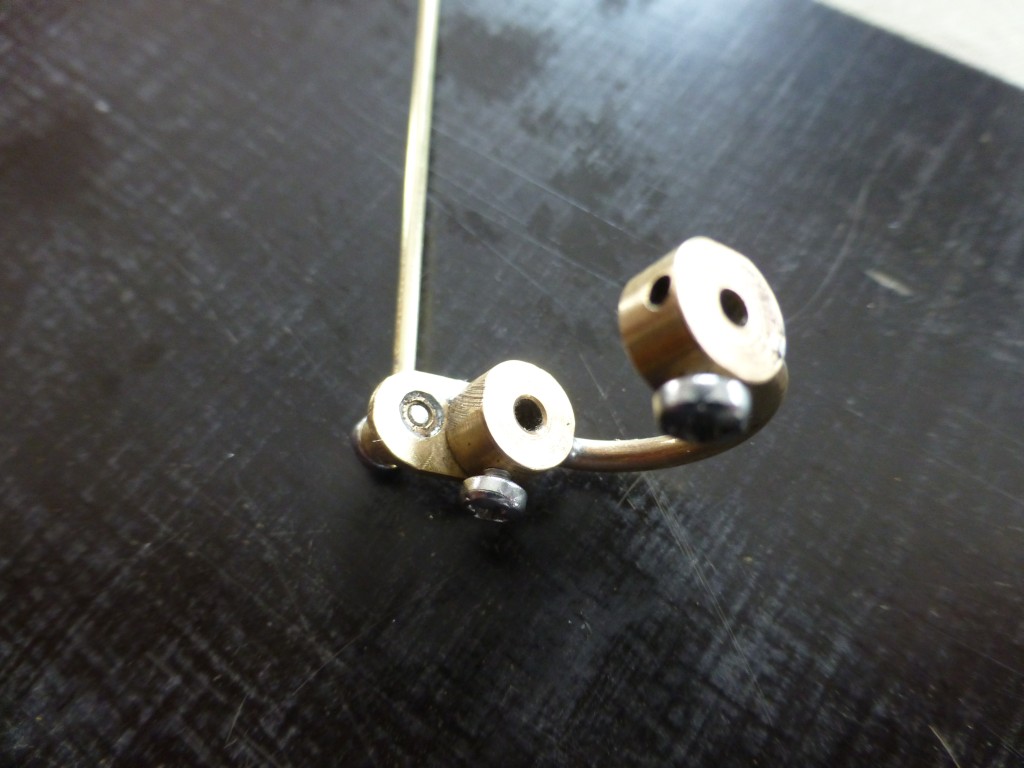
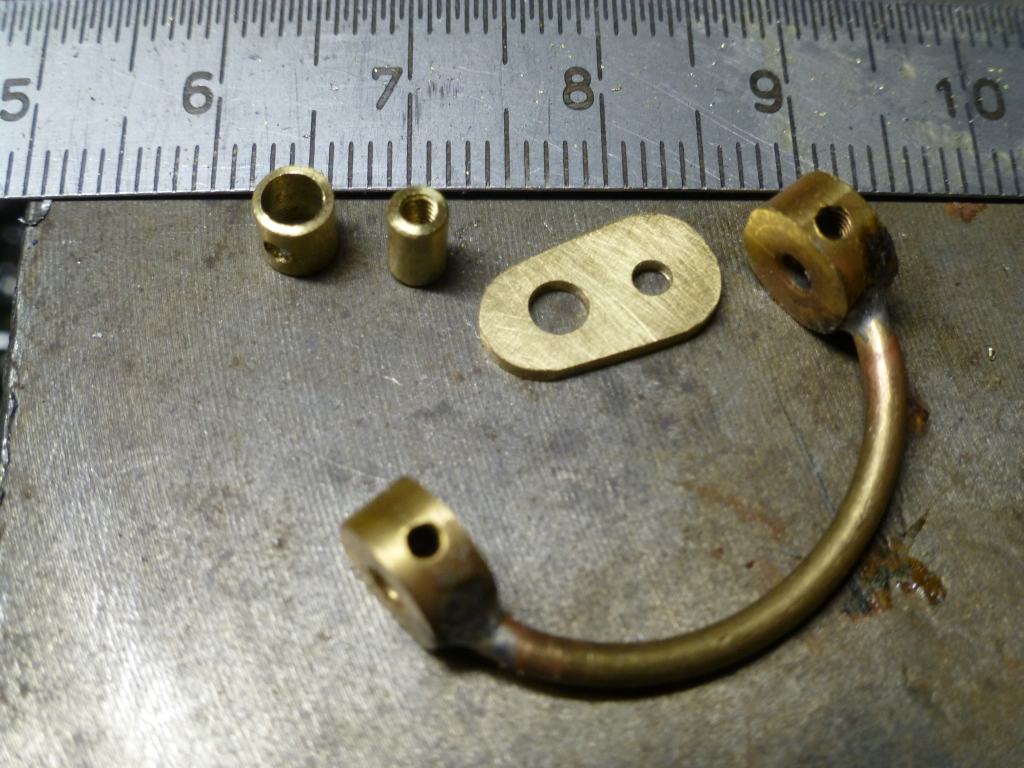
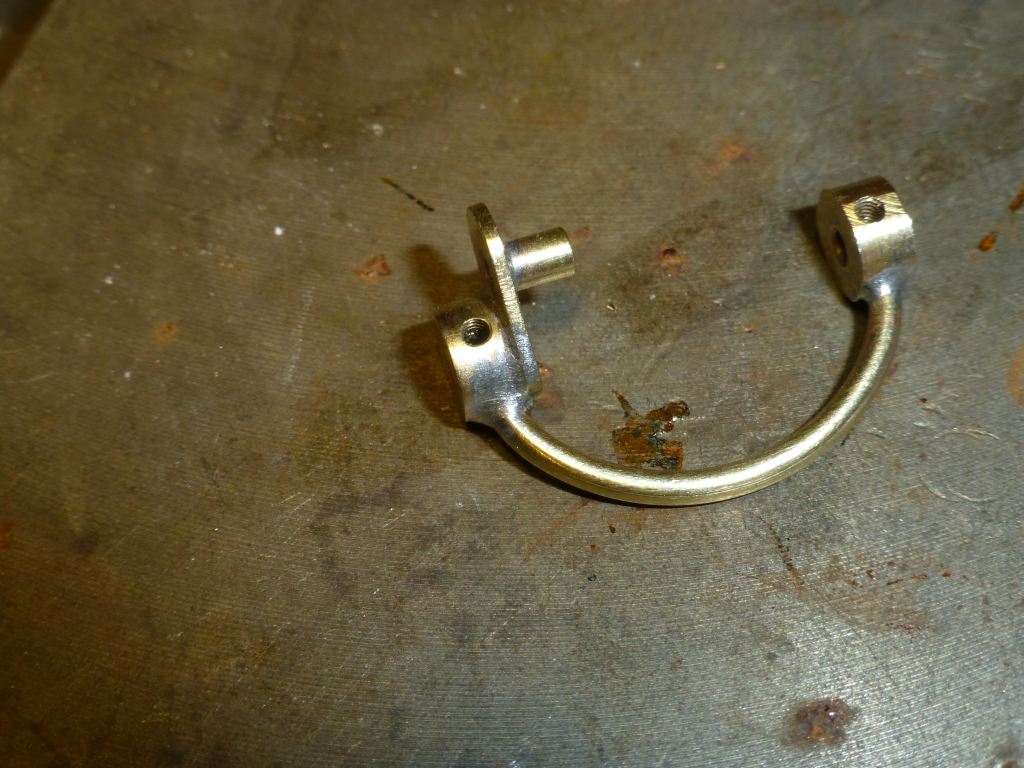
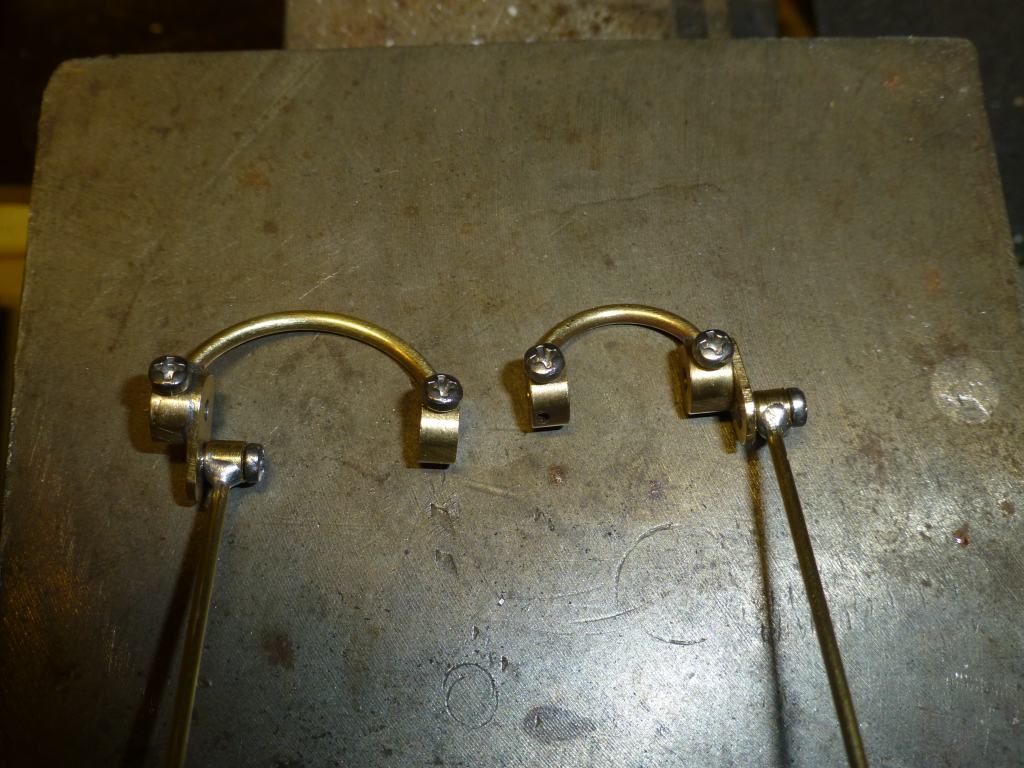
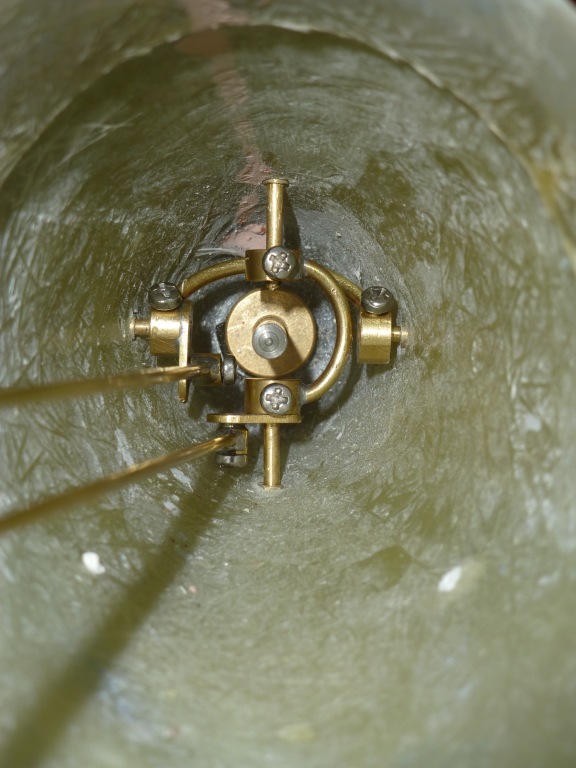
Working on the yokes.
Challenges
Yokes fabrication
Collars made out of brass, outer diameter 8mm (5/16), rod bore 2mm (3/32), screw 2mm (3/32).
Bridge 2mm (1/16) brass rod
Work in progress, testfitting the yokes


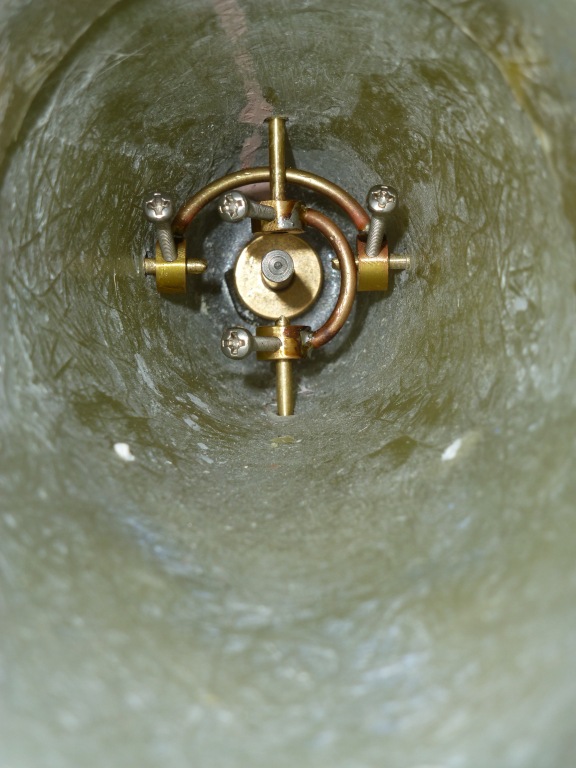
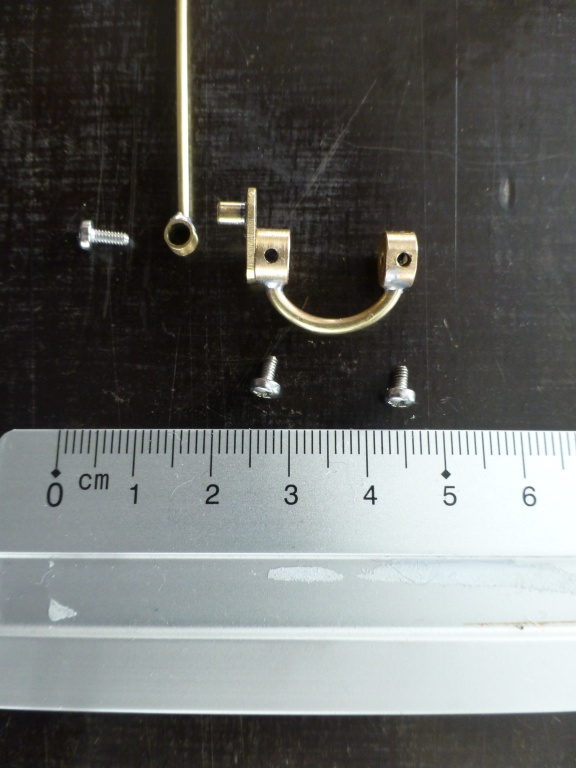
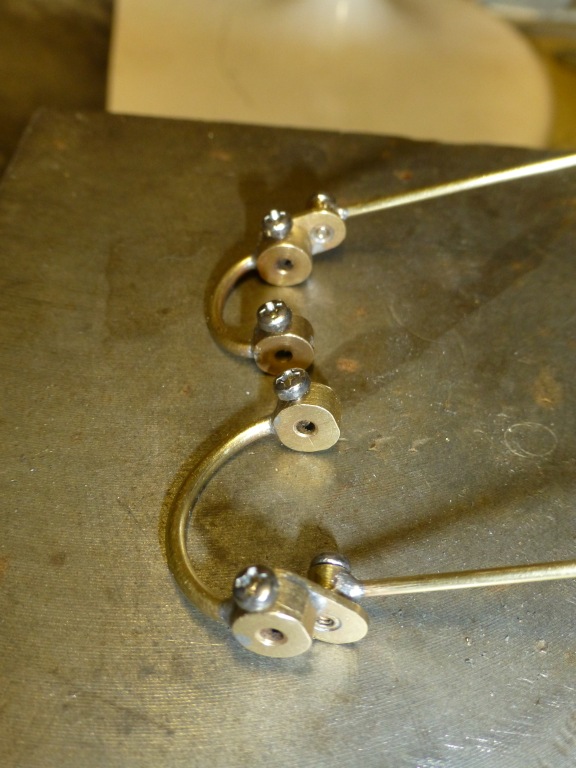
Bell crank Arm.
In order to get the deflection of 35°, a very short arm was necessary. The pitch could not exceed 6mm. It was impossible to use the usual Z-bent pushrods the rod would hit the collar restricting the deflection to 10°.
I came up with the following construction to make it work.
A brass bushing with outer diameter 4mm (???) and inner diameter 3mm (1/8) was fabricated and soldered to the brass pushrod of 1.5mm (1/16).
An arm was fabricated out of 1mm (1/32) brass sheet. Two holes were drilled in the arm, pitch 5mm.
An pin was made out of 3mm (1/8) brass rod and provided with a hole to take a 2mm (3/32) screw.
The pin was soldered to the arm, and the arm was soldered to the yoke.
The bushing of the pushrod pivots over the pin the screw holds the assembly together, preventing the bushing to slide of the pin.
Ready to solder

All parts
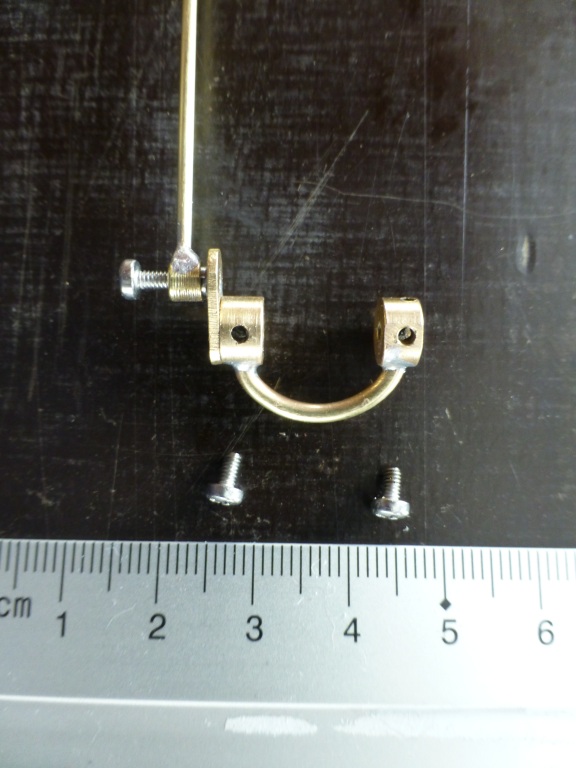
Assembled together.
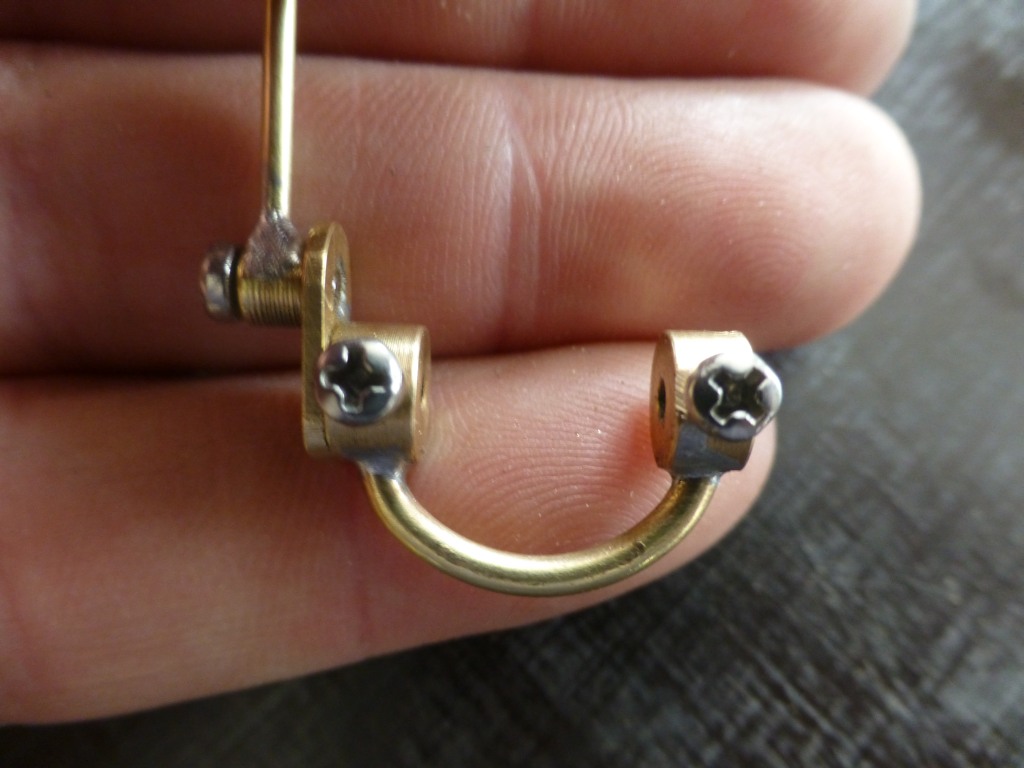
Finished the last one........test fitted everything........works like a charm.
I have included some more detailed pics while fabricating the second one.


Challenges
- Pushrod movement rear planes 7mm
- Pushrod movement rudders 10mm
- Need about 35° deflection on the rudders and planes.
Yokes fabrication
Collars made out of brass, outer diameter 8mm (5/16), rod bore 2mm (3/32), screw 2mm (3/32).
Bridge 2mm (1/16) brass rod
Work in progress, testfitting the yokes
Bell crank Arm.
In order to get the deflection of 35°, a very short arm was necessary. The pitch could not exceed 6mm. It was impossible to use the usual Z-bent pushrods the rod would hit the collar restricting the deflection to 10°.
I came up with the following construction to make it work.
A brass bushing with outer diameter 4mm (???) and inner diameter 3mm (1/8) was fabricated and soldered to the brass pushrod of 1.5mm (1/16).
An arm was fabricated out of 1mm (1/32) brass sheet. Two holes were drilled in the arm, pitch 5mm.
An pin was made out of 3mm (1/8) brass rod and provided with a hole to take a 2mm (3/32) screw.
The pin was soldered to the arm, and the arm was soldered to the yoke.
The bushing of the pushrod pivots over the pin the screw holds the assembly together, preventing the bushing to slide of the pin.
Ready to solder
All parts
Assembled together.
Finished the last one........test fitted everything........works like a charm.
I have included some more detailed pics while fabricating the second one.
bwi- AMS member
- Posts : 81
Join date : 2015-01-17
Location : Belgium
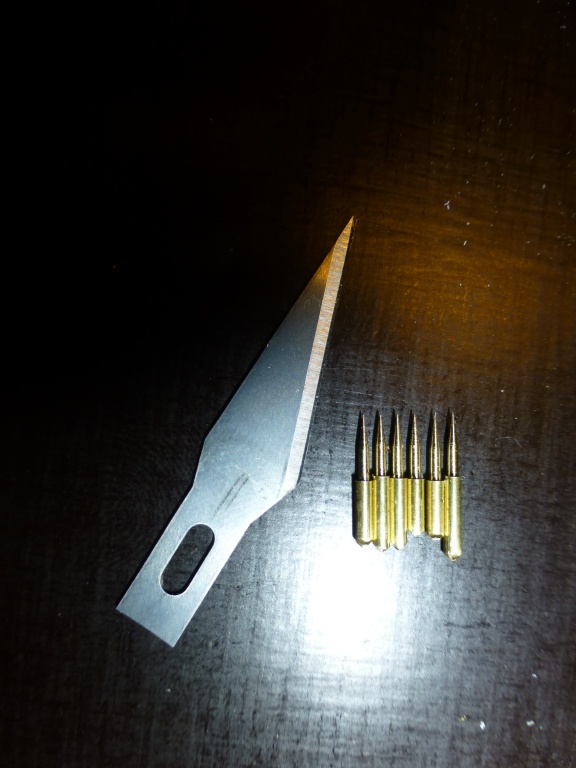
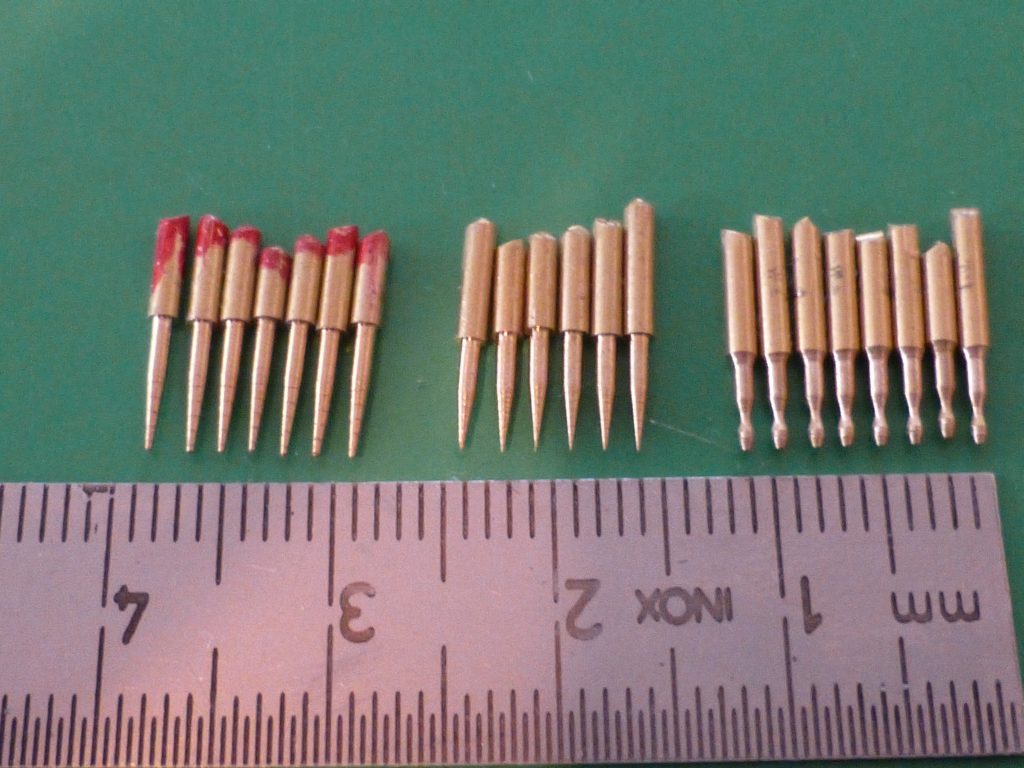
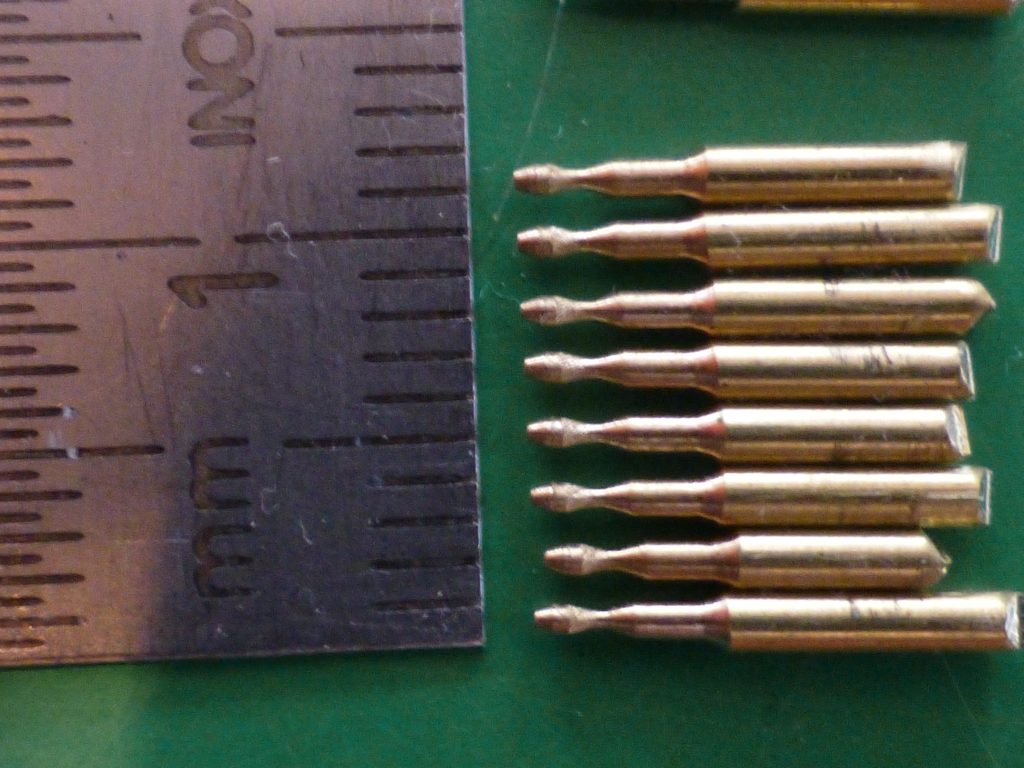
I'm working on the SOKS I have been doing some testing in the past regarding fabrication, more specific what is the smallest diameter I can manage.
Brass 1.5mm rod turned down diameter 1mm is the smallest I can do so I can still produce almost exact copy's.
I have divided them into 4 categories:
Spikes (5pc)
Tamps (7pc)
Drops (7pc)
Protectors (5pc)
This evening I finished the spikes, the 1.5mm rod needs to be trimmed down, for the moment I leave it on.


Almost finished eyeballing my lathe true the magnifier lamp......only the five protectors left.
I have marked the tamps with red to distinguish them from the spikes with the naked eye.
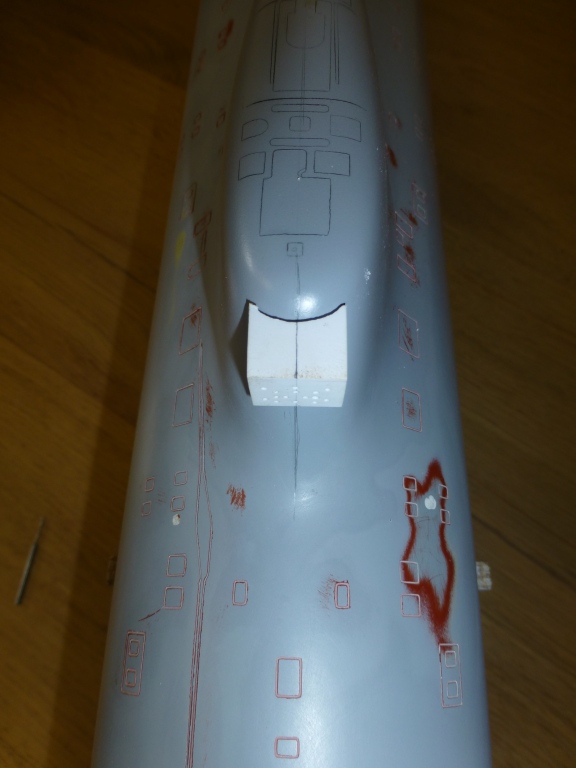
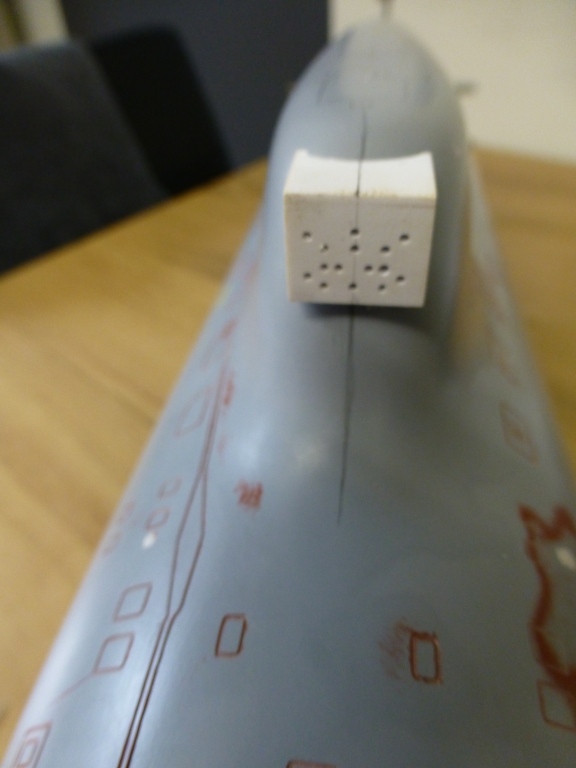
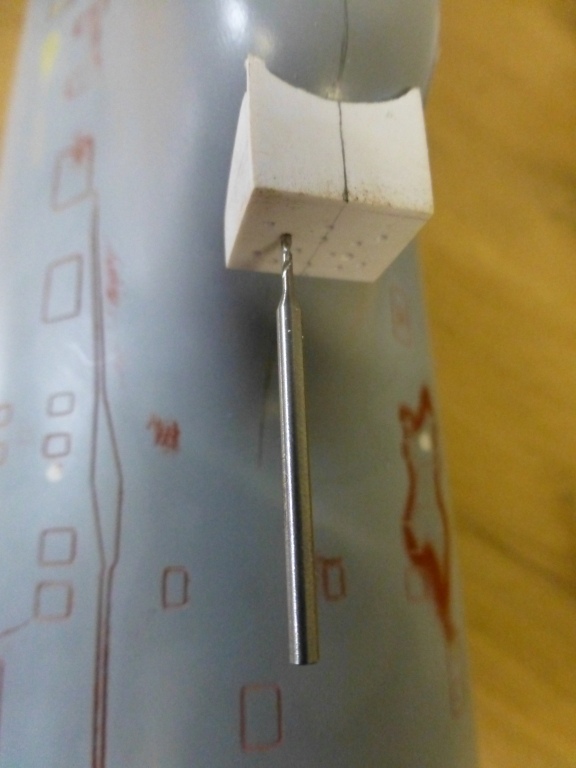
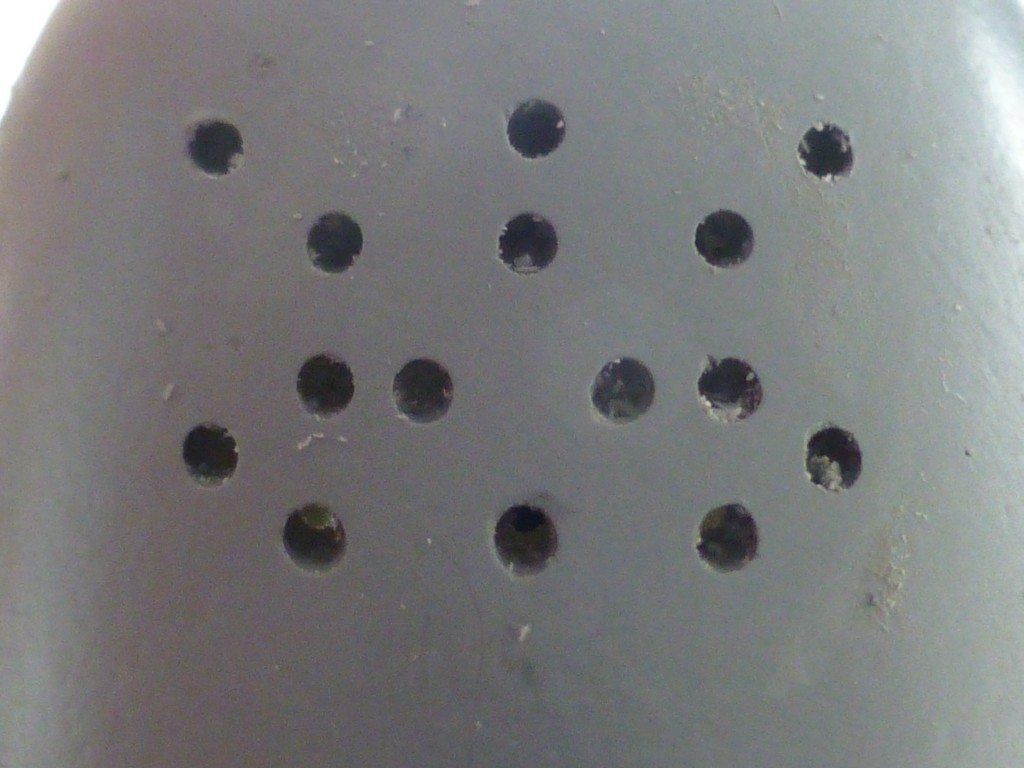
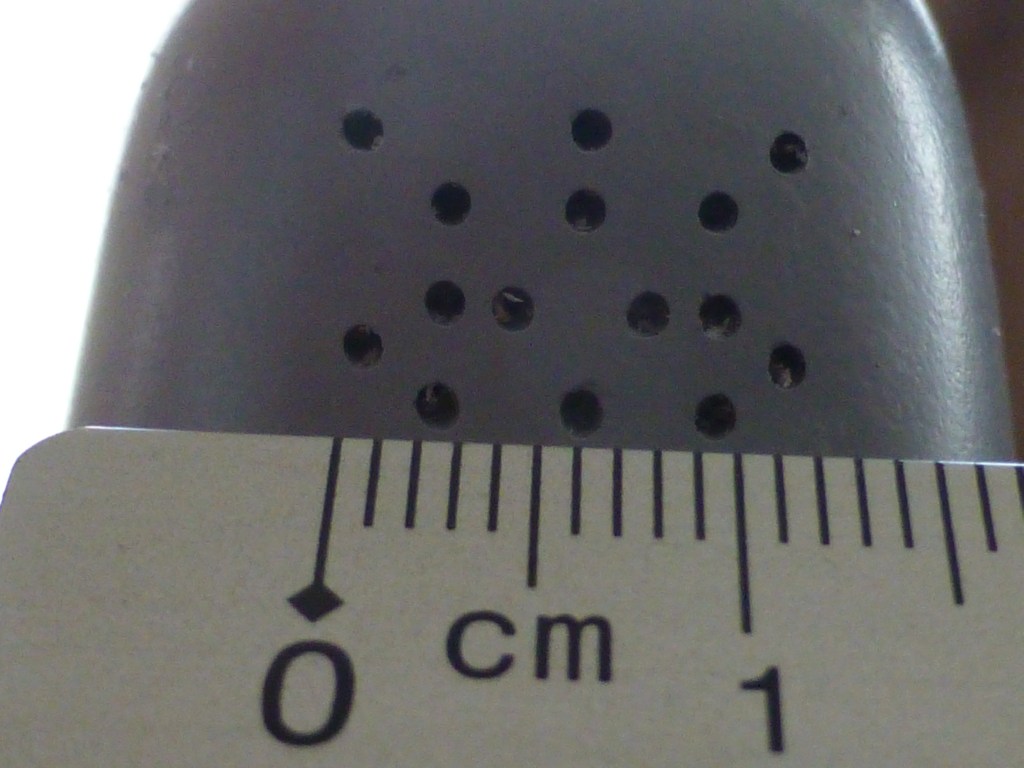
Drilling the SOKS holes in the sail.
The surface of the sail where I have to drill the hols in is angled and double curved to make things easier.
So I had to make an template to guide the 1mm drill while drilling and to make sure the drilled holes were parallel to the longitudinal axis of the sub.
The template was temporary fitted in the right position and the holes were drilled by turning the drill between the fingers, this made me feel what I was doing.
And NO there are not to many holes 10 for the SOKS and 5 for the protectors.

Grtz,
Bart
Brass 1.5mm rod turned down diameter 1mm is the smallest I can do so I can still produce almost exact copy's.
I have divided them into 4 categories:
Spikes (5pc)
Tamps (7pc)
Drops (7pc)
Protectors (5pc)
This evening I finished the spikes, the 1.5mm rod needs to be trimmed down, for the moment I leave it on.
Almost finished eyeballing my lathe true the magnifier lamp......only the five protectors left.
I have marked the tamps with red to distinguish them from the spikes with the naked eye.
Drilling the SOKS holes in the sail.
The surface of the sail where I have to drill the hols in is angled and double curved to make things easier.
So I had to make an template to guide the 1mm drill while drilling and to make sure the drilled holes were parallel to the longitudinal axis of the sub.
The template was temporary fitted in the right position and the holes were drilled by turning the drill between the fingers, this made me feel what I was doing.
And NO there are not to many holes 10 for the SOKS and 5 for the protectors.
Grtz,
Bart
bwi- AMS member
- Posts : 81
Join date : 2015-01-17
Location : Belgium
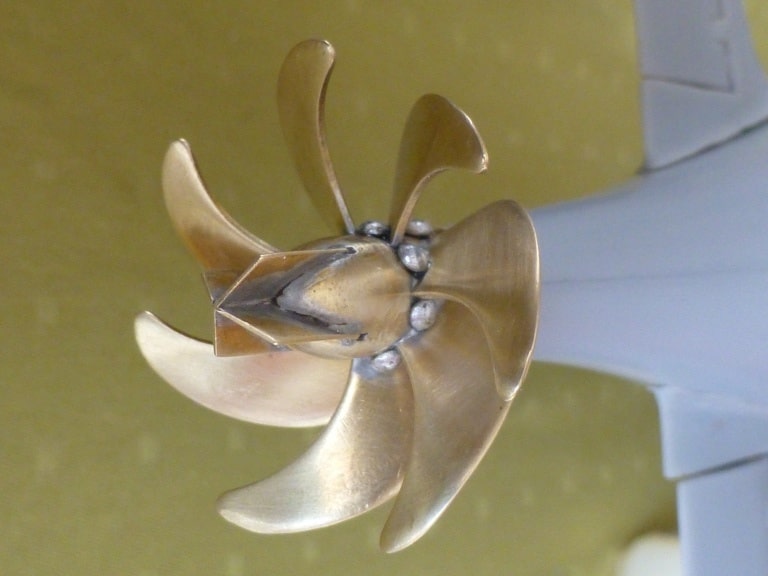
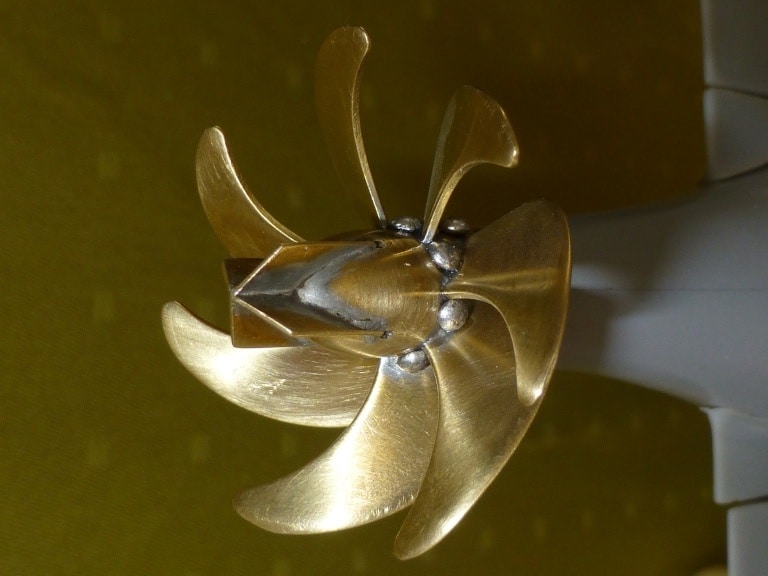
Propeller finishing diameter 40mm (1.6").
2 blades of the prop were slightly off regarding the diameter....It was starring at me every time I looked at the propeller.......so I needed to address.
The problem is You can't heat 2 blades without melting the solder of all the others.
I took a piece of pipe turned the inner diameter to the required diameter of the propeller 40 mm in my case.
Made a support for the blade roots, mounted the propeller on the jig with the root support, put the pipe over the propeller, filled the casing with sand halve way the propeller height, wetted the sand with water and heated everything up. When everything was hot enough I adjusted the blades till they touched the pipe casing and let everything cool down again. Put the propeller on the lath, turned the lath on, and I saw a perfect propeller NO MORE STARING.
.jpg)
.jpg)
.jpg)
.jpg)
While I was doing that I thought lets finish this thing........I saw on some pictures that sometimes the propeller of the AKULA's is provided with zinc anodes.....I casted some anodes with use of solder, they are approxiatly 1.5mm in diameter, and glude them on the hub.
Now the propeller can go into the finished box.


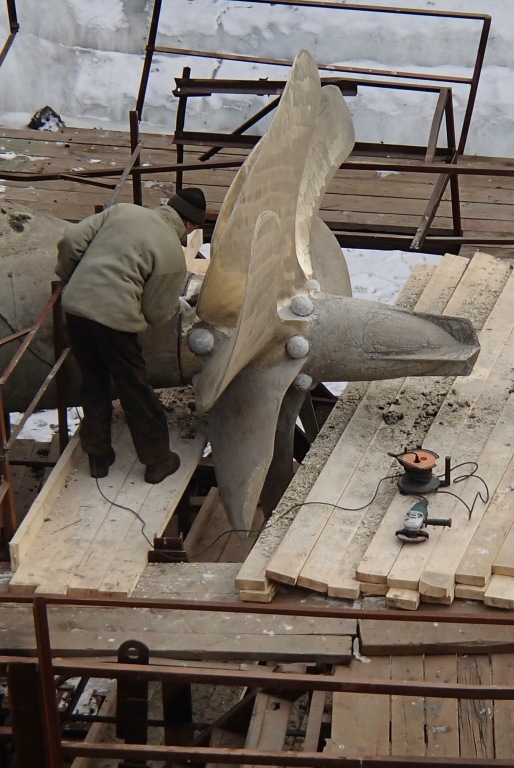
This pic showing the prop of a KILO class I used it as an example for the anodes.
2 blades of the prop were slightly off regarding the diameter....It was starring at me every time I looked at the propeller.......so I needed to address.
The problem is You can't heat 2 blades without melting the solder of all the others.
I took a piece of pipe turned the inner diameter to the required diameter of the propeller 40 mm in my case.
Made a support for the blade roots, mounted the propeller on the jig with the root support, put the pipe over the propeller, filled the casing with sand halve way the propeller height, wetted the sand with water and heated everything up. When everything was hot enough I adjusted the blades till they touched the pipe casing and let everything cool down again. Put the propeller on the lath, turned the lath on, and I saw a perfect propeller NO MORE STARING.
While I was doing that I thought lets finish this thing........I saw on some pictures that sometimes the propeller of the AKULA's is provided with zinc anodes.....I casted some anodes with use of solder, they are approxiatly 1.5mm in diameter, and glude them on the hub.
Now the propeller can go into the finished box.
This pic showing the prop of a KILO class I used it as an example for the anodes.
redboat219- Guest
- Posts : 39
Join date : 2013-08-20
What ever happened to this build? It's been 5 years.
» Modulated electric fields for submarine communication in a "heads up" from Harry!
» 868/915 Mhz as a viable frequency for submarines.
» Laser cut Robbe U47 conversion
» ExpressLRS - 868/915 Mhz equipment
» Information on camouflage patterns for German seahund
» WW2 mini sub build
» Not the hobby I expected :)
» Sheerline gasket material